Wahlin on .NET
Consuming WCF Services in Silverlight 3
If you've consumed an ASP.NET ASMX Web service before, then you'll feel right at home consuming a WCF service.
In a previous article, I discussed how a Windows Communication Foundation (WCF) service could be created for consumption by a Silverlight client. Using services, you can easily pass data from a server to a client without having to a write a lot of custom code.
In this article, I'll walk you through the steps required to consume a service in Silverlight 3 and mention a few important features to keep in mind along the way. I'll also discuss how to handle asynchronous calls within a Silverlight client.
Consuming a ServiceThe Silverlight Tools for Visual Studio 2008 provide built-in functionality to create Silverlight-enabled WCF services and consume them without writing a lot of code. Silverlight 3 now supports binary XML which allows data to be transferred from server to client faster than ever. Standard SOAP messages can also be sent if required.
If you've consumed an ASP.NET ASMX Web service before, then you'll feel right at home consuming a WCF service. Visual Studio 2008's Add Service Reference dialog allows you to pick the service and generate a client proxy without writing any code at all. Before generating the proxy, it's important to understand that Silverlight can only call back to the origin server where the Silverlight XAP application file was served from by default.
If you need to call a WCF service (or another service) that's either in a different domain or on a different port, then the service must have a client access policy file named clientaccesspolicy.xml at the root of the server. Silverlight checks for this file to see if it's allowed to make a cross-domain call (additional details on client access policy files can be obtained here).
Listing 1 below shows a sample file:
<?xml version="1.0" encoding="utf-8"?>
<access-policy>
  <cross-domain-access>
    <policy>
      <allow-from>
        <domain uri="*"/>
      </allow-from>
      <grant-to>
        <resource path="/" include-subpaths="true"/>
      </grant-to>
    </policy>
  </cross-domain-access>
</access-policy>
Listing 1: A client access policy file can be placed at the root of a server to allow Silverlight clients to call services located in different domains or running on different ports.
To create a WCF service proxy, you'll first need to create a Silverlight application project. Once that's created, you can right-click on the project and select Add Service Reference. You'll be presented with the Add Service Reference dialog, as shown in Figure 1.
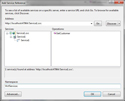
[Click on image for larger view.] |
| Figure 1. The Add Service Reference dialog allows a client proxy to be generated quickly and easily without writing any code. |
If the WCF service is located in the same Visual Studio solution, you can click the Discover button. Otherwise, you'll need to type the path to the service's Web Service Description Language (WSDL) file in the Address textbox. Once the service is located, you can give the proxy code a namespace and then click the OK button.
Once the client proxy is created, you can call the service from within a Silverlight application. It's important to remember that all of the networking operations that occur within Silverlight are asynchronous so that the browser doesn't lock up while a service is called. Listing 2 shows an example of using a client proxy to call a service and bind data:
void MainPage_Loaded(object sender, RoutedEventArgs e)
{
    //Create service proxy
    WcfService.Service1Client proxy = new WcfService.Service1Client();
    //Wire the proxy to a completed handler to allow the async operation to be handled
    proxy.GetCustomerCompleted +=
      new EventHandler<WcfService.GetCustomerCompletedEventArgs> (
    proxy_GetCustomerCompleted);
    //Call the service asynchronously
    proxy.GetCustomerAsync(id);
}

void proxy_GetCustomerCompleted(object sender, SilverlightApplication1.WcfService.GetCustomerCompletedEventArgs e)
{
    //Bind the returned data to the DataContext
    this.DataContext = e.Result;
}
Listing 2: Using a client proxy object to call a WCF service within Silverlight.
Looking through the code in Listing 2, you can see that the proxy object is first created and then wired to an asynchronous event handler named proxy_GetCustomerCompleted using an event-driven pattern. The service is then called asynchronously by invoking the GetCustomerAsync method. Once the service returns data the callback method is called automatically and the GetCustomerCompletedEventArgs parameter is accessed to retrieve the data. In this example, the data is bound directly to the application's DataContext property. Note that no extra work is required to route the data from the calling thread back to the user interface thread. The proxy handles all of that for you automatically.
Silverlight applications can't call a database directly, but they can access data from a variety of services such as WCF services, ASMX services and other standards-compliant services (to name just a few options).
About the Author
Dan Wahlin (Microsoft MVP for ASP.NET and XML Web Services) is the founder of The Wahlin Group which specializes in .NET and SharePoint onsite, online and video training and consulting solutions. Dan also founded the XML for ASP.NET Developers Web site, which focuses on using ASP.NET, XML, AJAX, Silverlight and Web Services in Microsoft's .NET platform. He's also on the INETA Speaker's Bureau and speaks at conferences and user groups around the world. Dan has written several books on .NET including "Professional Silverlight 2 for ASP.NET Developers," "Professional ASP.NET 3.5 AJAX, ASP.NET 2.0 MVP Hacks and Tips," and "XML for ASP.NET Developers." Read Dan's blog here.