In-Depth
6 MVVM Tips: Leverage ViewModel and Unit Test Silverlight and WP7 Apps
The Microsoft Model-View-ViewModel pattern is an indispensable tool for developing applications for Silverlight, Windows Phone 7 and Windows Presentation Foundation. Benjamin Day helps you avoid architectural pitfalls and create unit-testable and maintainable applications.
- By Benjamin Day
- 04/01/2011
After working on a Silverlight 4 project for the last 18 months, I've learned a few things about layer loyalty, code organization, unit testing and maintainable code. Not surprisingly, I've formed some opinions on how to implement the Microsoft
Model-View-ViewModel (MVVM) pattern, and used the Repository and Adapter patterns to achieve better results. It sounds complicated but it doesn't have to be, especially with these six tips to help you avoid common architectural pitfalls and get the results you're after: separation of concerns, testability and easier maintenance as your application evolves.
First off, what is MVVM? It's a code organization and testability pattern commonly used in Silverlight, Windows Phone 7 and Windows Presentation Foundation (WPF) applications that helps you to bridge the gap between your UI code and your "business" tier or Domain Model code. The Views are your *.xaml files, the Models are your Domain Model objects and the ViewModels are logical representations of your Views minus the UI-specific stuff. Your ViewModel classes won't have any UI-specific types like TextBox or Label but will instead use types like string, int and DateTime. If you have a View named PersonDetail.xaml that allows the user to view and edit information about a person, you'll have a ViewModel class named PersonViewModel. If you've got a TextBox on your View that displays a Person's FirstName, you'll have a property on the ViewModel named FirstName that's a string. If you have a Save button on your View, you'll have a property on your ViewModel of type ICommand named SaveCommand. The Views and the ViewModels are connected together via databinding expressions on the UI controls.
Like its sister pattern, Model-View-Controller (MVC), MVVM helps you to unit test your application. It does this by minimizing the amount of code that lives in your codebehind (*.xaml.cs, *.xaml.vb) files. Why is minimizing your codebehind so crucial for unit testing? One of the key problems with unit testing is figuring out how to test a running instance of the UI. It's a challenge because unit test frameworks like NUnit and MSTest are geared toward testing ordinary classes. Sure, a XAML page is a class, but it comes along with a lot of other Windows-related stuff that's notoriously difficult to automate.
You might be thinking, don't Microsoft Test Manager (MTM) and Coded UI tests in Visual Studio 2010 fix this? Well, yes and no. These tools make it much easier to automate testing the UI of a running application, but it's a different kind of test. MTM and Coded UI tests are generally aimed at integration testing of a deployed application. There's a difference in mindset between "integration" testing and "unit" testing. Integration tests test the complete functionality of a deployed application while unit tests test small pieces of functionality in isolation. Integration tests are "macro" and unit tests are "micro." In a way, using MVVM and unit tests solves the UI testing problem by not testing the UI. The ViewModels are an abstraction representing the state and logic behind the UI, so you minimize the amount of stuff that's difficult to test and focus on what's easy to test -- the non-Windows ViewModel classes that you write in C# or Visual Basic .NET.
Tip 1: Separate the Model from the ViewModel, no matter what.
There's a tendency to want to lump your Model and your ViewModel into a single object. Let's take the case of a screen that edits information about a person: Id, FirstName, LastName, EmailAddress. If you don't have a heck of a lot of business logic or complex validation logic, having a PersonViewModel and a Person model class is going to feel a little like overkill or code duplication. These two classes are definitely going to be pretty similar. One of the great things about Silverlight/WPF and MVVM is being able to use data binding. You don't have to write 62 zillion assignment statements to get data from your ViewModel on to your View, and the codebehind for your View stays extremely clean. If you use two-way data binding, your ViewModel gets refreshed from your View as soon as the user clicks off of a field.
I learned the importance of strictly separating the Model from the ViewModel when I needed to implement a Cancel button.
Let's say you're editing an existing Person record and you're using two-way data binding. You change the first name, you change the last name, you change the e-mail address and then you realize that you're completely wrong and you want to undo your changes. At this point, the ViewModel is already updated because of the two-way data binding and has the same values that are displayed on the View.
If you "cheaped out" and combined the Model and ViewModel, you don't have anything to roll back to unless you reload the Person record from the database. But, if you have a separate ViewModel and Model, you simply don't migrate the changes to the Model.
Instead you refresh the ViewModel from the Model and your cancel functionality is complete.
This demonstrates a key point about layer loyalty. The Views and ViewModel are all about displaying stuff to the user in a particular UI implementation. The Model cares nothing about how the data is displayed and is more concerned with business rules and persistence logic.
The Views and ViewModels are for displaying and collecting data from the user, but when the actual Save happens, the data from the ViewModel gets copied to the Model and it's the Model that gets saved.
For the simple example of a Person editor, there's a 1-to-1 mapping between the View, the ViewModel and the Model. When your Views become more complex, this mapping changes. There's almost always a 1-to-1 mapping between the View and ViewModel, but when the Views (and therefore the ViewModels) get complex, the ViewModel might need to talk to two or more Models to populate and save the data on that View. This is the second case where "cheaping out" on the separation between View, ViewModel and Model can get you into trouble.
Tip 2: The classes from "Add Service Reference" are not your Models or your ViewModels.
If you're writing a Silverlight business application, you're probably using Windows Communication Foundation (WCF) to save and retrieve data. Silverlight can't directly connect to a database, so you really don't have any other options than to call up to some kind of Web service, which will connect to the database on your behalf. This means that you're probably going to be using Add Service Reference to generate proxy classes to help your Silverlight application talk to those services. If you're writing a WPF client to a service-oriented application, you're probably using Add Service Reference as well.
When these proxy classes are generated, they implement INotify-PropertyChanged, and that means that they can be used for two-way data binding. However, just because they can be used doesn't mean you should use them. It's another example of "layer loyalty." These classes are basically data-access classes, and they're loyal to that service and to the WCF implementation. How you save and load data isn't really related to a View -- it's related to the persistence implementation. Plus, if you think about it, WCF isn't really about objects anyway; it's about messages, so what you get back from WCF almost definitely isn't shaped the way you want.
Sure, it can be convenient to use these proxy objects as your ViewModels, but it isn't going to do you any favors when it comes to maintenance because all your layers are going to be tightly coupled. Your Views are tied directly to the operations and messages for the service. If the service contract changes, you have to change your View, and if your View changes you have to change your service (yuck).
Unless your application is really simple, these proxy objects aren't good candidates to be your Models, either. The proxy objects are simply data-transfer objects for talking to the service. The messages that go back and forth between your Silverlight client application, and the service application should be optimized for those operations.
They might have more or less data than you need for your model or, more importantly, aren't going to be the same shape as what you need. The messages might even be shaped a certain way in order to make them serialize more compactly.
Remember, your Models are Domain Model objects. They should be object-oriented (not message-oriented) and should represent how your client application thinks about the data it manages. If you use the service proxy objects as your Models, you're probably going to have some funky object designs. If you use the service proxy objects as your ViewModels, you not only skip having Models but also create a direct dependency between your XAML-based Views and your services. That's not a good recipe for code maintenance.
Tip 3: Separate your ViewModel and Model from your data-access logic with the Repository Pattern.
Your ViewModels represent the state of the UI and they should be experts in doing exactly that. They might have to make calls to get data saved and loaded, but they shouldn't be experts in how that's actually achieved. That's where the Repository pattern comes in.
The Repository is commonly thought of as a way to wrap reads and writes to a database on behalf of Domain Model objects -- but it doesn't have to be a database. The pattern is actually focused more on hiding the details of saving and retrieving Model data to/from a persistent store than on any particular kind of persistent store.
What this means for Silverlight (or any other client to a service-oriented application), is that you can and probably should encapsulate the logic for calling the services inside of a Repository pattern object. Additionally, once you encapsulate that logic inside of the Repository pattern, you can create an interface for that Repository and code against that in your application -- IPersonRepository instead of WcfPersonRepository.
Creating that Repository interface and coding against the interface type rather than the concrete type makes a big difference in how your unit tests work. Remember the goal when creating unit tests is to test small units of functionality. If you're testing how the PersonViewModel handles the data it gets back from calls to IPersonRepository, you don't really need to call the WcfPersonRepository. You can create a fake version of IPersonRepository that returns canned data. Now you're testing only the logic in PersonViewModel rather than the logic for PersonViewModel, the WcfPersonRepository and the WCF service.
This gives you a much more focused test. It makes your test and application code maintainable because your application logic is clearly separated from the data-access logic, which makes the application easier to debug.
Tip 4: Use the Adapter pattern between ViewModel and Model, and Model and Service Data Transfer Objects.
As stated previously, the ViewModel is going to collect data from your UI so that you can populate and eventually save your Models. With Silverlight, you're going to need to take the data from your Models and turn them into service proxy objects that you'll send through WCF. You also have to populate your ViewModels from Models and populate your Models from WCF service proxy objects. That's a fair number of gets and sets.
Rather than scattering that code throughout your classes in a bunch of different places, try using the Adapter pattern. The basic idea of the Adapter pattern is to take two different object structures and create a third object (the Adapter) to make them work together. In our case, the adapter is going to be responsible for the fairly tedious job of taking data from one type of object and putting it into another type of object -- ViewModel to/from Model and Model to/from WCF service project objects.
Having these gets and sets in your Adapter classes not only keeps your code organized but makes it easy to unit test the adaptation logic. I'm continually surprised by how error--prone this logic tends to be and, because of this, I think it's one of the most important places to unit test in an application.
Tip 5: In Silverlight, figure out early on how you're going to handle asynchronous methods.
If you're like me and you like to keep your code well-layered and organized, you're even-tually going to need to do battle with the asynchronous WCF methods of Silverlight. In Silverlight, all networking traffic must be asynchronous. (Sounds harmless enough so far, right?) So where you might have a WCF service method named LoadPersonById, when you try to call it from Silverlight, you'll be calling LoadPerson-ByIdAsync and dealing with asynchronous callbacks. There are ways to force Silverlight to call WCF synchronously, but they're tricky, error prone and probably not worth doing.
If you don't embrace this asynchronous requirement early it can wreck your beautifully organized architecture and ViewModels. It will beat you up, laugh at you and run away with your lunch money in a matter of seconds if you aren't careful. The reason why comes down to a simple little problem: Methods that call WCF can't have any return values. Put another way, any method that calls an asynchronous method must return "void." You're probably thinking there's no possible chance that that's true -- but, I assure you, it is.
In Listing 1 you can see some Silverlight code for calling the LoadById method for a WCF service named PersonService. Notice that you need to subscribe to the LoadByIdCompleted event followed by a call to LoadByIdAsync. LoadByIdAsync has the return type of void and when you call it, it returns immediately and you don't get access to the return value of the WCF service method until the LoadByIdCompleted event fires.
Let that sink in for a bit. There's no connection between the call that requests the WCF call and logic that handles the response. So, if that LoadById method was part of a Repository called WcfPerson-Repository, that disconnect means that you can't return a populated Person Model object from that method because you don't have the data. Here's where it gets even trickier -- anything that calls anything that at any point calls an async WCF method is also not going to be able to return anything other than void.
Whew! That sure deflates your nicely layered architecture, doesn't it?
At this point, you can either decide that all Silverlight applications have to be single-tiered mounds of spaghetti code with everything jammed into a handful of unmaintainable ViewModel classes, or you need to figure out a way to actively embrace the asynchronousness.
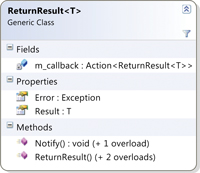
My solution to this is a class called ReturnResult<T> (see Figure 1). (Note: This can also be solved in a different way by using the Reactive Extensions for .NET, available here.) ReturnResult<T> serves as a bridge between the method that requests the WCF logic and the method that handles the results of the WCF call. It allows the WCF "complete" handler to return values or exceptions to the original caller while still being asynchronous.
[Click on image for larger view.] |
| Figure 1. ReturnResult<T> serves as a bridge between the method that requests the WCF logic and the method that handles the results of the WCF call. |
In Listing 1, I'd prefer that the method signature was something like public IPerson-Load-ById(int id), but it contains an asynchronous WCF call and therefore can't return any useful value. By using ReturnResult<T>, you can achieve something similar to returning an IPerson by introducing a method argument of type ReturnResult<IPerson>, as shown here:
public void LoadById(ReturnResult<IPerson> callback, int id)
{
  // Create an instance of the service proxy
  var client = new PersonService.PersonServiceClient();

  // Subscribe to the "completed" event for the service method
  client.LoadByIdCompleted +=
    new EventHandler<PersonService.LoadByIdCompletedEventArgs>(
    client_LoadByIdCompleted);
  // Call the service method
  client.LoadByIdAsync(id, callback);
}
In the LoadById method, when you're ready to call LoadById-Async on the service proxy, instead of just passing the Id that you want to load, you'll also pass the ReturnResult<IPerson> callback variable as the user state. All async calls provide a method overload that takes a variable of type object named userState. This userState parameter lets you pass data in to the async call that will later be available during the completed event via the CompleteEventArgs.
Listing 2 shows the code for the LoadByIdCompleted event handler. Notice that it retrieves the ReturnResult<IPerson> callback variable by accessing e.UserState. This event handler method now has a way to communicate back to the original caller so that it can pass back either a populated instance of IPerson or an Exception by calling the Notify method.
In Listing 3, you can see some sample code from a ViewModel class that makes a call to the Repository LoadById(ReturnResult<IPerson>, int) method. When the ViewModel makes the call, it creates an instance of ReturnResult<IPerson> and passes in a delegate to a method in the ViewModel that will handle the asynchronous response from the Repository call. In this case, it's a method named LoadCompleted, which is where the ViewModel consumes the IPerson data that has been retrieved.
As you can see, by using the Repository pattern, all the details of how the IPerson was loaded and from where it was loaded are abstracted away into another class. All that the ViewModel needs to worry about is handling any errors or data that get passed to it via the ReturnResult<IPerson> callback.
A convenient side effect of using the Repository is that the WCF service proxy data-transfer objects can be completely encapsulated within the Repository class itself -- no other class has to or should reference those classes generated by Add Service Reference. Without a solution to the asynchronous call problem, the ViewModel would have a lot more knowledge of how the IPerson data is retrieved, which would be a violation of the separation of concerns.
Tip 6: Simplify your bindings and your validation code with ViewModelField<T> and Custom Controls.
When you're coding a business application in Silverlight and WPF, you'll almost definitely be writing validation code and code to show/hide controls based on choices made in the UI or user security permissions. For example, if you're writing a Person Editor window that has an EmailAddress property, you're going to need a way to validate that e-mail address and notify the user if it's invalid. You might also have the case where Administrators can view all details about a person while non-Administrators can see everything except for the person's salary. In this case, your ViewModel would be checking the type of user and setting the visibility of the Salary field.
What this means is that, for nearly every field on your page, your ViewModel is going to have the following:
- A property for the value you want to display/edit.
- A Boolean property that says if that value is valid.
- A string property with the error message if the value is invalid.
- A Boolean property that indicates whether that field should be visible.
So, what started out as a small number of fields on your relatively simple ViewModel has now exploded by a factor of four because of metadata about the field.
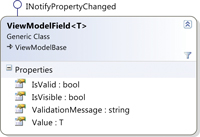
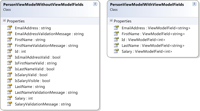
You can cut down on this metadata clutter by creating a generic object to represent the field, for example ViewModelField<T>, shown in Figure 2. The exploded version of PersonViewModel would need four separate properties -- Salary, IsSalaryVisible, IsSalaryValid and SalaryValidationMessage -- to represent Salary, while the version that used ViewModelField<int> needs only one (see Figure 3). When you think about what this means for the whole PersonViewModel, one way has 14 properties (most of which are similar) and the other has only five.
[Click on image for larger view.] |
| Figure 2. ViewModelField<T> encapsulates the value of the field plus the metadata. |
[Click on image for larger view.] |
| Figure 3. The exploded version of PersonViewModel needs four separate properties to represent Salary, while ViewModelField<int> only needs one. |
When you're implementing your Views, lots of ViewModel properties means lots of DataContext data bindings to write, maintain and debug. Creating a common design pattern for your common ViewModel logic allows you to start simplifying your data bindings by creating custom controls that understand how to efficiently talk to your ViewModelField<T> properties. Here's the XAML that would be required to display and bind the Salary field without ViewModelField<T>:
<Grid Visibility="{BindingIsSalaryVisible ...}}">
<Grid.RowDefinitions>
<RowDefinition />
</Grid.RowDefinitions>
<StackPanel Orientation="Vertical">
<TextBlock Text="SALARY" />
<TextBlock Text="{BindingSalaryValidationMessage}"
 Visibility="{BindingIsValid ...}}" Foreground="Red" />
<TextBox Text="{Binding Salary, Mode=TwoWay}" />
</StackPanel>
</Grid>
It's fairly complex for one field, and this technique starts to become seriously ugly when you bind all of PersonViewModel -- and it's the same stuff over and over again. Using ViewModelField<T> and a custom textbox control, you can not only encapsulate and reuse the layout so that your View has a consistent look, but you can also simplify the XAML in the page that contains the control. Plus, there's only a single binding, as shown in Listing 4.
Using ViewModelField<T> plus custom controls can greatly simplify the code for your ViewModels and Views and eliminates lots of duplicated or nearly identical code from your application. Plus, once you've created and tested your custom controls, writing the rest of your application starts to go a lot faster because you can add new fields to your Views and ViewModels without having to write a lot of code.
The MVVM pattern is an indispensable tool for developing applications for Silverlight, Windows Phone 7 and WPF. If you avoid some of the architectural pitfalls and use MVVM in conjunction with other design patterns like Repository and Adapter, you can easily write unit-testable and maintainable applications.