Code Focused
Creating an HTTP Service with ASP.NET Web API
ASP.NET Web API allows you to write a service once and provide different output formats with little effort on the developer's side.
ASP.NET Web API is a new framework technology from Microsoft, due for release with the .NET Framework 4.5. It allows a single Web service to communicate with multiple clients in various formats such as XML, JSON and OData.
IT organizations are looking to expose their functionality to a variety of clients. Although many protocols exist for communicating data on the Internet, HTTP seems to be dominating due to its ease of use and wide acceptance.
ASP.NET Web API allows developers to expose data and services to the Web directly over HTTP. This approach offers developers the ability to fully harness the richness of HTTP as an application layer protocol to communicate with a broad set of clients, including browsers, mobile devices, desktop applications, or backend services. The architecture is designed to support applications built with REST, but it does not force new applications to use a REST-style architecture.
Useful features in ASP.NET Web API are listed below:
- Access HTTP programming model in Windows Communication Foundation (WCF)
- Content negotiation
- HttpClient
- Out of the box support for XML, JSON and OData
- Type-less JSON support using a dynamic object
- Any format/media type
- IQueryable support for OData
- Validation, URI model binding, caching, etags
- Integration with custom IoC containers
- Simple code-based configuration model
- HTTP file upload and MIME-based batching support
- Integrated Web API test client
History of ASP.NET Web API
This new technology first emerged in October 2010 at the Microsoft Professional Developers Conference (PDC) with the release of Preview 1. At the time, it was called "WCF Web API." Since then the product has continued to evolve. Preview 6, released in November 2011, is the latest version. Shortly after the release of Preview 6, Microsoft announced the new name of ASP.NET Web API. The project is a joint effort between the WCF and ASP.NET teams to create an integrated Web API framework.
ASP.NET Web API is available as a NuGet package for ASP.NET MVC 3, ASP.NET MVC 4 beta or ASP.NET applications. It can be installed in a variety of ways:
- Via the NuGet Package Manager, specify WebApi.All
- Enter "Install-Package WebApi.All -Version 0.6.0" in the Package Manager Console
- Download the ASP.NET MVC4 beta.
Unfortunately, Silverlight applications aren't supported at this time. However, HTTP resources can be consumed in Silverlight using HttpWebRequest. The WCF Web API and WCF support for jQuery content on the CodePlex site is ending and will be removed by the end of 2012.
Creating an HTTP Service
To demonstrate the powerful capabilities of ASP.NET Web API, I'll do a code walk-through. Let's assume I own a used car dealership and want to display my inventory to potential customers with various platforms (mobile, PC) or trading partners (wholesale dealers or distributors) using back-end services. I'm going to create a service that will report all vehicles on-hand, and later allow the results to be queried and filtered.
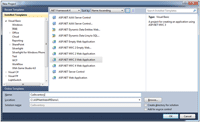
First, I'll create an ASP.NET MVC 3 solution called WebAPIDemo, as shown in Figure 1.
[Click on image for larger view.] |
| Figure 1. Selecting ASP.NET MVC 3 Web App. |
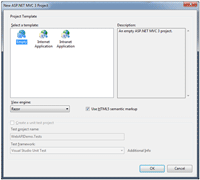
I want to start with an empty project, so I'll select the Empty template and click OK, as shown in Figure 2.
[Click on image for larger view.] |
| Figure 2. Selecting an Empty project template. |
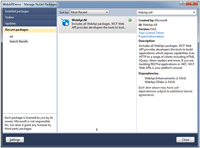
Next, I'll retrieve the latest NuGet Package, via Package Manager in Visual Studio. I'll right-click on the solution in Solution Explorer, select Manage NuGet Packages and then enter WebApi.All in the search box. This retrieves the latest version of the package as shown in Figure 3.
[Click on image for larger view.] |
| Figure 3. Selecting WebApi.All v0.6.0. |
In this case, I have WebApi.All already installed so a green checkmark appears next to it. If it wasn't installed, an install button would be in place of the green checkmark. Clicking the install button next to WebApi.All in the center pane will start the installation.
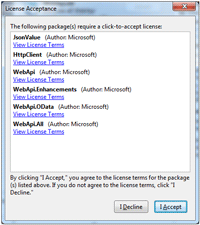
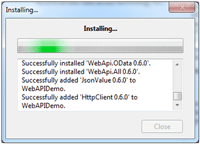
Accepting the necessary license agreements (see Figure 4) will continue the installation until completion, as shown in Figure 5.
[Click on image for larger view.] |
| Figure 4. License Terms for installation. |
[Click on image for larger view.] |
| Figure 5. Additional installation after accepting license agreements. |
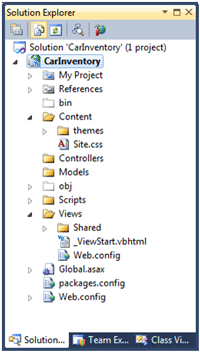
At this point, the project has all the necessary references in place to start coding. Figure 6 shows a view of Solution Explorer with the default files provided from the selected template.
[Click on image for larger view.] |
| Figure 6. Default files after selecting template and WebApi.All installation. |
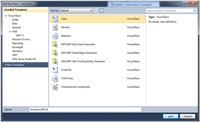
Next, I'll create a folder in the project and call it InventoryWebAPIs. I'll add a class to this folder and call it InventoryAPI.vb, as shown in Figure 7.
[Click on image for larger view.] |
| Figure 7. Selecting class file. |
The next step is to decorate the class with the <ServicesContract()> attribute. This will also require importing the namespace System.ServiceModel. The <ServicesContract()> indicates to the ASP.NET Web API framework that this class will be exposed over HTTP. When finished, the class code will look similar to the following:
Imports System.ServiceModelNamespace Inventory.APIs <ServiceContract()> Public Class InventoryAPI End ClassEnd Namespace
Now, the ASP.NET Web API needs to be hosted, which requires registering it as an ASP.NET route using ServiceRoute method. This is done in the global.asax.vb file by adding the following code to the RegisterRoutes method:
routes.Add(New ServiceRoute("InventoryWebAPIs/Inventory", New HttpServiceHostFactory(), GetType(InventoryAPI))) The complete code is shown in Listing 1.
Create a Resources folder in the project with a new InventoryDTO class within it. This Resources folder will hold the Data Transfer Object (DTO) to be passed to and from the ASP.NET Web API.
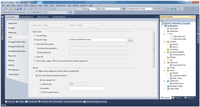
The next step is to specify the "Start Action" for the project in the project properties. Because this is an ASP.NET MVC project, I'll specify the name of the class previously set up with the <ServiceContract()> attribute, class "Inventory." Please note, this class is in folder InventoryWebAPIs, so it also needs to be specified for "Specific Page," as shown in Figure 8.
[Click on image for larger view.] |
| Figure 8. Specifying class name of Web API for Start Action. |
If the class "InventoryWebAPIs/Inventory" isn't specified and the project is started, an HTTP 404 error will result.
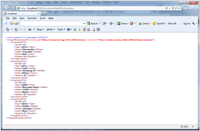
If the settings in my project are correct, I can start debugging my project and it will immediately render an XML form of the data, as shown in Figure 9.
[Click on image for larger view.] |
| Figure 9. Default result of initial execution. |
Using the Built-In Test Client
Now that everything is working correctly, the next step is to use the built-in ASP.NET WCF test pages for fully testing the ASP.NET Web API. First, add Imports Microsoft.ApplicationServer.Http to global.asax.vb. Second, add an HttpConfiguration object and instantiate it:
EnableTestClient = True
This configuration variable will then be used in the previously added routes.Add. The modified code is reflected in
Listing 2.
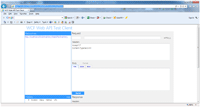
After making the necessary coding changes, I will start debugging the application by pressing F5. When the initial page loads, it will look similar to Figure 9. However, if I append "/test" to the URL, it displays the built-in test client, as shown in Figure 10.
[Click on image for larger view.] |
| Figure 10. Default ASP.NET Web API test client page. |
The test client page contains four sections:
- Resources are the available APIs.
- History displays a listing of calls submitted to the server in chronological order.
- Request shows the verb, URI and the content header request sent to the server. These items will remain blank until a URI is selected from the Resources section.
- Response shows the data received from the server.
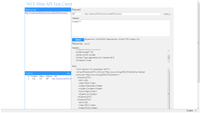
To use the test client, click the Resources link in the left pane. This will populate the "Request" section with verb, URI and content header. Clicking the Send button will result in the output seen in Figure 11.
[Click on image for larger view.] |
| Figure 11. Test client with Request and Response. |
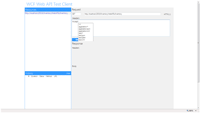
The advantage of the test client is it expedites sending different content headers and verbs to the server. These are available in lists that appear when editing either the verb or the header, as shown in Figure 12. This allows the data to be sent in XML, JSON, plain text or any other format listed. Once the content header changes, ASP.NET Web API immediately adjusts to send the proper formatted output to the client.
[Click on image for larger view.] |
| Figure 12. Selecting different header information. |
Enabling OData Query Support
Another advantage of ASP.NET Web API is the ability to provide OData query support. Currently, only a subset of the query URI formats are accepted ($top, $skip, $orderby and $filter). To modify the existing API for OData support, simply change it to return an IQueryable type. This will also require using the System.Linq namespace. A complete listing of the modified code is shown in Listing 3.
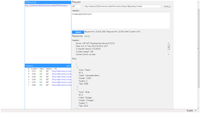
After making the necessary changes, the project is now ready to provide OData query support. Once the browser page loads, append the query string "?$top=2&$orderby=Model" to the address, click Send, and the modified query will be returned as shown in Figure 13.
[Click on image for larger view.] |
| Figure 13. Test client with OData Request and Response. |
Advantages of ASP.NET Web API
ASP.NET Web API is not fully released yet, but it still offers many promising features. It allows the ability to write a service once and provide many different output formats with little effort on the developer’s side. This capability is made available in ASP.NET MVC 3, ASP.NET MVC 4 beta and standard ASP.NET applications. In addition, it offers a built-in test client to facilitate testing and viewing the data passed to and from the client.
About the Author
Sam Nasr has been a software developer since 1995, focusing mostly on Microsoft technologies. Having achieved multiple certifications from Microsoft (MCAD, MCTS(MOSS), and MCT), Sam develops, teaches, and tours the country to present various topics in .Net Framework. He is also actively involved with the Cleveland C#/VB.Net User Group, where he has been the group leader since 2003. In addition, he also started the Cleveland WPF Users Group in June 2009, and the Cleveland .Net Study Group in August 2009, and is the INETA mentor for Ohio. When not coding, Sam loves spending time with his family and friends or volunteering at his local church. He can be reached by email at [email protected].