C# Corner
Working with Advanced Live Tiles in Windows 8
In part 1 of his series on advanced live tiles, Eric Vogel shows you how to add secondary tiles to your Windows 8 Metro style applications.
A secondary tile is an additional live tile for your Windows 8 Metro style application, which is designed to help the user promote content. Unlike a primary tile, the user has to initially approve (or disapprove) of a secondary tile. You can add multiple secondary live tiles to an application.
In terms of size, a secondary tile can be wide or the standard square. It can also receive tile and badge notifications just like the primary live tile. In this article, I'll cover how to add secondary tiles to a Windows 8 Metro style application.
First, create a Windows Metro style application in the Visual Studio 11 Beta. To generate a secondary Live Tile, you create a new instance of the SecondaryTile class from the Windows.UI.StartScreen namespace, and then call its RequestCreateAsync method. The following code creates a secondary tile with square and wide logos and with no tile arguments.
string tileId = "TestTile1";
string args = String.Empty;
            Uri squareTileUri = new Uri("ms-appx:///Assets/Check.png");
            Uri wideTileUri = new Uri("ms-appx:///Assets/CheckWide.png");
            SecondaryTile tile = new SecondaryTile(tileId, "SecondaryTile",
                                            "TestSecondaryTile",args,
                                            TileOptions.ShowNameOnWideLogo |
TileOptions.ShowNameOnLogo,
                                            squareTileUri,
                                            wideTileUri);
return await secondaryTile.RequestCreateAsync();
You can also use the RequestCreateForSelectionAync method to place the confirmation message at a particular region specified by the given Rect object. To center the confirmation dialog on the top of the page, run the following code:
GeneralTransform transform = this.TransformToVisual(null);
 Point transformPoint = transform.TransformPoint(new Point());
 var rect =  Rect(transformPoint, new Size(this.ActualWidth, this.ActualHeight));
 secondaryTile.RequestCreateForSelectionAsync(rect);
Creating the Custom Secondary Tile Library
I decided to create a class wrapper around the SecondaryTile class named CustomSecondaryTile to ease the use of sending notifications to a created secondary tile. Create a new Class Library for the project--I named my project VSMAdvancedTiles.Common. Next, create an empty class file for the CustomSecondaryTile class. The CustomSecondaryTile class contains two constructors: one that accepts a tileId, and one that accepts both a tileId and a message. The former is used to update an existing secondary tile, the later for creating a new tile.
The RequestCreation method calls the SecondaryTile instance's RequestCreateForSelectionAsync method to request the user to allow the tile's creation. The PushBageNotification creates a badge notification and pushes it to the secondary tile using the BadgeUpdateManager. The PushTileNotification function takes a message, a wide tile template and a square tile template. The method creates a tile update that includes a square and wide tile with the given message. The TileUpdateManager is used to send the completed tile notification to the secondary tile. The RequestDelete method unpins the secondary tile with the given tileId. The actual deletion request is prompted by the SecondaryTile class's RequestDeleteForSelectionAsync function using the centered Rect for the page that created the tile. The GetCenteredElementRect method is the previous code (used to center the confirmation dialog) wrapped in a reusable method. See Listing 1 for the completed code.
Adding the UI to the Application
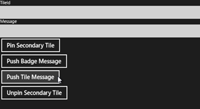
Now it's time to setup the user interface (UI) for the test application. Open up BlankPage.xaml, and copy the StackPanel XAML to your markup file. See Listing 2 for the entire page's markup.
You need to click on each of the buttons to setup their Click event handlers. You should now be able to run the application, and see the completed UI shown in Figure 1.
[Click on image for larger view.] |
| Figure 1. Finished UI |
Finishing the Application
Lastly, you just need to utilize the CustomSecondaryTile class in the page controller. Open up BlankPage.xaml.cs. In the PinTile Click event handler, I clear the Status text, and then create a CustomSecondaryTile object instance to request its creation from the user. Once the tile has been created, the status label is updated to display its success. The PushBadge Click event handler retrieves the created secondary tile and calls the PushBadgeNotification method passing the user's entered message. If the push notification succeeded, the status label is updated to indicate its success. The PushTile Click event handler retrieves the existing secondary tile and calls its PushTileNotification method, passing the user's entered message along with appropriate wide and square tile templates. Finally, the UnPinTile Click event handler retrieves the existing secondary tile and calls its RequestDelete method to request its removal. See Listing 3 for the completed code.
Now sit back and run the completed application! You can create a new secondary tile and view it from the Start Menu as depicted in Figure 2 and Figure 3.

[Click on image for larger view.] |
| Figure 2. Requesting a new Secondary Tile |

[Click on image for larger view.] |
| Figure 3. Created Secondary Tile |
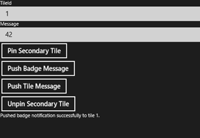
You can push a badge notification to a secondary tile as shown in Figure 4 and Figure 5.
[Click on image for larger view.] |
| Figure 4. Pushing a Badge to a Secondary Tile |

[Click on image for larger view.] |
| Figure 5. Pushed Secondary Tile Badge Update |
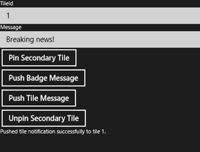
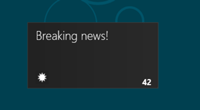
Lastly, you can send a tile notification to a secondary tile as shown in Figure 6 and Figure 7.
[Click on image for larger view.] |
| Figure 6. Pushing Tile Notification to Secondary Tile |
[Click on image for larger view.] |
| Figure 7. Received Secondary Tile Notification |
As you can see, adding secondary tiles to your application allows for further differentiation and user control. I think that secondary tiles will become a user expectation rather than the exception for Metro style applications. Stay tuned to the next iteration where I'll cover how to use auto polling tiles and lock screen notifications.
About the Author
Eric Vogel is a Senior Software Developer for Red Cedar Solutions Group in Okemos, Michigan. He is the president of the Greater Lansing User Group for .NET. Eric enjoys learning about software architecture and craftsmanship, and is always looking for ways to create more robust and testable applications. Contact him at [email protected].