C# Corner
Azure Mobile Services, Part 2
In Part 2 of this series, Eric Vogel covers how to implement authentication and basic authorization with an Azure Mobile Service-backed Windows Store application.
In "Azure Mobile Services, Part 1," I covered how to setup and configure an Azure Mobile Service, and call it from a Windows Store application. In Part 2, I’ll show you how to add authentication and basic authorization to the same Windows Store application through an Azure Mobile Service.
Please refer to the first article if you don’t have an Azure Mobile Web service already configured. Then download the code from Part 1 along with the Live SDK for Windows.
The next step is to go to the Windows Store Developer Portal to register your Windows Store application name (Figure 1).
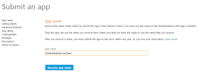
[Click on image for larger view.] |
| Figure 1. Reserving Windows Store application name. |
Then you’ll need to associate your registered Windows Store application with your Visual Studio application project as shown in Figure 2.
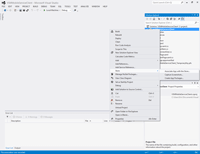
[Click on image for larger view.] |
| Figure 2. Associating application with Windows Store. |
Click on the Sign In button to initiate the association process (Figure 3).
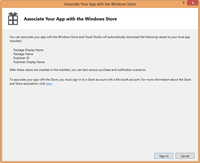
[Click on image for larger view.] |
| Figure 3. Click on the Sign In button. |
Now select your registered Windows Store app from the list and click on the Next button (Figure 4).
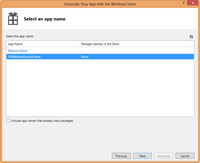
[Click on image for larger view.] |
| Figure 4. Selecting application to associate. |
You’ll be presented with the details of your associated application. Click on the Associate button and the Package.appxmanifest file will be updated accordingly, as shown in Figure 5.
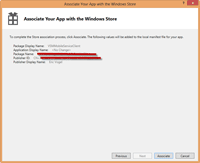
[Click on image for larger view.] |
| Figure 5. Associating your Windows Store application. |
Now it’s time to link the Azure Mobile Service to the registered Live Connect application. Go to the Live Connect My Applications section.
Then click on your Azure Mobile Service application in the list (Figure 6).
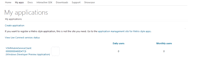
[Click on image for larger view.] |
| Figure 6. Click on your application in Live Connect My Applications. |
Now click on the Edit settings link for your application (Figure 7).

[Click on image for larger view.] |
| Figure 7. Click on Edit settings in Live Connect application settings. |
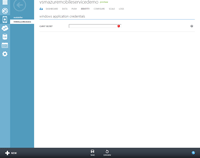
Then click on the API Settings link in the left hand navigation (Figure 8).
[Click on image for larger view.] |
| Figure 8. Click on API Settings to edit Live Connect application settings. |
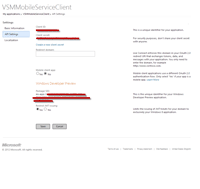
Enter your Azure Mobile Service URL into the Redirect domain setting and click on Save. Your Azure Mobile Service URL will be in the format "x.azure-mobile.net/" and can be found by going to the Dashboard tab in the Azure Mobile Service management site shown in Figure 9.

[Click on image for larger view.] |
| Figure 9. The dashboard shows your Azure Mobile Service URL. |
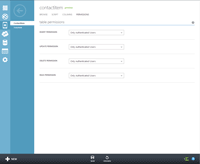
Now it’s time to link the Live Connect application to the Azure Mobile Service. Click on the Identity tab within the mobile service dashboard, and enter the client secret that was given to you by the Live Connect portal (Figure 10).
[Click on image for larger view.] |
| Figure 10. Entering the Live Connect Client Secret. |
Now it’s time to configure the Azure table storage permissions. Click on the Data tab in the Azure Mobile Service dashboard. Then select the ContactItem table (Figure 11).
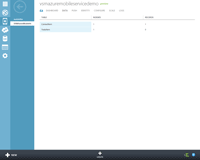
[Click on image for larger view.] |
| Figure 11. Selecting the ContactItem Azure Storage Table. |
Now you can configure create, read, update and delete (CRUD) permissions for the ContactItem table. Set each of the options to the "Only Authenticated Users" setting as shown in Figure 12.
[Click on image for larger view.] |
| Figure 12. Setting the ContactItem table permissions. |
It’s finally time to write some code. Open up the VSMMobileServiceClient solution in Visual Studio 2012 if needed, and run the application. You should see the error message shown in Figure 13.
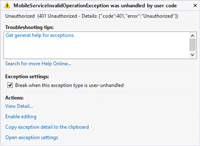
[Click on image for larger view.] |
| Figure 13. Authorization settings are correct if you see this unauthorized exception. |
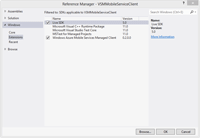
If you see the exception, then the authorization settings are correct for your ContactItem Azure Storage table. Let’s proceed to writing the Live Connect log-in code for the Windows Store application. Add project reference to the Live SDK as shown in Figure 14.
[Click on image for larger view.] |
| Figure 14. Adding Live SDK project reference. |
First I’ll add the LiveConnectUser class that will be used to hold the logged-in user's information for display. Add a new class named LiveConnectUser with string UserId, FirstName, and LastName properties as shown in Listing 1.
Next, update the UI for the application to include sign-in and sign-out buttons along with some labels to display the currently logged-in user’s name. Open up MainPage.xaml and update your markup to match the code in Listing 2. I’ve also updated the Contact StackPanel to be collapsed until the user is logged in.
Now it's time to update the MainPage class to login the current Windows user through Live Connect. Open up MainPage.xaml.cs and add the following using statements for the Live SDK and the Azure Mobile Services SDK:
using Microsoft.Live;
using Windows.UI.Popups;
using System;
using Microsoft.WindowsAzure.MobileServices;
Next, add member variables to store the LiveConnectSession, the mobile service URL, mobile user and the LiveAuthClient.
LiveConnectSession _liveConnectSession;
const string _azureMobileServiceEndpoint = "Your Azure Mobile Service Hostname";
LiveConnectUser _user;
LiveAuthClient _liveAuthClient;
Now update the MainPage constructor to instantiate the LiveAuthClient instance passing in the Azure Mobile Service endpoint URL.
public MainPage()
 {
     this.InitializeComponent();
     _liveAuthClient = new LiveAuthClient(_azureMobileServiceEndpoint);
     ClearItem();
 }
Finally, it’s time to implement the core Login method that will authenticate the current Windows user with the Azure Mobile Service as shown in Listing 3.
I first check to see if the user already has an active Live Connect session.
while (_liveConnectSession == null)
{
Next I attempt to login within the LoginAsync method passing in the "w1.basic" scope. The "w1.basic" scope will prompt the user to allow read access to their profile once he or she has logged in. Check the Status property of the liveLoginResult to see if the login was successful:
LiveLoginResult liveLoginResult = await _liveAuthClient.LoginAsync(new[] { "wl.basic" });
if (liveLoginResult.Status == LiveConnectSessionStatus.Connected)
If the user logged in successfully, then I store a copy of the active session into the _liveConnectSession variable. After that I get the logged-in user’s Live Connect profile through the "me" path.
LiveConnectClient liveConnectClient = new LiveConnectClient(liveLoginResult.Session);
LiveOperationResult liveOpResult = await liveConnectClient.GetAsync("me");
Next I log the Live Connect user into the Azure Mobile Service through the MobileService.LoginAsync method, passing in the AuthenticationToken from the Live Connect session.
 MobileServiceUser mobileServiceLoginResult = await
 App.MobileService.LoginAsync(liveLoginResult.Session.AuthenticationToken);
Then I create a new LiveConnectUser with the captured UserId, first name, and last name data from the user’s Live Connect profile.
 _user = new LiveConnectUser(mobileServiceLoginResult.UserId,
 liveOpResult.Result["first_name"].ToString(),
     liveOpResult.Result["last_name"].ToString());
Then the _user is bound to the MobileUser StackPanel for display; the SignOut button is enabled; and the Contact StackPanel is displayed.
MobileUser.DataContext = _user;
SignOut.IsEnabled = _liveAuthClient.CanLogout;
Contact.Visibility = Windows.UI.Xaml.Visibility.Visible;
If the user failed to sign in, then I null out the _liveConnectSession variable and display a dialog box notifying the user to try to log-in again with "OK" and "Cancel" buttons. If the user clicks on "Cancel," then the application is exited. If the user clicks on "OK," then the application tries to log in again.
else
{
    _liveConnectSession = null;
    var loginErrorDialog = new MessageDialog("Please try login in again.", "Retry Login");
    var okCommand = new UICommand("OK");
    var cancelCommand = new UICommand("Cancel");
    loginErrorDialog.Commands.Add(okCommand);
    var dialogResult = await loginErrorDialog.ShowAsync();
    if (dialogResult != new UICommand("OK"))
    {
        Application.Current.Exit();
    }
}
Now update the OnNavigatedTo event handler to call the Login method prior to the GetContacts method.
protected async override void OnNavigatedTo(NavigationEventArgs e)
{
    await Login();
    await GetContacts();
}
When the SignOut button is clicked, I check to see if the user can be logged out. If the user can be logged out, then he or she is logged out; the SignIn button is displayed; and the Contact StackPanel is hidden.
private void SignOut_Click(object sender, RoutedEventArgs e)
{
    if (_liveAuthClient.CanLogout)
    {
        _liveAuthClient.Logout();
        SignIn.Visibility = Windows.UI.Xaml.Visibility.Visible;
        Contact.Visibility = Windows.UI.Xaml.Visibility.Collapsed;
    }
}
When the SignIn button is clicked, the user is logged in and the SignIn button is hidden.
private async void SignIn_Click(object sender, RoutedEventArgs e)
{
    await Login();
    SignIn.Visibility = Windows.UI.Xaml.Visibility.Collapsed;
}
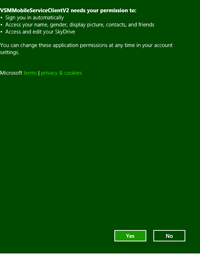
Authentication is now fully implemented in the application! When you first run the application, you should see a prompt, similar to the one shown in Figure 15, asking you to grant access to your user profile settings.
[Click on image for larger view.] |
| Figure 15. Granting access with a User Profile Access Consent Form. |
After you accept the user access prompt, the application should be fully functioning with authentication and basic authorization as shown in Figure 16.

[Click on image for larger view.] |
| Figure 16. Updated application with authentication. |
In this article, I've covered how to add authentication and basic authorization to a Windows Store application with Azure Mobile Services. Stay tuned for the third and final installment of this series, in which I’ll show you how to add advanced authorization rules and push notifications to the application.