UI Code Expert
Automated UI Testing with Visual Studio 2012
Learn how to effectively create UI automation tests that verify whether a Windows application is performing as expected.
The last five years have seen a significant increase in the use of unit tests by developers as a key way to improve software quality, thereby reducing the overall cost of software development over time. However, when it comes to writing automated tests of the UI, the industry in general still has a long way to go. This article delves into what it takes to effectively create UI automation tests that verify whether a Windows application is performing as expected. The benefit is the same as unit tests -- an unattended execution of tests that verify the behavior, resulting in increased software quality and a reduction in the overall software development cost.
I'll walk you through how to use the UI automation functionality included with Visual Studio 2012 to test the UI of a rich-client app.
Recording a UI Test
Developing UI automation tests against an existing set of screens is generally easier than using test-driven development (TDD), especially at first. That's because the Visual Studio UI automation tooling from Microsoft -- coded UI tests (CUITs) -- supports recording as a means of generating an initial UI test.
Start by writing a CUIT against the Windows Calculator (Calc.exe):
- After creating a Unit Test project, right-click on the project from Solution Explorer and select Add | New Item from the test project's context menu.
- Navigate to the Test node under Installed/Visual C# Items (or Visual Basic) and select Coded UI Test Map. Call the new file CalculatorUIMap.uitest. The name of the file will dictate the name of the class representing the UI map of the application under test, hence the "UIMap" suffix.
Note that you can also (more simply) select Add | Coded UI Test (or Project | Add Coded UI Test from the Visual Studio 2012 menu bar); however, this doesn't prompt for a file name and instead names the file UIMap.uitest. Unfortunately, due to some issues in default folder and namespace structure in the current implementation, renaming doesn't work. For this reason, using the Add | New Item approach is preferred.
Tip: In order to support renaming of the *.uitest file (and its corresponding generated classes), use the Add | New Item menu rather than the Add | Coded UI Test menu.
- From the context menu of the .uitest file (with the *.uitest extension), you can select Edit with Coded UI Test Builder, thereby launching the recording utility. This will cause Visual Studio 2012 to minimize and display a Coded UI Test Builder form at the bottom-right corner of the screen (see Figure 1).
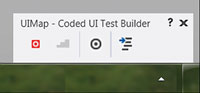
[Click on image for larger view.] |
| Figure 1. The Coded UI Test Builder window in Visual Studio 2012. |
The Coded UI Test Builder is the recording window that controls when UI activity (both mouse- and keyboard-related) is activated.
- Click the Start/Resume Recording button to begin the recording.
- From the Windows menu, launch the Calculator and enter a calculation using either the mouse or the keyboard (or a combination thereof).
- Click the Pause Recording button. This will result in a recording of the actions between start and pause, viewable any time after starting the recording via the Show Recorded Steps button, as shown in Figure 2.
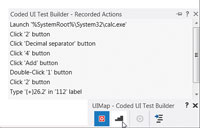
[Click on image for larger view.] |
| Figure 2. View recorded steps in the Visual Studio 2012 Coded UI Test Builder. |
- Click the Generate Code button and name the method LaunchAndTestCalculator.
Generating the code will result in two additional files underneath the .uitest file. The first is a *.cs file intended for the developer to edit and maintain. The second is the designer file (*.designer.cs), which the Coded UI Test Builder will modify each time you regenerate the code. The main class between these two files is the UI map: CalculatorUIMap.
Although the Coded UI Test Builder generated the UIMap for automating the calculator, at this point there are no tests to execute the automation. To create a test, add a Basic Unit Test file to the project; for the test method, invoke CalculatorUIMap.LaunchAndTestCalculator. The final step is to change the attribute on the class from TestClass to CodedUITest. The code for the CalculatorTests class is:
[CodedUITest]
public class CalculatorTests
{
  [TestMethod]
  public void LaunchAndShutdownCalculator()
  {
    CalculatorUIMap calculatorUIMap = new CalculatorUIMap();
    calculatorUIMap.LaunchAndTestCalculator();
  }
}
(An alternative, which generates considerably more commented-out code, is to add a CUIT and then select the Use an Existing Action Recording radio button when prompted.)
Now run the test and watch it automate the calculator. The result is a simple introductory demonstration, but one that provides an overview of CUIT functionality, components and development.
Maintaining CUITs
Recording the initial test, even one with a multitude of steps, is relatively easy. However, the crux of UI testing is not so much in the initial recording, but rather the maintenance of the tests over time, especially as the application changes.
Consider the following scenarios:
- Adding a control to a window and including that in the test script
- Changing the test script to handle a different directory path to the application under test (by default, the recorded script is hardcoded to a specific directory).
- Refactoring tests to avoid relaunching the entire app between tests.
- Adding robustness to handle the relocation of buttons or windows.
- Verifying application behavior beyond whether automation works properly.
Regarding the last scenario, consider again the calculator example. You didn't make any verifications of the app behavior in the original recording. As long as the application automation executes successfully, the test passes -- even if, for example, the values displayed are incorrect. How do you add verification steps along the way?
Editing via the UI Control Map
To begin understanding how UI automation works, it's necessary to first understand the UI map. Opening up the CalculatorUIMap.uitest file displays the Coded UI Test Editor window, shown in Figure 3.

[Click on image for larger view.] |
| Figure 3. The Coded UI Test Editor in Visual Studio 2012. |
The right side has each of the controls automated via either mouse or keyboard. Corresponding to each of these is a generated class, which in this case is derived from Microsoft.VisualStudio.Test- Tools.UITesting.WinControls.WinWindow. UIItemWindow1 appears in Listing 1.
Visual Studio generated a WinWindow-derived class in this case because you were automating an unmanaged application; different types of applications will use different base classes. A Windows Presentation Foundation (WPF) application, for example, will derive from the Microsoft.VisualStudio.TestTools.UITesting.WpfControls.WpfCustom class, and it will likely have a different UI control to class structure mapping as well.
The name of the derived class is entirely arbitrary; the use of the "1" in the name, for example, corresponds to when in the sequence of actions the button was used, not the calculator's "1" button. This is in contrast to a UIObject, such as UIDecimalseparatorButton, for which -- at least on occasion -- the name might have relative meaning depending on the care with which the developers named the control, along with the UI frameworks' ability to represent that in the Windows accessibility API.
As shown in Listing 1, the UIObject name in the Coded UI Test Editor corresponds to the name of a property on the UIItemClass, a property with no setter and a lazy initialization pattern that searches for the control the first time the property's getter is called.
Fortunately, you can rename both the classes and the UIObject from the Coded UI Test Editor, something you'll want to do sooner rather than later. That way, there isn't any code referring to it that will need to be manually edited (something the rename action warns about).
Tip: Rename the items in the UI Control Map sooner rather than later, to avoid having to deal with references to the old names in code outside of the *.designer.cs file. (The Coded UI Test Editor doesn't leverage the Refactor Rename functionality.)
Test Assertions
The UI automation doesn't yet make any test assertions besides a check that the automation is successful -- that it can find the controls included in the automation, for example. However, a test should verify that the behavior is as expected. If we're going to calculate a value, it should be possible to assert the result, not simply ensure that the "equal" button exists. Similarly, if there's validation on a text box, the test should ensure that the error message appears appropriately and the OK/Save button is enabled appropriately.
To add the assertion, once again open up the .uitest file using the Coded UI Test Builder. With the application under test open, drag the crosshair icon to the control/window. This will highlight the window with a blue outline and display a list of properties available for checking on the selected control. In this case, to check the value of the total, you can select the DisplayText before clicking the Add Assertion button and specifying the comparison operator and the comparison value (see Figure 4).
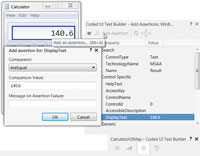
[Click on image for larger view.] |
| Figure 4. Adding a test assertion in the Visual Studio 2012 Coded UI Test Builder. |
Tip: Be sure to select the appropriate property (DisplayText, for example) against which the assertion will occur.
After adding the assertions, you can again generate the code and specify a method name that can be invoked from the test.
Refactoring the UI Actions
On the left side of the Coded UI Test Editor (Figure 3) appears a list of the actions that were recorded, arranged in order below the name of the UI automation method created, LaunchAndTestCalculator. There are several options for maintaining the sequence of actions.
The most simple, perhaps, is right-clicking on any action and inserting a delay of n seconds between actions. Although not ideal, this allows you to easily insert a delay while waiting for a particular state because the automation executes too quickly.
Another item available from the right-click context menu on an action is to split (refactor) it and all following actions into their own methods. For example, splitting the Click '2' button will create a new LaunchAndTestCalculator_1 method. Following the split, rename (again using the Coded UI Test Editor) the old and new methods to indicate the newly refactored scope; LaunchCalculator and TestCalculator, for example. You'll need to manually update your unit test to invoke the new methods individually; the UI will provide a reminder dialog as you perform the split operation.
In the initial recording example, I didn't close down the Calculator window after the test. Fortunately, the UI Automation framework takes care of this automatically (via the IDisposable implementation in the Microsoft.VisualStudio.TestTools.UI- Testing.ApplicationUnderTest class). However, it would be preferable to explicitly shut down the application when desired by editing the .uitest file using the Coded UI Test Builder (not the Coded UI Test Editor). This provides a second way of maintaining the sequence of actions. (In this case, before turning on the recording, you'll want to start the calculator application to avoid an additional action that will need to be deleted because it duplicates the functionality of the LaunchCalculator method.)
Tip: There are two ways to edit the .uitest file; be sure to become familiar with which tool enables what capability. The Coded UI Test Builder allows you to add additional steps to the UI automation. The Coded UI Test Editor provides a means of renaming or refactoring existing recorded actions.
Once recording is complete you can generate the code, assigning a name such as ShutdownCalculator to the new method when prompted and closing the Coded UI Test Builder. The result now is a UI Action list with four methods and the corresponding actions below them, as shown in Figure 5.
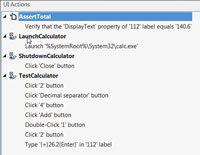
[Click on image for larger view.] |
| Figure 5. A UI Action list with refactored methods and assertions in Visual Studio 2012. |
With the new structure, you can move things such as starting and stopping the application into the TestInitialize and TestCleanup methods, allowing the application to start and stop automatically for each test. If, on the other hand, the application is slow to start, you can move application launch and shutdown functionality into the ClassInitialize and ClassCleanup methods, respectively. Given that it's preferable not to have one test depend on or affect another, restarting the application is preferable, as shown in Listing 2. Leveraging Test/Class Intialize/Cleanup methods2.
The last, and perhaps most significant edit -- this time via the context menu on the method -- is Move code to <File >.cs (in the current example, the file would be CalculatorUIMap.cs). It extracts the corresponding code out of the designer file so that any changes in the code won't get overwritten next time the designer file is regenerated. Once done, however, you'll no longer be able to edit those actions from the Coded UI Test Editor, as it won't even appear in the UI Action list. The advantage is that now you can write the code as you want, rather than relying on the generated output, which frequently doesn't conform to well-structured, object-oriented patterns.
Maintaining the UI Test Source Code
Note that any changes made to the .uitest file will get replicated into the designer file the next time you build. This is obviously why the "Move code to" functionality is available; editing the designer file directly will just result in losing your changes the next time you build. Consider, for example, splitting the LaunchCalculator method out from the designer file and into the CalculatorUIMap.cs class. The resulting code, shown in Listing 3. UIMap constructor launch code.3, reveals that the generated code isn't what you'd expect from readable, organized, object-oriented code.
Consider, for example, that there's a class (LaunchCalculatorParams) for specifying the path to the application under test. Unfortunately, however, the initial generated code provides no way to assign non-default values for the parameters; although the LaunchCalculator method uses the parameters, the property it pulls them from is read-only.
Fortunately, once the code is in the non-designer .cs file, all such issues can be addressed. For example, you can create a constructor that includes a path parameter from which to launch the application, add such a parameter to the LaunchCalculator method, or simply hardcode the values to the new path. When the application under test is another project within the solution, you'll want to leverage the TestContext for determining where the application under test is located:
public void RunApplePi()
{
  ApplicationUnderTest uIMainWindowWindow =
    ApplicationUnderTest.Launch(
      TestContext.DeploymentDirectory + @"\ApplePi.exe");
}
If you prefer to maintain code using a text editor rather than the Coded UI Test Editor/Builder, you might want to consider using the .uitest and its corresponding designer files only as drafts from which you copy the generated code into your own class structures.
This approach provides an entirely new level of control on all code elements. For example, the generated UIMap created a separate class definition for each of the calculator buttons, even though the classes themselves were identical; only the data within them varied. To address this, one approach would be to define your own UICalculatorButton class and use that within your test method repeatedly, for all the buttons.
From an object-design perspective this would be a significant improvement, but it doesn't come without caveats. The key one in this case is manually maintaining the code base and, thereby, requiring a level of programming expertise hitherto avoided. For developers writing CUITs as unit tests, this is likely a great fit. For a QA team that includes both programming and non-programming capabilities, this might be less optimal.
Break It Down
The initial recording of a CUIT is fairly trivial to get up and running. However, simply recording a multitude of tests with a multitude of steps is likely to become very difficult to maintain over time as the application changes, as even a simple UI modification could potentially break a test and require the entire recording to be redone.
The key to effective UI testing is to refactor out the tests into constituent pieces that can be used individually and combined together to meet the requirements of a full test script/case. Be sure to plan out the UI testing structure and process so as to make CUITs valuable assets that accompany the production source code itself.