C# Corner
Recording Media in a Windows Store App Part 3: Video Capture
Eric Vogel covers how to capture video in a Windows Store app by using the MediaCapture API.
More On Windows Store App Media from Visual Studio Magazine:
Welcome to the third and final installment of the MediaCapture API series, where I'll cover how to record video with audio from a video camera in a Windows Store app. The user will be able to record and save a video in a given video format and encoding quality.
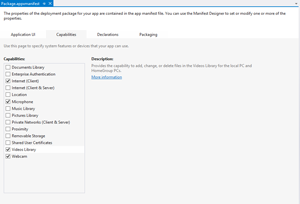
To get started, create a new blank C# Windows Store app. Next, open up the Package.appxmanifest file and go to the Capabilities tab. Then check the Internet (Client), Microphone, Videos Library and Webcam boxes as seen in Figure 1.
 [Click on image for larger view.]
Figure 1. Setting app capabilities for audio and video recording.
If you start the empty application now you can verify that the settings are correct, as you'll be prompted to grant access to your microphone and video camera as seen in Figure 2.
 [Click on image for larger view.]
Figure 2. App audio and video access user confirmation.
Start out by creating some necessary enumerators for the video encoding format and encoding quality user selections. Create a new class file named VideoEncodingFormat, then create a public enum with Mp4 and Wmv members:
public enum VideoEncodingFormat
{
  Mp4,
  Wmv
}
Next, create the VideoEncodingFormatExtensions static extension methods class. The class has two members -- ToFileExtension and ToDisplayName -- that translate a VideoEncodingFormat to an appropriate file extension and display name, respectively. See Listing 1 for the full VideoEncodingFormatExtensions code.
Listing 1. The VideoEncodingFormat.cs class file.
public static class VideoEncodingFormatExtensions
{
  public static string ToFileExtension(this VideoEncodingFormat format)
  {
    switch (format)
    {
      case VideoEncodingFormat.Mp4:
        return ".mp4";
      case VideoEncodingFormat.Wmv:
        return ".wmv";
      default:
        throw new ArgumentOutOfRangeException("format");
    }
  }

  public static string ToDisplayName(this VideoEncodingFormat format)
  {
    switch (format)
    {
      case VideoEncodingFormat.Mp4:
        return "MPEG 4 (Mp4)";
      case VideoEncodingFormat.Wmv:
        return "Windows Media (Wmv)";
      default:
        throw new ArgumentOutOfRangeException("format");
    }
  }
}
Next, create the VideoRecordingState enumerator that will be used to capture the user's video recording state. Create a new class file named VideoRecordingState with a public enum named VideoRecordingState. Add None, Stopped, Previewing and Recording members to the enum:
namespace MediaCaptureApiVideo
{
  public enum VideoRecordingState
  {
    None,
    Stopped,
    Previewing,
    Recording,
  }
}
Now it's time to create the view model classes that will be used to load the video encoding and video quality combo boxes. Create a new folder named ViewModels in your project, then create a new class file named VideoEncodingDisplay. The VideoEncodingDisplay class has Name, FileExtension and Format properties, and is constructed from a VideoEncodingFormat enum value. See Listing 2 for the full VideoEncodingDisplay view model code.
Listing 2. The VideoEncodingDisplay class file.
namespace MediaCaptureApiVideo.ViewModels
{
  public class VideoEncodingDisplay
  {
    public string Name { get { return Format.ToDisplayName(); }}
    public string FileExtension { get { return Format.ToFileExtension(); } }
    public VideoEncodingFormat Format { get; set; }

    public VideoEncodingDisplay(VideoEncodingFormat format)
    {
      Format = format;
    }
  }
}
Next, create the VideoQualityDisplay class file in the ViewModels directory. Add Name and Quality properties to the class of type string and VideoEncodingQuality, respectively. See Listing 3 for the full VideoQualityDisplay code.
Listing 3. The VideoQualityDisplay class file.
using Windows.Media.MediaProperties;

namespace MediaCaptureApiVideo.ViewModels
{
  public class VideoQualityDisplay
  {
    public string Name
    {
      get { return Quality.ToString(); }
    }
    public VideoEncodingQuality Quality { get; set; }

    public VideoQualityDisplay(VideoEncodingQuality encodingDisplay)
    {
      Quality = encodingDisplay;
    }
  }
}
Now it's time to create the UI for the app. Open up the MainPage.xaml file and add the markup in the root <Grid> element to your file, as seen in Listing 4.
Listing 4. The MainPage.xaml file.
<Grid Background="{StaticResource ApplicationPageBackgroundThemeBrush}">
    <StackPanel HorizontalAlignment="Center">
      <StackPanel HorizontalAlignment="Center" Margin="0,10,0,0" Orientation="Horizontal">
        <TextBlock Margin="0,0,10,0">Video Encoding</TextBlock>
        <ComboBox Name="VideoEncoding" ItemsSource="{Binding}" DisplayMemberPath="Name"
          SelectedValuePath="Format"
          SelectionChanged="VideoEncodings_SelectionChanged"></ComboBox>
      </StackPanel>
      <StackPanel HorizontalAlignment="Center" Orientation="Horizontal">
        <TextBlock Margin="0,0,10,0">Video Quality</TextBlock>
        <ComboBox Name="VideoQuality" ItemsSource="{Binding}" DisplayMemberPath="Name"
          SelectedValuePath="Quality"
          SelectionChanged="VideoQuality_SelectionChanged"></ComboBox>
      </StackPanel>
      <CaptureElement Name="CaptureElem" Width="400" Height="600"></CaptureElement>
      <StackPanel Name="VideoPanel" HorizontalAlignment="Center" Orientation="Horizontal">
        <Button Name="PreviewButton" Click="PreviewButton_Click" >Preview</Button>
        <Button Name="RecordButton" Click="RecordButton_Click">Record</Button>
        <Button Name="StopButton" Click="StopButton_Click">Stop</Button>
        <Button Name="SaveButton" Click="SaveButton_Click">Save</Button>
      </StackPanel>
      <TextBlock Name="Status" Foreground="Orange" Margin="0,0,10,0" FontSize="20"></TextBlock>
    </StackPanel>
  </Grid>
Now it's time to tie everything together and bring the application to life. Open up the MainPage.xaml.cs MainPage class file and add the following namespaces to the class file:
using System.Threading.Tasks;
using Windows.Media.Capture;
using Windows.Media.MediaProperties;
using Windows.Storage;
using Windows.Storage.Pickers;
using Windows.Storage.Streams;
using Windows.UI.Popups;
using MediaCaptureApiVideo.ViewModels;
Next, add private class variables for storing the media capture, media stream, encoding format, encoding quality and the current recording state:
private MediaCapture _mediaCapture;
private IRandomAccessStream _mediaStream;
private VideoEncodingFormat _encodingFormat;
private VideoEncodingQuality _encodingQuality;
private VideoRecordingState _recordingState;
Then update the OnNavigatedTo method to load the video encoding formats and qualities combo boxes. You must also initialize the media capture and set the initial enabled states for the recording UI controls:
protected async override void OnNavigatedTo(NavigationEventArgs e)
  {
    LoadVideoEncodings();
    LoadVideoQualities();
    await InitializeMediaCapture();
    UpdateRecordingState(VideoRecordingState.None);
  }
The LoadVideoEncodings method populates the VideoEncoding combo box from a List<VideoEncodingDisplay> view model object constructed from the available VideoEncodingFormat enum values. At this time I'll also set the initial SelectedIndex to 0 and set the local _encodingFormat to the selected VideoEncoding value:
private void LoadVideoEncodings()
{
  var imageEncodings = Enum.GetValues(typeof(VideoEncodingFormat));
  List<VideoEncodingDisplay> encodings = new List<VideoEncodingDisplay>();
  foreach (VideoEncodingFormat imageEncoding in imageEncodings)
  {
    encodings.Add(new VideoEncodingDisplay(imageEncoding));
  }
  VideoEncoding.ItemsSource = encodings;
  VideoEncoding.SelectedIndex = 0;
  _encodingFormat = (VideoEncodingFormat)VideoEncoding.SelectedValue;
}
In the LoadVideoQualities method, populate the VideoQuality combo box from a collection of VideoQualityDisplay values created from the available VideoEncodingQuality enum values. You must also set the initial selected VideoQuality index to 0, and set the _encodingQuality member to the selected value:
private void LoadVideoQualities()
{
  var videoQualities = from VideoEncodingQuality v
                       in Enum.GetValues(typeof (VideoEncodingQuality))
                       select new VideoQualityDisplay(v);
  VideoQuality.ItemsSource = videoQualities;
  VideoQuality.SelectedIndex = 0;
  _encodingQuality = (VideoEncodingQuality)VideoQuality.SelectedValue;
}
Next, implement the InitializeMediaCapture method, which initializes the _mediaCapture object for a video with audio capture. You must also subscribe to the Failed and RecordLimitationExceeded events on the _mediaCapture object:
private async Task InitializeMediaCapture()
{
  _mediaCapture = new MediaCapture();
  var mediaCaptureInitSettings = new MediaCaptureInitializationSettings()
  {
    StreamingCaptureMode = StreamingCaptureMode.AudioAndVideo
  };
  await _mediaCapture.InitializeAsync(mediaCaptureInitSettings);
  _mediaCapture.Failed += MediaCaptureOnFailed;
  _mediaCapture.RecordLimitationExceeded += MediaCaptureOnRecordLimitationExceeded;
}
Now it's time to implement the UpdateRecordingState method. The method sets the enabled properties on the stop, record, preview and save buttons. It also sets the Status TextBlock to display the current recording state via the UpdateStatus method as seen in Listing 5.
Listing 5. The UpdateRecordingState MainPage method implementation.
private async void UpdateRecordingState(VideoRecordingState recordingState)
{
  _recordingState = recordingState;
  string statusMessage = string.Empty;

  switch (recordingState)
  {
    case VideoRecordingState.Stopped:
      StopButton.IsEnabled = false;
      RecordButton.IsEnabled = true;
      PreviewButton.IsEnabled = true;
      SaveButton.IsEnabled = true;
      statusMessage = "Stopped";
      break;
    case VideoRecordingState.Previewing:
      StopButton.IsEnabled = false;
      RecordButton.IsEnabled = true;
      PreviewButton.IsEnabled = false;
      SaveButton.IsEnabled = false;
      statusMessage = "Previewing...";
      break;
    case VideoRecordingState.Recording:
      StopButton.IsEnabled = true;
      RecordButton.IsEnabled = false;
      PreviewButton.IsEnabled = false;
      SaveButton.IsEnabled = false;
      statusMessage = "Recording...";
      break;
    case VideoRecordingState.None:
      StopButton.IsEnabled = false;
      RecordButton.IsEnabled = true;
      PreviewButton.IsEnabled = true;
      SaveButton.IsEnabled = false;
      break;
    default:
      throw new ArgumentOutOfRangeException("recordingState");
  }

  await UpdateStatus(statusMessage);
}
Next, implement the MediaCaptureOnRecordLimitationExceeded method, which stops the current video capture and displays a message dialog to the user notifying him that his recording session has exceeded the maximum duration:
private async void MediaCaptureOnRecordLimitationExceeded(MediaCapture sender)
{
  await Dispatcher.RunAsync(Windows.UI.Core.CoreDispatcherPriority.Normal, async () =>
  {
    await _mediaCapture.StopRecordAsync();
    var warningMessage = new MessageDialog(String.Format(
      "The video capture has exceeded its maximum length: {0}", "Capture Halted"));
    await warningMessage.ShowAsync();
  });
}
Next, implement the MediaCaptureOnFailed method that gets fired when an error occurs during a media capture. In the method, display a message dialog to the user notifying him that his video capture has failed:
private async void MediaCaptureOnFailed(MediaCapture sender,
  MediaCaptureFailedEventArgs erroreventargs)
{
  await Dispatcher.RunAsync(Windows.UI.Core.CoreDispatcherPriority.Normal, async () =>
  {
    var warningMessage = new MessageDialog(String.Format(
      "The video capture failed: {0}", erroreventargs.Message), "Capture Failed");
    await warningMessage.ShowAsync();
  });
}
The UpdateStatus method simply updates the Status TextBlock Text property on the UI thread:
private async Task UpdateStatus(string status)
{
  await Dispatcher.RunAsync(Windows.UI.Core.CoreDispatcherPriority.Normal, () =>
                                                                           Status.Text = status);
}
Next, implement the PreviewButton_Click event handler that initiates a video preview through the MediaCapture API. In addition, call the UpdateRecordingState method, passing in the preview value:
private async void PreviewButton_Click(object sender, RoutedEventArgs e)
{
  if (_recordingState != VideoRecordingState.Recording &&
    _recordingState != VideoRecordingState.Previewing)
  {
    CaptureElem.Source = _mediaCapture;
    await _mediaCapture.StartPreviewAsync();
    UpdateRecordingState(VideoRecordingState.Previewing);
  }
}
The RecordButton_Click method handles the Click event of the RecordButton element. In the method a new InMemoryRandomAccessStream is created:
_mediaStream = new InMemoryRandomAccessStream();
Then a MediaEncodingProfile is created via the GetMediaEncodingProfile method:
MediaEncodingProfile encodingProfile = GetMediaEncodingProfile(_encodingQuality);
Then the media capture to stream is started:
await _mediaCapture.StartRecordToStreamAsync(encodingProfile, _mediaStream);
Last, the UpdateRecordingState method is called with the recording enum value:
UpdateRecordingState(VideoRecordingState.Recording);
Here's the completed RecordButton_Click implementation:
private async void RecordButton_Click(object sender, RoutedEventArgs e)
{
  _mediaStream = new InMemoryRandomAccessStream();
  MediaEncodingProfile encodingProfile = GetMediaEncodingProfile(_encodingQuality);
  await _mediaCapture.StartRecordToStreamAsync(encodingProfile, _mediaStream);
  UpdateRecordingState(VideoRecordingState.Recording);
}
In the GetMediaEncodingProfile, the given VideoEncodingQuality enum value is used to either create an MP4 or WMV video encoding profile as seen in Listing 6.
Listing 6. The GetMediaEncodingProfile method implementation.
private MediaEncodingProfile GetMediaEncodingProfile(VideoEncodingQuality encodingQuality)
{
  MediaEncodingProfile encodingProfile = null;

  switch (_encodingFormat)
  {
    case VideoEncodingFormat.Mp4:
      encodingProfile = MediaEncodingProfile.CreateMp4(encodingQuality);
      break;
    case VideoEncodingFormat.Wmv:
      encodingProfile = MediaEncodingProfile.CreateWmv(encodingQuality);
      break;
    default:
      throw new ArgumentOutOfRangeException();
  }
  return encodingProfile;
}
The StopButton_Click method stops the current video capture and updates the recording controls through the UpdateRecordingState method:
private  async void StopButton_Click(object sender, RoutedEventArgs e)
{
  await _mediaCapture.StopRecordAsync();
  UpdateRecordingState(VideoRecordingState.Stopped);
}
The VideoEncodings_SelectionChanged method handles the SelectionChanged event of the VideoEncoding combo box. In the method the local _encodingFormat variable is assigned to the selected value of the VideoEncoding element:
private void VideoEncodings_SelectionChanged(object sender, SelectionChangedEventArgs e)
{
  if (VideoEncoding.SelectedValue != null)
    _encodingFormat = (VideoEncodingFormat)VideoEncoding.SelectedValue;
}
The VideoQuality_SelectedChanged method handles the SelectionChanged event of the VideoQuality combo box. In the method the local _encodingQuality variable is assigned to the selected value of the VideoQuality element:
private void VideoQuality_SelectionChanged(object sender, SelectionChangedEventArgs e)
{
  if (VideoQuality.SelectedValue != null)
    _encodingQuality = (VideoEncodingQuality)VideoQuality.SelectedValue;
}
Last, implement the methods for saving the captured video file. First implement the SaveButton_Click event handler that handles the Click event of the SaveButton. In the method a new FileSavePicker is created with an initial location of the user's Videos directory:
FileSavePicker videoSavePicker = new FileSavePicker();
videoSavePicker.SuggestedStartLocation = PickerLocationId.VideosLibrary;
Then the available file extension is set on the videoSavePicker by using the ToFileExtension extension method on the selected encoding format:
videoSavePicker.FileTypeChoices.Add(new KeyValuePair<string, IList<string>>(
  "Video", new List<string>() { _encodingFormat.ToFileExtension() }));
Then the user is prompted to pick his save file location through the videoSavePicker:
var mediaFile = await videoSavePicker.PickSaveFileAsync();
Next, the file saved to the user's selected location:
await SaveStreamToFileAsync(_mediaStream, mediaFile);
Last, the Status label is updated to notify the user that his video file has been created:
await UpdateStatus(String.Format("Capture saved to {0}", mediaFile.Path));
Here's the completed SaveButton_Click method implementation:
private async void SaveButton_Click(object sender, RoutedEventArgs e)
{
  FileSavePicker videoSavePicker = new FileSavePicker();
  videoSavePicker.SuggestedStartLocation = PickerLocationId.VideosLibrary;
  videoSavePicker.FileTypeChoices.Add(new KeyValuePair<string, IList<string>>(
    "Video", new List<string>() { _encodingFormat.ToFileExtension() }));
  var mediaFile = await videoSavePicker.PickSaveFileAsync();
  await SaveStreamToFileAsync(_mediaStream, mediaFile);
  await UpdateStatus(String.Format("Capture saved to {0}", mediaFile.Path));
}
The final method to implement is SaveStreamToFileAsync. The method takes a given IRandomAccessStream and saves it to a given StorageFile as seen in Listing 7.
Listing 7. The SaveStreamToFileAsync method implementation.
private static async Task SaveStreamToFileAsync(IRandomAccessStream stream,
  StorageFile mediaFile)
{
  if (mediaFile != null)
  {
    using (var dataReader = new DataReader(stream.GetInputStreamAt(0)))
    {
      await dataReader.LoadAsync((uint)stream.Size);
      byte[] buffer = new byte[(int)stream.Size];
      dataReader.ReadBytes(buffer);
      await FileIO.WriteBytesAsync(mediaFile, buffer);
    }
  }
}
Congratulations! You've just created your first video-capture application for Windows 8.
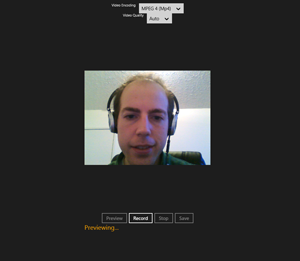
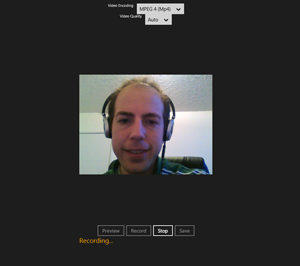
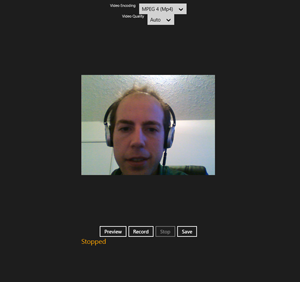
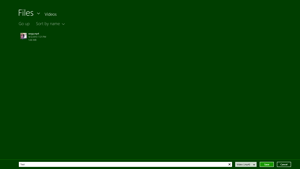
You should now be able to preview (Figure 3), record (Figure 4), stop (Figure 5) and save (Figure 6 and Figure 7) a video.
 [Click on image for larger view.]
Figure 3. Previewing a video capture in the app.
 [Click on image for larger view.]
Figure 4. Recording a video in the app.
 [Click on image for larger view.]
Figure 5. Stopping a video in the app.
 [Click on image for larger view.]
Figure 6. Selecting a video save file from the app.
 [Click on image for larger view.]
Figure 7. The video successfully saved in the app.
As you can see, by using the MediaCapture API you can quickly add video- and audio-capture capabilities to your application. Now go forth and create the next great Windows Store multimedia app!