Code Focused
Use Microsoft Word as a Report Writer from Silverlight 4
I spent many happy years of my childhood living on a lake in Michigan. Considering the northern latitude, to say the water was sometimes frigid is an understatement. I quickly learned then what turned out to be a great metaphor for learning new technologies:
To fully enjoy the water, sometimes you just need to jump in head first.
For my first Silverlight 4 application in Visual Basic, I wanted to jump in head first and show how to offload the application’s text formatting and printing to Microsoft Word, essentially automating Microsoft Word as a report writer for Silverlight 4.
The approach is conceptually simple. Prepare a Microsoft Word document of the desired final output, place properly formatted text markers at the spots in the document where data should appear, include that document in the Silverlight project, extract it at the client, load it into Microsoft Word, replace the text markers with the appropriate data values and then print. A next step in the evolution of this concept would be to download a Microsoft Word mail merge document and produce output via a dynamically determined merge file via the Silverlight 4 application. For the purposes of this article, I will stick with search and replace, which is more than adequate for many simple business applications.
The first new capability of Silverlight 4 needed to accomplish this task is COM Automation. The second is the ability to access local file resources when granted elevated trust.
The Silverlight 4 application must be able to start an instance of Microsoft Word and pass commands to it. Silverlight 4 can drive a COM Automation server if each of the following conditions has been met:
- The Silverlight 4 application is running Out of Browser
- The Silverlight 4 application has been granted elevated trust
- The COM Automation application is available on the client.
The COM Automation demonstrations I have seen as of this writing consistently demonstrate how to create and modify a new native object in the target application. This article demonstrates the more difficult, but much more useful technique of loading an existing document as a template to be modified by the COM Automation server.
IntelliSense is not available while coding for the Silverlight COM application since it is late bound. In essence, you are sending commands to an application that is declared at run-time and not available by the traditional add-reference mechanism. Since Visual Studio has no idea what commands are possible for an application instance that does not yet exist, IntelliSense is not available. To get around this limitation, I prototype my automation code in a desktop application, where I can make a reference to the application assemblies and get IntelliSense, then copy that code into the final Silverlight application.
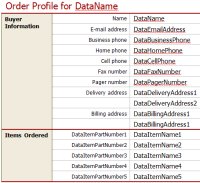
To create the application, first prepare a Microsoft Word document that will serve as the template. I modified a document from the Microsoft Office Gallery as shown in Figure 1.
[Click on image for larger view.] |
| Figure 1.Microsoft Word Document as a Report Pattern. |
Setting up the Silverlight Project for Elevated Trust - Out of Browser
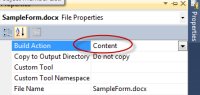
Create a new Silverlight Application in Visual Studio 2010 using the Visual Basic. Use Add Existing Item to include the Microsoft Word document, in this case, SampleForm.docx, into the Silverlight project. Change its Build Action from “None” to “Content” and the remaining setting should remain at default as shown in Figure 2.
[Click on image for larger view.] |
| Figure 2. Properties of Microsoft Word document in Silverlight 4 Project. |
Next enable the Silverlight application to run out of browser by checking that option on the Silverlight project Properties page under the Silverlight tab. Click on the Out of Browser Settings... button and check the option to Require elevated trust when running outside the browser.
When the application runs in the browser, right click in the Silverlight surface and choose Install MSWordReportWriter Application onto this computer. To test with a new version of the application, the out of browser Silverlight application must be uninstalled and then re-installed. Run the updated application in Visual Studio, right click the runtime Silverlight surface, choose Remove this application... , and right click again to install the new version as previously described.
Simulating Report Data
To represent the report data, create a class that corresponds to the text markers in the Microsoft Word document and a routine to fill the class with data as shown in the code in Listing 1 below. In a true application, the routine FillOrderDetailsData() would access an external data source to determine the needed values. Notice the auto-implemented properties used in the OrderDetailsData class, a new feature in Visual Basic 2010.
    Public Class OrderDetailsData
        Public Property DataName As String
        Public Property DataEmailAddress As String
        Public Property DataBusinessPhone As String
        Public Property DataHomePhone As String
        Public Property DataCellPhone As String
        Public Property DataFaxNumber As String
        Public Property DataPagerNumber As String
        Public Property DataDeliveryAddress1 As String
        Public Property DataDeliveryAddress2 As String
        Public Property DataBillingAddress1 As String
        Public Property DataBillingAddress2 As String
        Public Property DataItemPartNumber1 As String
        Public Property DataItemName1 As String
        Public Property DataItemPartNumber2 As String
        Public Property DataItemName2 As String
        Public Property DataItemPartNumber3 As String
        Public Property DataItemName3 As String
        Public Property DataItemPartNumber4 As String
        Public Property DataItemName4 As String
        Public Property DataItemPartNumber5 As String
        Public Property DataItemName5 As String
    End Class

    Private Function FillOrderDetailsData() As OrderDetailsData
        Dim odd As New OrderDetailsData
        odd.DataBillingAddress1 = "Buyer Billing Address 1"
        odd.DataBillingAddress2 = "Buyer Billing Address 2"
        odd.DataBusinessPhone = "Buyer Business Phone"
        odd.DataCellPhone = "Buyer Cell Phone"
        odd.DataDeliveryAddress1 = "Buyer Delivery Address 1"
        odd.DataDeliveryAddress2 = "Buyer Delivery Address 2"
        odd.DataEmailAddress = "Buyer Email Address"
        odd.DataFaxNumber = "Buyer Fax Number"
        odd.DataHomePhone = "Buyer Home Phone"
        odd.DataItemName1 = "Product Item Name 1"
        odd.DataItemName2 = "Product Item Name 2"
        odd.DataItemName3 = "Product Item Name 3"
        odd.DataItemName4 = "Product Item Name 4"
        odd.DataItemName5 = "Product Item Name 5"
        odd.DataItemPartNumber1 = "Product Item Part Number 1"
        odd.DataItemPartNumber2 = "Product Item Part Number 2"
        odd.DataItemPartNumber3 = "Product Item Part Number 3"
        odd.DataItemPartNumber4 = "Product Item Part Number 4"
        odd.DataItemPartNumber5 = "Product Item Part Number 5"
        odd.DataName = "BuyerFirstName BuyerLastName"
        odd.DataPagerNumber = "Buyer Pager Number"
        Return odd
    End Function
Listing 1. Creating data for the report.
Accessing Local File Resources
The Microsoft Word document that is to be used as the report template resides in the XAP file, due to the Build Action of Content as shown in Figure 2 above. It needs to be extracted from the XAP file and placed in a location where Microsoft Word can load it. At first glance, isolated storage is an attractive place to extract the document since it is a temporary document. Unfortunately isolated storage will not work for our purposes since there is no easy way to determine the actual full path of the document within isolated storage on the client machine.
New with Silverlight 4, local file resources can be accessed when elevated trust is granted, specifically the “My” series of folders, such as My Documents, My Pictures, My Music, etc. The My Documents folder is the better choice for the location of the extracted Word document, since it is a folder that can easily be identified via the .NET Framework.
Extracting the Microsoft Word Document into the My Documents folder
The document must be accessed as a ResourceStream object and copied to a new FileStream object that has been created in the My Documents folder under the desired name. The code listing below provides a generalized method to accomplish this.
    Private Sub ExtractReportTemplate(ByVal ZapFileName As String, ByVal LocalFileName As String, _
        ByVal DataPath As String)
        Try
            Dim fileUri As Uri = New Uri(ZapFileName, UriKind.Relative)
            Dim sr As StreamResourceInfo = Application.GetResourceStream(fileUri)
            Dim WordDoc As Stream = sr.Stream
            Dim FullLocalFilename As String = Path.Combine(DataPath, LocalFileName)
            Dim LocalFile As New FileStream(FullLocalFilename, FileMode.Create)
            WordDoc.CopyTo(LocalFile)
            LocalFile.Close()
        Catch ex As Exception
            Throw New Exception("MainPage.xaml.vb:ExtractReportTemplate:Error: " + ex.Message, ex)
        End Try
    End Sub
Listing 2. Copying a XAP Resource to the Local File System.
Instantiating Microsoft Word in the Client Environment
The new AutomationFactory.CreateObject method is used to instantiate the COM Automation application via late-binding. An exception will be thrown if the application does not exist on the client environment and should be handled.
The instance of Microsoft Word is made visible in the client environment and the previously extracted Microsoft Word report template is opened and activated. A series of custom functions are called to perform the individual find/replace actions that actually update the document. In Listing 3 below, the automation interactions are highlighted.
    Private Sub FillTemplate(ByVal OrderDetails As OrderDetailsData, _
                             ByVal DataPath As String, ByVal WordFilename As String)
        Dim appWord As Object = Nothing
        Const Word_WdUnits_wdStory As Integer = 6

        Try
            appWord = AutomationFactory.CreateObject("Word.application")
        Catch ex As Exception
            Throw New Exception("Microsoft Word is Not Available.", ex)
        End Try

        appWord.Visible = True

        Dim WordDocFileName As String = Path.Combine(DataPath, WordFilename)
        If (File.Exists(WordDocFileName)) Then
            Dim ReportTemplate As Object = appWord.Documents.Open(WordDocFileName)
            ReportTemplate.Activate()
            Dim FoundCount As Integer = 0

            FoundCount = ReplaceText(appWord, "DataBillingAddress1", OrderDetails.DataBillingAddress1)
            FoundCount = ReplaceText(appWord, "DataBillingAddress2", OrderDetails.DataBillingAddress2)
            FoundCount = ReplaceText(appWord, "DataBusinessPhone", OrderDetails.DataBusinessPhone)
            FoundCount = ReplaceText(appWord, "DataCellPhone", OrderDetails.DataCellPhone)
            FoundCount = ReplaceText(appWord, "DataDeliveryAddress1", _
                                     OrderDetails.DataDeliveryAddress1)
            FoundCount = ReplaceText(appWord, "DataDeliveryAddress2", _
                                     OrderDetails.DataDeliveryAddress2)
            FoundCount = ReplaceText(appWord, "DataEmailAddress", OrderDetails.DataEmailAddress)
            FoundCount = ReplaceText(appWord, "DataFaxNumber", OrderDetails.DataFaxNumber)
            FoundCount = ReplaceText(appWord, "DataHomePhone", OrderDetails.DataHomePhone)
            FoundCount = ReplaceText(appWord, "DataItemName1", OrderDetails.DataItemName1)
            FoundCount = ReplaceText(appWord, "DataItemName2", OrderDetails.DataItemName2)
            FoundCount = ReplaceText(appWord, "DataItemName3", OrderDetails.DataItemName3)
            FoundCount = ReplaceText(appWord, "DataItemName4", OrderDetails.DataItemName4)
            FoundCount = ReplaceText(appWord, "DataItemName5", OrderDetails.DataItemName5)
            FoundCount = ReplaceText(appWord, "DataItemPartNumber1", OrderDetails.DataItemPartNumber1)
            FoundCount = ReplaceText(appWord, "DataItemPartNumber2", OrderDetails.DataItemPartNumber2)
            FoundCount = ReplaceText(appWord, "DataItemPartNumber3", OrderDetails.DataItemPartNumber3)
            FoundCount = ReplaceText(appWord, "DataItemPartNumber4", OrderDetails.DataItemPartNumber4)
            FoundCount = ReplaceText(appWord, "DataItemPartNumber5", OrderDetails.DataItemPartNumber5)
            FoundCount = ReplaceText(appWord, "DataName", OrderDetails.DataName)
            FoundCount = ReplaceText(appWord, "DataPagerNumber", OrderDetails.DataPagerNumber)

            appWord.PrintOut()
        End If
        Return
    End Sub
Listing 3. Opening and Modifying a Microsoft Word Document.
Automating Find and Replace in Microsoft Word
Listing 3 above makes repeated calls to the ReplaceText() method, where each occurrence of the Search text is replaced by the Replace text. This is the heart of the interaction with Microsoft Word. The source code for ReplaceText() is shown in Listing 4 below.
A While loop ensures that each occurrence of the Search string is replaced. For each loop, the cursor is moved to the start of the document, any existing highlighting is removed, and the Search text is located and highlighted. The TypeText method then replaced the highlighted text with the Replace text.
This interaction was initially developed and tested in a Windows Form application with full IntelliSense, and then copied into the Silverlight 4 application.
    Private Function ReplaceText(ByRef AppWord As Object, _
                                 ByVal Search As String, ByVal Replace As String) As Integer
        Const Word_WdUnits_wdStory As Integer = 6
        Dim ReplaceCount As Integer = 0

        Dim FoundText As Boolean = True
        While FoundText
            AppWord.Selection.HomeKey(Word_WdUnits_wdStory)
            AppWord.Selection.Find.ClearFormatting()
            AppWord.Selection.Find.Text = Search
            FoundText = AppWord.Selection.Find.Execute()
            If FoundText Then
                AppWord.Selection.TypeText(Replace)
                ReplaceCount += 1
            End If
        End While

        Return ReplaceCount
    End Function
Listing 4. Automating Find and Replace in Microsoft Word.
Putting it all together
Finally we need a button on the Silverlight 4 surface that can be clicked to initiate the report. Add a button to trigger the automation to the Silverlight design surface by adding the following line of XAML:
        <Button Content="Generate Report" Height="23" HorizontalAlignment="Left"
Margin="40,60,0,0" Name="Button1" VerticalAlignment="Top" Width="100" />
Double-click the button and add the code in Listing 5 below to create and fill an OrdersDetailData object and have its data shown in the Microsoft Word report template.
Private Sub Button1_Click(ByVal sender As System.Object, _
                              ByVal e As System.Windows.RoutedEventArgs) _
                          Handles Button1.Click
        Dim OrderDetails As OrderDetailsData = FillOrderDetailsData()
        Call AutomateWord(OrderDetails)
    End Sub
Listing 5. Calling the AutomateWord method.
Conclusion
Silverlight 4 introduces new features that enable the development of sophisticated business applications that deliver much more value than simply advanced graphics in the browser. In this article we saw the power of just two of these features, COM Automation and Local File System access.
The Visual Basic solution for this article can be downloaded in full from by clicking the download link at the top of this article.