In-Depth
Lab Management in Visual Studio2010
Visual Studio Lab Management promises to streamline thorny debug and test challenges by enabling an efficient, virtualized test environment.
Many teams have started improving their software development lifecycle using Visual Studio 2010 and Team Foundation Server 2010. Developers can now easily track their work items, version control their source code and manage builds using Visual Studio 2010. In addition, Visual Studio 2010 brings in a great set of architecture and testing tools to integrate the work of all software engineering disciplines in a project. For instance, software testers can use the new testing tools in Visual Studio to create test plans, run tests on various configurations, collect logs to be included in bugs and generate test reports. So, what else can you do with Visual Studio 2010 to increase your productivity?
What if you could do the following:
- Easily create multi-machine test environments to aid in your development or testing activities.
- Deploy build after build into test environments without having to worry about re-imaging the machines or
uninstalling the earlier builds.
- Increase the build quality by running a set of automated integration tests in addition to unit tests after every build.
- Collect and attach server logs with bugs in addition to client-side logs, so that developers can fix those bugs faster.
In August 2010, Microsoft made Visual Studio Lab Management available without any additional cost for all MSDN subscribers of Visual Studio 2010 Ultimate and Visual Studio Test Professional 2010. For the first time, Lab Management brings the power of virtualization to your Visual Studio-based development process. This article will help you navigate this new technology by describing how it works and how you can realize scenarios such as the ones just described.
How Lab Management Works
Using virtual machines (VMs) for software development has many benefits. Developers can create sand-boxed environments using VMs and install different software components in them without having to worry about conflicts. They can create a virtual hard disk called the golden image with the base OS and all the necessary prerequisite software for their development needs. After working on a copy of that golden image for a while, they can simply discard that and start fresh from another copy of it without having to re-install the OS or prerequisites.
To create VMs, developers often use desktop virtualization tools, such as Microsoft Virtual PC, because they're easy to install on their desktops. However, to run VMs more efficiently, you need a layer of software called hypervisor that runs directly on physical hardware. Microsoft Hyper-V is a hypervisor that's included as part of the Windows Server 2008 R2 OS, or as a standalone, free download product. Using Hyper-V, you can easily host multiple VMs on a single physical computer. The physical computer is then called a Hyper-V host. But, what if you want to set up a shared lab of Hyper-V hosts for the benefit of the entire team? Or, what if you want to manage a library of golden images? That's where Microsoft System Center Virtual Machine Manager (SCVMM) 2008 R2 comes in. SCVMM 2008 R2 is a tool for managing multiple hypervisors. Using SCVMM 2008 R2, you can pool several Hyper-V hosts into a host group. You can also set up a few machines called library servers to store and manage golden images of various OSes that are commonly used in your project. Every time you need to create a new VM, SCVMM 2008 R2 lets you pick a golden image and one of the host groups and provision a VM in a self-service manner.
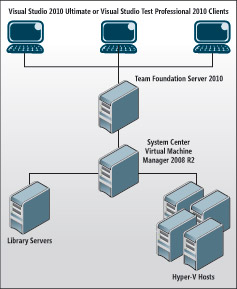
Although SCVMM 2008 R2 is a great management tool for IT administrators, Visual Studio Lab Management makes virtualization features more easily accessible to developers and testers. It's implemented as a service in Team Foundation Server, just like version control or work-item tracking. Internally, this service uses SCVMM 2008 R2 and lets you create and use VM environments on Hyper-V hosts right from Microsoft Test Manager or Visual Studio (see Figure 1).
[Click on image for larger view.] |
| Figure 1. Lab Management Architecture |
Detailed steps for setting up Lab Management can be found in MSDN documentation. In addition, there are several articles on the Visual Studio Lab Management team blog that provide additional guidance on topics such as capacity planning and supported network topologies as you adopt Lab Management.
Creating Environments
Setting up and maintaining environments for development, testing, integration and staging is a painstaking task for software teams.
Visual Studio Lab Management enables your team members to create environments easily in a self-service manner without having to incur long lead times for IT to provision them. An environment in Lab Management is simply a collection of virtual machines, each fulfilling a role for the application you are developing. For instance, an environment can consist of a virtual machine serving as a database and another virtual machine serving as a Web server. Using Lab Management, you can create environments in one of three ways:
- From VMs you already have
- From a set of golden images stored in the library
- By cloning another environment
Creating environments from golden images reduces the duplication of effort because these images can be created once and then reused multiple times.
To prepare a reusable golden image, follow these steps:
- Create a VM with all prerequisites: Prepare one VM for each role that you need for your application under test, and for each configuration that you need of that role. As an example, if your application requires a Web server that has to run on a Windows Server 2008 OS, create one VM with a Windows Server 2008 OS, and enable the IIS role in it.
- Install Visual Studio Agents 2010 in the VM: Visual Studio Agents 2010 is additional software that's available as a free download with Visual Studio 2010. Lab Management requires that you install three agents in the VMs -- Test Agent 2010, Lab Agent 2010 and Build Agent. The software for the first two agents is part of Visual Studio Agents 2010. The software for Build Agent is part of the Team Foundation Server installation. There's a great utility called VM Prep Tool at vslabmgmt.codeplex.com, which can help you simplify the installation of all three agents into a VM.
- Store the VM in the library: The VM Prep Tool also generalizes the VM and stores it as a golden image in the library. Every time you use the golden image for creating a new environment, it'll be customized with a unique computer name. To create an environment from golden images, follow these steps:
- Import the golden images into your team project: Before using the golden images, you have to first import them into your project. Do this from the Library tab under Lab Center in Microsoft Test Manager 2010. When you import the golden image, you have to provide information on how it should be customized every time an environment is created from it. For example, you have to enter a product
key and the Active Directory domain it should be joined to, among other things.
- Create a new virtual environment: Using the Creation Wizard in the Lab tab, select the golden images and create a new environment.
This paradigm of creating an environment on demand from a set of golden images and making that accessible to developers and testers changes the way software teams provision environments. You don't have to perform the repetitive tasks of installing OSes and prerequisites. Later in this article, we'll explore another way of creating environments by cloning them.
Deploying Application Builds
Self-service creation of environments is only the beginning of what you can do with Lab Management. The real value of this technology comes when you start using the rich integration features of those environments. The first such integration is with build automation. Project teams spend significant resources in deploying every build on multiple environments before an application goes into production.
Ad hoc processes are followed to roll back an environment to a clean state and to re-try the process each time a deployment fails. Furthermore, test teams have to repeat the same tests on every build to catch regressions. Although it's expensive for regression tests to be re-run on every build, not doing so often would only delay the detection of problems, thereby affecting the quality of your application.
Lab Management exploits the power of snapshots to simplify the deployment of application builds into an environment. A snapshot is a "marker" of an entire state of an environment at a given point in time. A user can revert to that snapshot at any time, and resume the execution of the machines from exactly the same state they were in when the snapshot was taken. This makes it convenient to preserve the clean state of an environment. One can revert to this clean state before deploying a build or after running tests.
In addition to deploying builds on a clean snapshot, Lab Management also allows you to run a set of automated regression tests on it. This entire build-deploy-test workflow is available just as another build template in Visual Studio.
Follow these steps to create a build-deploy-test workflow:
- Create a build-deploy-test workflow definition: Using Visual Studio Team Explorer, create a new build definition starting from lab default template. While creating the definition select the virtual environment, the clean snapshot to restore the environment to, the definition for compiling sources, the scripts for deployment and the test suite.
- Queue the new build definition: You can either set the build-deploy-test workflow to be triggered manually or on a schedule.
With this, dev teams don't have to worry about consistency of the deployment process in various environments. You don't have to spend time running rollback scripts or performing additional procedures when deployment fails. Simply revert to the clean snapshot of the environment before deploying the next build. You can also run regression and integration tests in addition to unit tests, because you have a real environment on which the build is deployed. Testers will now have a better sense of the build quality.
Running Tests
Finding bugs and identifying steps to reproduce them is still more of an art than science. And because of project deadlines, developers often don't have the time to re-create environments to adequately verify their fixes. These problems often cause software teams to remain inefficient.
All the testing features of Microsoft Test Manager can be exercised on environments created by Visual Studio Lab Management. By using environments either in manual or automated testing, you can collect logs of various forms from all machines in the environment. Testers can attach these logs when they file bugs. In fact, testers can also include a snapshot of the entire environment to the bug.
Developers can then connect to the same environment or to a copy of the environment to reproduce the problem or to validate their fix. Follow these steps to file a bug with snapshot:
- Configure to run your test cases on an environment: Create a Test Settings in Microsoft Test Manager using the same set of roles that you used when creating the environment. Use the Test Settings tab under Lab Center to do this. While running your manual tests, select the option to run the tests on an environment.
- File a rich bug: During your testing session, when you find a bug, take a snapshot of the environment. When a bug is filed, the snapshot and a variety of logs are automatically attached to the bug.
- Reproduce the bug: When a developer sees the bug in Team Explorer, he or she can open the snapshot to connect to the same environment, provided the environment is not in use by the tester.
With this feature, testers don't have to spend time finding a consistent reproduction for an accidental bug they discovered. Coupled with the rich data collection features, snapshots provide all the information necessary for a developer to act upon an issue. The turnaround of a bug that's otherwise spent by developers in reproducing it or in recreating the environment is cut down.
Cloning Environments
Wouldn't you want the testers to use the same environment on which the build-deploy-test workflow was run? When a tester finds a bug, wouldn't you want a developer to use the same environment to verify the fix? But, all this sharing diminishes the productivity of a team, because it requires team members to schedule their time to share environments. Lab Management allows cloning of environments so that every developer and tester can get his own private copy.
Bringing up multiple clones of environments at the same time causes computer name and other networking conflicts. Lab Management solves this problem through a technology called network isolation, which automatically configures the network of VMs and their IP stack to avoid conflicts. Follow these steps to copy environments:
- Configure network isolation: When creating the environment, ensure that network isolation capability is selected.
- Store a fully prepared environment in the library: After working with it (or after filing a bug with snapshot), shut down the environment and store a copy in the library. Once the copying is done, you can continue working with it.
- Create clone: Deploy another copy of the environment from the library. At this point, you have two deployed environments.
Save Time and Resources
Visual Studio Lab Management enables teams to accelerate setup and restoration of complex multi-machine environments to a known clean state for test execution and build automation. It also allows testers to file rich bugs with links to environment snapshots that developers can then use to re-create complex environments, effectively reducing wasted time and resources in development and test lifecycle. With the August release of Lab Management, this set of features is available for you to use, if you're a Visual Studio 2010 Ultimate with MSDN or Visual Studio Test Professional 2010 with MSDN user.
About the Author
Vijay Machiraju is a senior program manager at Microsoft with the Visual Studio Team, leading the engineering effort of various features in Lab Management. Being in the software industry since 1997, he specializes in application lifecycle management, systems management and virtualization. He's the coauthor of "Web Services -- Concepts, Architectures and Applications" (Springer, 2004) and has published at various conferences. Machiraju has a master's degree in computer science from University of Utah in Salt Lake City. You can reach him at [email protected].