C# Corner
Using Push Notifications in Windows 8
Eric Vogel walks through how to send and receive push notifications in a Windows 8 Metro application.
Push notifications have been available on mobile devices for the past few years, but are just recently making their way to the desktop. At last year's BUILD conference, Microsoft announced its push notification strategy for Windows 8, which uses the Windows Push Notification Service (WNS).WNS is very similar to the Microsoft Push Notification Service (MPNS) used by Windows Phone 7 applications. I'll first go over the various types of push notifications available to developers in the current Windows 8 Consumer Preview, and then how to implement each of them.
The three types of push notifications available through WNS are tile, badge and toast.
- A tile notification is used to change the tile displayed on an application's start screen. It can contain an image and/or text.
- A badge notification displays an overlay on top of a tile. It can contain an icon, text or both. One of most common uses for a badge is to notify the user of updated items in an application.
- A toast notification displays an urgent message to the user. Toast notifications are displayed at the top of the screen outside the application, and contain both images and text.
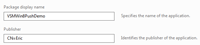
To get started, create a new Windows Metro Style application using the Visual Studio 11 Beta. Next, register the Metro application to be able to retrieve push notifications. You'll need a Windows Live account to sign-in. On the Web form, enter the Package display name and Publisher certificate from the Package.appxmanifest file for your Metro application (Figure 1).

[Click on image for larger view.] |
| Figure 1. Package.appxmanifest of Metro app |
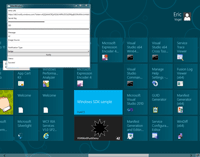
[Click on image for larger view.] |
| Figure 2. Registering a Windows 8 app for push notifications |
You'll then get a package name, client secret and package security identifier (SID), as
Figure 3 shows.
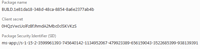
[Click on image for larger view.] |
| Figure 3. WNS registration success |
Copy and paste the package name into the Package Name in the Package.appxmanifest of your application. Make sure to save a copy of your client secret and SID (
Figure 4), as you'll be using those to authenticate with WNS.

[Click on image for larger view.] |
| Figure 4. Updated WNS package name |
Next, you need to register a channel URI in the Metro application, to be able to receive push notifications. You can receive a URI from WNS that can be used to for push notifications through the Push NotificationChannelManager as follows:
var channelOperation = await
Windows.Networking.PushNotifications.PushNotificationChannelManager.
CreatePushNotificationChannelForApplicationAsync();
When the channel's opened, you can retrieve the WNS URI and expiration time to use for sending push notifications to the application. The URI is only valid until the expiration time is reached. For demonstration purposes, I'll register the push URI in the OnNavigatedTo event of the BlankPage code-behind page.
<Grid Background="{StaticResource ApplicationPageBackgroundBrush}">
        <StackPanel Name="PushStack" Margin="8">
            <TextBlock>WNS Push URI</TextBlock>
            <TextBox Name="WnsPushUri" Text="{Binding Path=Uri}" TextWrapping="Wrap"></TextBox>
            <TextBlock>Expiration Date</TextBlock>
            <TextBox Name="ExpirationDate" Text="{Binding Path=ExpirationTime}"></TextBox>
        </StackPanel>
 </Grid>
To bind the data to the form, update the OnNavigatedTo event:
protected async override void OnNavigatedTo(NavigationEventArgs e)
{
    var channelOperation = await Windows.Networking.PushNotifications.PushNotificationChannelManager.
CreatePushNotificationChannelForApplicationAsync();
    PushStack.DataContext = channelOperation;
}
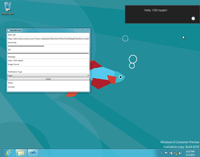
You should be able to load the application and have a WNS Push URI and Expiration Date displayed, as shown in
Figure 5.

[Click on image for larger view.] |
| Figure 5. Push notification-aware Metro app |
The next step is to use the acquired WNS push notifications URI to send push notifications to the application. This can be accomplished in many ways, depending on the application's needs. You could send the URI to a custom Web service that then sends notifications to the application. Another method is to run an Azure worker role Web service that routinely checks a database and sends out push notifications when pertinent data changes. I'll leave you to decide what works best for your applications needs.
Regardless of your setup, the means by which you communicate with WNS to send push notifications to the client application remains the same. You first need to retrieve an OAuth access token from WNS using the secret key and SID for the application. I've created a simple authorization class (Listing 1) called WnsAuthorization that retrieves an OAuthToken from WNS given a valid secret key and SID pair.
Now you can send the various push notifications to WNS with the OAuthToken. I've created a PushNotifer class to make it easier to quickly send a push notification given a push URI and valid access token. The constructor stores the push URI and access token for subsequent requests. The SendNotification method takes a given PushType, text, and image source for the push message. Based off the given PushType, the correct XML is created to be sent to WNS to schedule the push notification. See Listing 2 for the full PushNotifier class code.
The PushNotifier class contains only a small subset of the available badge, tile and toast templates available to WNS consumers. Feel free to update the class as needed to support the needs of your application.
To put everything together, create a new C# WPF Application in Visual Studio 2010 and name it VSMWnsPushNotifier. Next, add the WnsAuthorization and PushNotifier classes detailed in listings 1and 2. Next, create a new class named PushTypeViewModel that contains a Text and Value property.
using System;
using System.Collections.Generic;
using System.Linq;
using System.Text;

namespace VSMWnsPushNotifier
{
    public class PushTypeViewModel
    {
        public string Text { get; set; }
        public string Value { get; set; }
    }
}
Next, open up MainWindow.xaml and insert the markup in Listing 3 to create the UI.
Now it's time to put it all together and send the push notification. First I populate the PushType combo box by enumerating over each of the PushType values in the enum in the LoadPushTypes method.
Next, in the Notify_Click event I retrieve an OAuthToken through the WnsAuthorization class's GetOAuthToken method. Then I retrieve the selected PushType from the combo box. The push notification class is then used to send message. Finally, I update the Status label to display "Success!" if the message was delivered or "Failed to send" if an error occurred. See Listing 4 for the entire MainWindow.xaml.cs code.
Now you should be able to run the Metro Application and send badge, tile and toast notifications as displayed in Figures 6, 7 and 8, respectively.
[Click on image for larger view.] |
| Figure 6. Sending a badge notification - 42 |

[Click on image for larger view.] |
| Figure 7. Sending a tile notification: "Hello, VSM reader!" |
[Click on image for larger view.] |
| Figure 8. Sending a toast notification: "Hello, VSM reader!" |
As you can see, push notifications are a way to distinguish your application. They are also an excellent way to both draw the user back into your application and keep him or her quickly updated on what's important.
Toast notifications should be used judiciously, as they're displayed out of band and could be a nuisance to the user if over-used. I believe that users will come to expect tile and badge notifications and it's best to learn how to utilize them early on.
About the Author
Eric Vogel is a Senior Software Developer for Red Cedar Solutions Group in Okemos, Michigan. He is the president of the Greater Lansing User Group for .NET. Eric enjoys learning about software architecture and craftsmanship, and is always looking for ways to create more robust and testable applications. Contact him at [email protected].