C# Corner
Azure Mobile Services, Part 1
Eric Vogel covers how to create an Azure Mobile Services-backed Windows Store application.
In the past month, Windows Azure has been updated with some new services to widen its reach. Azure Mobile Services is a particularly interesting new service in the Azure ecosystem. When you create an Azure Mobile Service, a Web service is created that may connect to one or many Azure Storage tables. This service is exposed through a REST endpoint that may easily be called by a mobile or smart client application. Today I'll cover how to create an Azure Mobile Service and connect to it via a custom Windows 8 Store Application.
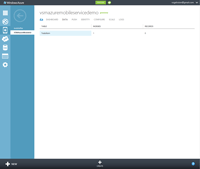
To get started, you'll need a Windows Azure account. A free trial account will do. Once you're set up, make your way here. You should now see a mobile services option on the left-hand side, as shown in Figure 1.
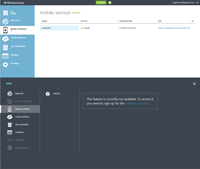
[Click on image for larger view.] |
| Figure 1. Creating the mobile service. |
Click on the Create icon, and you'll be prompted to enter a name for your new mobile service, as shown in Figure 2.
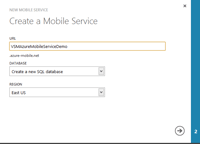
[Click on image for larger view.] |
| Figure 2. Naming the mobile service. |
Next you'll be prompted to enter your database settings for the mobile service. You'll have the option of creating a new database or using an existing one. As you can see in Figure 3, I've chosen to create a new database.
[Click on image for larger view.] |
| Figure 3. Entering database credentials. |
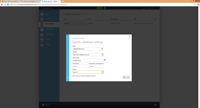
Within about 30 seconds, your new mobile service should be created. The result should look like Figure 4.

[Click on image for larger view.] |
| Figure 4. Waiting for the service to install. |
Select the existing Windows 8 application option, as in Figure 5, then copy the code for creating a MobileServiceClient. This code will be used within the demo application to connect to the mobile service.
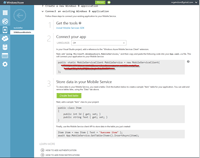
[Click on image for larger view.] |
| Figure 5. The mobile service installed. |
Now that the Web service is set up, it's time to put it to good use. To demonstrate the full capabilities, I'll go over a simple contacts data entry application that showcases CRUD (Create-Read-Update-Delete) with the service.
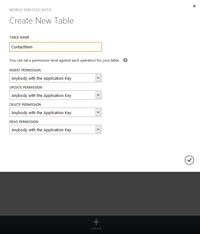
The first thing is to add a ContactItem table in Azure table storage (Figure 6), to store contacts for the application. First click on the Data tab and then click on the Create icon.
[Click on image for larger view.] |
| Figure 6. Adding an Azure Storage table. |
You'll then be prompted to enter a name for the table. Name the table ContactItem and leave the default CRUD permissions, as shown in Figure 7.
[Click on image for larger view.] |
| Figure 7. Adding the ContactItem Azure Storage table. |
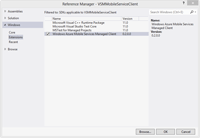
Now that the Web service is fully set up, it's time to put it to good use through a new Windows Store application. Create a new Windows Store App in Visual Studio 2012. Next, add a reference to Microsoft.WindowsAzure.MobileServices to the project, as seen in Figure 8.
[Click on image for larger view.] |
| Figure 8. Adding the Azure Mobile Services SDK client reference. |
Now, open up App.xaml.cs and add code to create the MobileServiceClient for your newly-created Azure Mobile Service:
public static MobileServiceClient MobileService = new MobileServiceClient(
    "Service endpoint URL goes here",
    "serive password goes here");
Your App class should now resemble Listing 1.
Now it's time to add the ContactItem data transfer object class that will be used to transfer contacts to and from the Azure Mobile Service. A ContactItem will contain an Id, first name, last name and email properties. The Id field will be set by the Azure Mobile Service.
namespace VSMMobileServiceClient
{
    public class ContactItem
    {
        public int Id { get; set; }
        public string FirstName { get; set; }
        public string LastName { get; set; }
        public string Email { get; set; }

        public override string ToString()
        {
            return string.Format("{0}, {1}", LastName, FirstName);
        }
    }
}
Next, set up the user interface for the application. Open up MainPage.xaml and insert the XAML from the root <StackPanel> element in
Listing 2.The user will able to enter a first name, last name and email address for the contact. When a contact is added it will be display in the ListBox. When an item's selected, its contents will be loaded and the contact may then be updated or deleted.
Now it's time to bring the application alive. Open up MainPage.xaml.cs. First, add a using statement for System.Threading.Taks. Next, add three member variables that store the list of contacts, the current contact, and a flag for indicating an item is being updated.
List<ContactItem> _contacts;
ContactItem _item;
bool _update = false;
In the MainPage constructor, I set up binding for the editable contact item and initialized the rest of the form via the ClearItems method.
public MainPage()
{
    this.InitializeComponent();
    ClearItem();
}
To initialize the form, a new contact item is created and bound to the form. Then the delete button is disabled and the status is cleared.
private async void ClearItem()
{
    _item = new ContactItem();
    Contact.DataContext = _item;
    Delete.IsEnabled = false;
    _update = false;
    await UpdateStatus(string.Empty);
}
The UpdateStatus method simply clears the Status TextBlock on the form and remains in place for a quarter of a second.
private async Task UpdateStatus(string status)
{
    Status.Text = status;
    await Task.Delay(250);
}
In the OnNavigatedTo event handler, I retrieve the existing contacts via the GetContacts method asynchronously, via the MobileServiceClient instance on the App class. Then the retrieved contacts are bound to the Contacts ListBox on the form.
protected async override void OnNavigatedTo(NavigationEventArgs e)
 {
     await GetContacts();
 }

private async Task GetContacts()
 {
     _contacts = await App.MobileService.GetTable<ContactItem>().ToListAsync();
     Contacts.ItemsSource = _contacts;
 }
Next, the click button handler is set up to either insert or update the contact item loaded in the form. Once the item is saved, the Status label is updated to display "Saved" to the user, and the list of contacts is updated. Finally, the form is cleared to allow a fresh item to be added.
private async void Save_Click(object sender, RoutedEventArgs e)
 {
     if (_update)
         await App.MobileService.GetTable<ContactItem>().UpdateAsync(_item);
     else
         await App.MobileService.GetTable<ContactItem>().InsertAsync(_item);

     await UpdateStatus("Saved");
     await GetContacts();
     ClearItem();
 }
In the Contacts LisBox SelectionChanged event, I get the selected item and then bind the item to the form. Then the update flag is turned on and the Delete button is enabled.
Lastly, the Delete Click event handler is added. When the Delete button is clicked, the loaded item in the form is deleted via the MobileService instance. Then the Status label is updated to display "Deleted" to the user. Finally, the form is cleared and then the Contact list is rehydrated via the GetContacts method. See Listing 3 for the full MainPage class source code. The completed application is shown in Figure 9.
Congratulations -- you've just created your first Azure Mobile Service client application!
[Click on image for larger view.] |
| Figure 9. The finished application. |
As you can see, Azure Mobile Services is an interesting cloud service offering. With just a few clicks, you can set up a full cloud storage-backed Web service that can be quickly integrated into a Windows Store application. In the next article, I'll cover how to add authentication and push notifications to the mobile service and sample application.
About the Author
Eric Vogel is a Senior Software Developer for Red Cedar Solutions Group in Okemos, Michigan. He is the president of the Greater Lansing User Group for .NET. Eric enjoys learning about software architecture and craftsmanship, and is always looking for ways to create more robust and testable applications. Contact him at [email protected].