Code Focused
How To Refactor For Dependency Injection, Part 4: Configuration Changes
Ondrej Balas continues his series on refactoring code for dependency injection, looking at patterns and strategies for changing application behavior after it has already been compiled.
- By Ondrej Balas
- 08/11/2014
So far in this series on dependency injection (DI), I have only talked about the configuration of the container being done at compile time. This works well for most applications and is my preferred way of doing things, but there are times in which the decisions about application composition need to occur at deployment time or even runtime. There are a few techniques that can be used, depending on how much control is needed after compilation. The techniques fall into a spectrum, from code-only configuration where bindings are configured at compile time, to XML configuration where the bindings are spelled out in an XML file and processed at runtime.
In the early days of DI containers, XML configuration was the generally recognized method of configuring a container. As time went on and fluent interfaces became popular, the focus shifted away from XML configuration and more toward using code as configuration. By using code as configuration you gain all the benefits of the compiler checking your types for you, making configuration much easier. Now, in modern DI, XML configuration is seldom used, and instead techniques that involve code configuration are used.
Binding Primitive Types
The most common technique I use is to put things such as connection strings into configuration files, which are read by the DI container and then injected into the objects that need them. The problem with that approach is that it leads to binding statements like this:
string connectionString = ConfigurationManager.ConnectionStrings["SQLMaster"].ConnectionString;
kernel.Bind<string>().ToConstant(connectionString);
kernel.Bind<IRepository>().To<ProductRepository>();
Now, any object that requires a string in its constructor will be given the same string, and having multiple string bindings gets tricky. One way to solve that problem is to use something called conditional binding. With conditional binding you can specify that a binding only be active when being injected into a specific type, like this:
string connectionString = ConfigurationManager.ConnectionStrings["SQLMaster"].ConnectionString;
kernel.Bind<IRepository>().To<ProductRepository>();
kernel.Bind<string>().ToConstant(connectionString)
  .WhenInjectedInto<ProductRepository>();
Another option is the more delicate named-constructor conditional binding:
string connectionString = ConfigurationManager.ConnectionStrings["SQLMaster"].ConnectionString;
kernel.Bind<IRepository>().To<ProductRepository>()
  .WithConstructorArgument("connectionString", connectionString);
While those methods both work, I find them to be somewhat cumbersome. My preferred method is to use purpose-built objects for holding that information. By doing that, the bindings turn into this:
string connectionString = ConfigurationManager.ConnectionStrings["SQLMaster"].ConnectionString;
kernel.Bind<SqlConnectionString>()
  .ToConstant(new SqlConnectionString() {ConnectionString = connectionString});
kernel.Bind<IRepository>().To<ProductRepository>();
ProductRepository would then have a constructor that takes an SqlConnectionString object rather than just a string. This method removes both the ambiguity that results from the binding of primitive types, as well as the frailty that comes with using "magic strings" to reference parameter names.
Configuration Sets
Taking things a step beyond the binding of primitives is the idea of configuration sets, where flags can be used to switch between various complex configurations. The terminology for this feature varies between DI containers, but most containers support this feature. In Ninject, bind statements can be grouped into sub-containers called Modules, whereas in Castle Windsor they're called Installers.
To create a module in Ninject, create a class that inherits from NinjectModule like this:
public class LiveDataModule : NinjectModule
{
  public override void Load()
  {
    Bind<IRepository>().To<ProductRepository>();
  }
}
At this point you can read from the config file or use conditional-compilation constants to load in the right modules. Often when developing applications I like to create a fake data layer by using a fake library, and then using a "FAKE" compile-time constant along with modules to load in the appropriate configuration. This makes my composition root end up looking like this:
  kernel.Load<DefaultModule>();
#if FAKE
  kernel.Load<FakeModule>();
#else
  kernel.Load<LiveDataModule>();
#endif
This same technique can be used to make decisions at run time based on user input. Instead of using conditional-compilation constants, you could ask the user which mode they want to run in when the composition root is initialized, and load the appropriate modules based on that input.
XML Configuration
XML configuration is at the extreme end of being able to change an application's behavior after compilation. I must warn you, however, that using XML configuration will cause the composition of your application to be brittle and prone to human error. If one character is off, or if an assembly cannot be accessed, your application will fail.
The good news, though, is that if you do need to use XML configuration within your application, it's pretty easy to get started. If you're using Ninject, you'll need to grab the extension Ninject.Extensions.Xml from NuGet, and then add a reference to it. If you're not familiar with NuGet, check out my article on the SelfHosted Web API, which starts off with a brief introduction to NuGet.
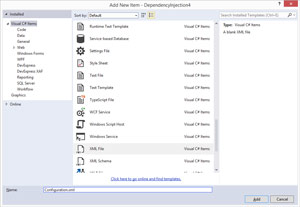
The next thing you'll need to do is create an XML file. You can do that within Visual Studio by going to the Project menu and selecting Add New Item… and then choosing XML File, as shown in Figure 1. In my demo project, I bind the IRepository to ProductRepository by putting the following code into my Configuration.xml file:
<?xml version="1.0" encoding="utf-8" ?>
<module name="DefaultConfigurationModule">
  <bind service="DependencyInjection4.IRepository, DependencyInjection4"
    to="DependencyInjection4.ProductRepository, DependencyInjection4" />
</module>
 [Click on image for larger view.]
Figure 1. Creating an XML File in Visual Studio
[Click on image for larger view.]
Figure 1. Creating an XML File in Visual Studio
The module element is the required root element into which you can put bindings. Each bind statement has a serviceattribute and a to attribute, which behave just like the bind statement with which you're familiar. The difference is that you have to use the full path of the object, including its namespace, and then the assembly. In my case, both IRepository and ProductRepository are in the DependencyInjection4 namespace, and also within the DependencyInjection4 assembly. This will differ in your application.
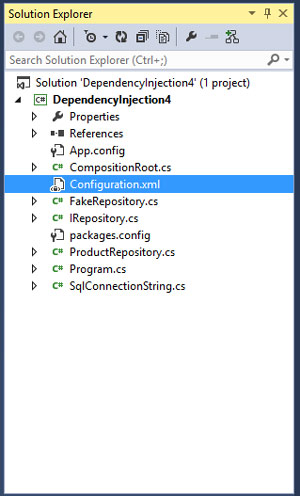
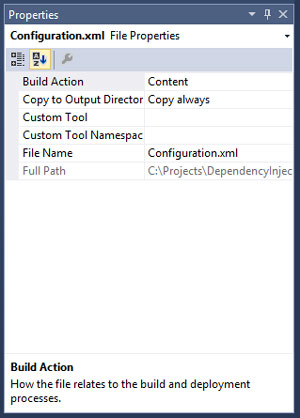
Before you can load the XML file, you'll need to make sure it gets output to the build directory. You can do this by finding the file in Solution Explorer as shown in Figure 2, right-clicking it, and selecting Properties to see the properties for the file. Once in the properties window, set Copy to Output Directory to Copy always, as shown in Figure 3.
 [Click on image for larger view.]
Figure 2. Selecting the XML File in Solution Explorer in Visual Studio
[Click on image for larger view.]
Figure 2. Selecting the XML File in Solution Explorer in Visual Studio
 [Click on image for larger view.]
Figure 3. Setting the Copy to Output Directory to Copy Always for the XML File
[Click on image for larger view.]
Figure 3. Setting the Copy to Output Directory to Copy Always for the XML File
Finally, alter your composition root to load in the XML file like this:
string connectionString = ConfigurationManager.ConnectionStrings["SQLMaster"].ConnectionString;
kernel.Bind<SqlConnectionString>()
  .ToConstant(new SqlConnectionString() { ConnectionString = connectionString });
kernel.Load("Configuration.xml");
And that should be it! If anything goes wrong, check your Output Directory to make sure the XML file exists there, and verify the contents of the file are correct. For more information on using XML configuration with Ninject, check out the Getting Started documentation on GitHub.
Wrapping Up
Though I generally don't prefer to use XML configuration anymore, it can still have its place in specialized situations. Before using it, be sure to consider the other options that I've presented, and make the best choice for the needs of your application.
At the beginning of this article there's a link to download a simple project containing the code I've presented here.
Up to now I've been focusing on my favorite DI container, Ninject. Next month, I aim to show the differences between some of the more popular containers.
About the Author
Ondrej Balas owns UseTech Design, a Michigan development company focused on .NET and Microsoft technologies. Ondrej is a Microsoft MVP in Visual Studio and Development Technologies and an active contributor to the Michigan software development community. He works across many industries -- finance, healthcare, manufacturing, and logistics -- and has expertise with large data sets, algorithm design, distributed architecture, and software development practices.