Tips and Tricks
Creating SharePoint 2013 Workflow Apps with Visual Studio
SharePoint 2013 workflows for automating common business processes can be deployed as SharePoint apps built using Visual Studio.
- By Malin De Silva
- 03/12/2015
Modern organizations have well-defined business processes that can be programmatically automated through SharePoint. Consider the leave-approval process. An employee asking for an annual leave needs to get approval from an immediate manager, then it goes to a department head for approval, then an HR manager needs to approve it to complete the process. Of course, there might be other conditions in a real-world scenario, such as annual leave requests needing at least a three-week's advance notice prior to the start date. For casual, short-term leave there might be no need for department head approval.
These types of business processes can be automated through a workflow engine with custom logics applied. In this article, I'll develop a workflow in SharePoint 2013 and deploy it as an app using Visual Studio.
Workflows in SharePoint 2013
SharePoint 2013 workflows are powered by Windows Workflow Foundation 4. The activities defined in Windows Workflow Foundation are used in SharePoint 2013 to implement the logic and flows of the business processes.
Workflows are created in one of three ways:
- Out-of-the-box SharePoint workflows that can be configured through a Web browser.
- SharePoint Designer workflows can be further customized with logic built-in.
- Visual Studio workflows have the most customizable features with more custom logic components.
There are also many third-party custom workflow engines that can be used to create workflows in SharePoint.
SharePoint has three types of workflows:
- Site Workflows can be used across anywhere within the site.
- List workflows are attached to a specific list and can be initiated when a list item is added or updated.
- Reusable workflows are attached to a particular content type and can be created only using SharePoint Designer.
Prior to SharePoint 2013, SharePoint workflows used the same application pool to run workflows. This resulted in many performance issues with the entire farm when there are long-running workflows. SharePoint 2013 is designed with a new workflow execution engine hosted outside SharePoint -- you'll need to install the Workflow Manager in the server farm in order to run those workflows.
SharePoint 2013 also supports SharePoint 2010 workflows that are built on Windows Workflow Foundation 3, with SharePoint workflow interop. Microsoft provides this to make the workflow migration procedure easier.
Visual Studio Workflow Authoring Types
Visual Studio workflows can be divided into three types by the means of authoring:
- Sequential
- Flowchart
- State machine
A sequential workflow executes according to a particular order -- it might have some decision points, but once it moves forward, it cannot backtrack.
A flowchart workflow provides the ability to move around to different sections according to the conditions specified in the logic.
A state machine workflow maintains state and allows the workflow to stay in many states according to the events happening around it. It differs from a fowchart because it doesn't follow a specific path of execution.
Prerequisites
The following environment configurations are needed to start building workflows for SharePoint 2013.
- SharePoint Server 2013 with KB2767999
- Visual Studio 2012 Update 2 (KB2797912) or newer
- Microsoft .NET Framework 4.5 Update (KB2750149)
- Office Developer Tools for Visual Studio 2012 or newer
- Workflow Manager 1.0 Cumulative (KB2799754)
If you are deploying a workflow for Office 365, it already comes with the necessary features activated. All you need is a Visual Studio version newer than the ones mentioned in these prerequisites.
Sample Scenario
I'll show how to create a basic workflow using Visual Studio. Imagine a scenario for budget approval. Certain processes are set in order to manage the approval depending on the budget amount. Here are the two scenarios:
- If the amount is less than or equal to $100USD, it will be approved directly.
- If the amount is greater than $100USD and less than or equal to $500USD, it needs to be approved by a member of the "Approvers" SharePoint group in the host Web.
This SharePoint app will provide the budget approval functionality, and it will be deployed to a development site hosted on Office 365. The app will contain four components:
- BudgetApproval list
- BudgetApproval workflow
- WorkflowTask list
- WorkflowHistory list
Creating the Visual Studio Solution
To start, create a new project with the App for SharePoint template under the Office/SharePoint section and name it BudgetApprovalWorkflow. Next, give a SharePoint developer site URL for debugging the app and select SharePoint-hosted as the hosting option. You might be asked to enter the credentials to the developer site. In my case I'm deploying the app to a SharePoint site on Office 365.
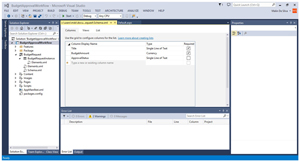
Right-click on the project in Solution Explorer and add a new List in the Office/SharePoint section of the Add New Item window. Name it BudgetRequest and select the Default (Custom List) template.
Add two columns to the list definition named BudgetAmount (Currency-Required) and ApprovalStatus (Single Line of Text). The list definition should look like Figure 1.
 [Click on image for larger view.]
Figure 1. Adding BudgetAmount and ApprovalStatus to the Newly Added List Definition
[Click on image for larger view.]
Figure 1. Adding BudgetAmount and ApprovalStatus to the Newly Added List Definition
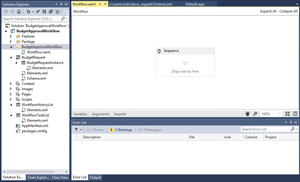
Right-click on the project in Solution Explorer and add a new Workflow in the Office/SharePoint section of the Add New Item window. Name it BudgetApprovalWorkflow. Define it as a List Workflow in the SharePoint Customization Wizard window and click Next. Select the BudgetRequest list as the list to associate with and select the <Create New> option for the history list and task list as shown in Figure 2.
 [Click on image for larger view.]
Figure 2. Associating BudgetApprovalWorkflow with BudgetRequest List
[Click on image for larger view.]
Figure 2. Associating BudgetApprovalWorkflow with BudgetRequest List
Click Next and select "The workflow starts automatically when an item is created." Click Finish to add the workflow. You'll notice a WorkflowHistoryList and WorkflowTaskList also added to the Solution Explorer, as shown in Figure 3. The task list will create tasks for the approval process and history list will log messages for the workflow.
 [Click on image for larger view.]
Figure 3. Adding BudgetApprovalWorkflow Automatically Adds WorkflowHistoryList and WorkflowTaskList
[Click on image for larger view.]
Figure 3. Adding BudgetApprovalWorkflow Automatically Adds WorkflowHistoryList and WorkflowTaskList
Implementing Workflow Logic
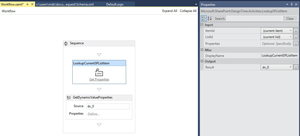
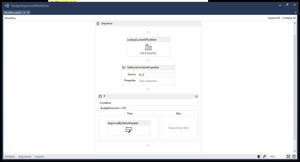
The workflow designer window should appear open with one Sequence activity on it. First, you should get the value of the BudgetAmount column. Go to Toolbox window and drop a LookupSPListItem inside the Sequence activity. It will display an error, "Value for a required activity argument 'ListId' was not supplied." Select LookupSPListItem and focus on the Properties window. Set the following values: ItemId: (current item), ListId: (current list) and DisplayName: LookupCurrentSPListItem.
Next, click the Get Properties link in the LookupCurrentSPListItem activity. Clicking that will add a new activity to the design canvas named GetDynamicValueProperties, as seen in Figure 4.
 [Click on image for larger view.]
Figure 4. Click Get Properties Under LookupCurrentSPListItem Activity Adds GetDynamicValueProperties Activity
[Click on image for larger view.]
Figure 4. Click Get Properties Under LookupCurrentSPListItem Activity Adds GetDynamicValueProperties Activity
It will also change the Result property of the LookupCurrentSPListItem to dv_0.
Now click on the "Define…" text in the Properties property of the GetDynamicValueProperties activity. This will open the Properties window. Select "List Item of BudgetRequest" as the Entity Type. Select BudgetAmount for the path property and click the Populate Variables link. This will add a variable named BudgetAmount and assign the property value to it as shown in Figure 5. Then click OK.
 [Click on image for larger view.]
Figure 5. Click Populate Variables Under BudgetAmount
[Click on image for larger view.]
Figure 5. Click Populate Variables Under BudgetAmount
So now you have a C#.NET variable named BudgetAmount that will have the list item value of the BudgetAmount field.
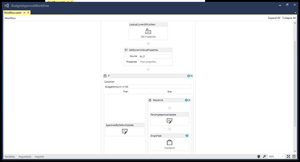
Now, select If activity from the Toolbox and drop it as the last activity. It will display a warning, saying condition is not specified for the If activity. In the Condition property of the If element, type BudgetAmount <= 100. This will do a check for the variable value to be less than or equal to 100.
Now you need to update the status column straight away as Approved by default if the value is less than or equal to 100. Drop an UpdateListItem activity from the toolbox to the Then section of the If activity. Set the properties of that activity as follows: ItemId: (current item), ListId: (current list) and DisplayName: ApprovedByDefaultUpdate.
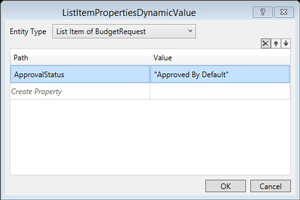
Also, click on the "…" button related to ListItemPropertiesDynamicValue property of the ApprovedByDefaultUpdate activity in order to set the fields that needed to be changed.
Select the entity type as "List Item of BudgetRequest" and select ApprovalStatus for path and set its value to "Approved By Default" with the double quotes in it, as shown in Figure 6.
 [Click on image for larger view.]
Figure 6. Setting ApprovedByDefaultUpdate Activity's Properties
[Click on image for larger view.]
Figure 6. Setting ApprovedByDefaultUpdate Activity's Properties
The flow of the workflow should look like Figure 7.
 [Click on image for larger view.]
Figure 7. The Finished Version of the Budget Amount Workflow
[Click on image for larger view.]
Figure 7. The Finished Version of the Budget Amount Workflow
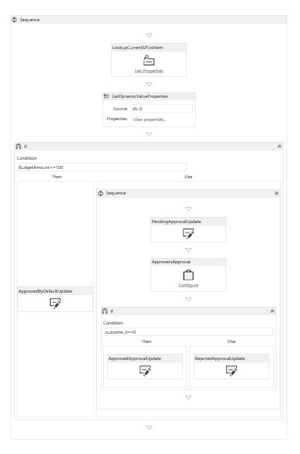
Now that you're done with the logic for budget amounts less than or equal to $100USD, you'll implement the logic for the Else branch of the If activity. This branch has a task approval that might take some time for approvers to approve. Therefore, at the beginning of the Else branch, you'll update the approval status for "Pending approval from approvers."
Right-click on the ApprovedByDefaultUpdate activity inside the Then branch and select copy option. Then right-click on the area with Drop activity here inside the Else branch and paste it. Now, select it and change the following properties:
- DisplayName: PendingApprovalUpdate
- ApprovalStatus coloumn value in ListItemPropertiesDynamicValue: Pending approval from approvers
Other properties do not need to be changed as the activity was copied and pasted.
The next step is to create a task to be approved by the Approvers SharePoint group. Select a Single Task activity from Toolbox and drop it below the PendingApprovalUpdate activity, as shown in Figure 8.
 [Click on image for larger view.]
Figure 8. Creating Task Approval for Approvers SharePoint Group
[Click on image for larger view.]
Figure 8. Creating Task Approval for Approvers SharePoint Group
Select the SingleTask activity and change its properties as follows (see Figure 9):
- AssignedTo: "Approvers"
- DefaultTaskOutcome: Rejected
- Title: "Budget Approval"
- DisplayName: ApproversApproval
This will rename the activity to ApproversApproval. Also note that this will set the Outcome property value to outcome_0. This is an integer value where value 0 represents approved and 1 represents rejected.
 [Click on image for larger view.]
Figure 9. Change SingleTask Activity
[Click on image for larger view.]
Figure 9. Change SingleTask Activity
When a task is created, it sends an e-mail notification to the people who are assigned the task. In this case it's the Approvers SharePoint group. That e-mail notification can be customized through the Email properties in the SingleTask activity, which are collapsed in Figure 9.
You're almost done. All that's left is to update the status of the value of the outcome_0 variable. So, drop an If activity below the ApproversApproval activity and set the condition to "outcome_0==0" without the double quotes.
Then make a copy of the ApprovedByDefaultUpdate activity as you did before and paste a copy of each in the Then and Else branches.
Update the properties of the "ApprovedByDefaultUpdate" activity in the Then branch as follows:
- DisplayName: ApprovedApprovalUpdate
- ApprovalStatus coloumn value in ListItemPropertiesDynamicValue: "Approved by approvers"
Update the properties of the "ApprovedByDefaultUpdate" activity in the Else branch as follows:
- DisplayName: RejectedApprovalUpdate
- ApprovalStatus coloumn value in ListItemPropertiesDynamicValue: "Rejected by approvers"
The final workflow diagram should look like Figure 10.
 [Click on image for larger view.]
Figure 10. Finished Version of Task Approval Workflow
[Click on image for larger view.]
Figure 10. Finished Version of Task Approval Workflow
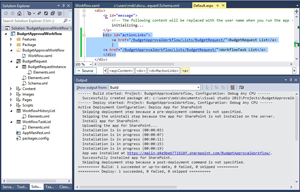
Now, add two links to the Default.aspx in order to make it easier for the users to navigate between the BudgetRequest list and the WorkflowTask list. Add the following HTML under the paragraph element with the id message inside the Default.aspx file:
<div id="actionLinks">

    <a href="/BudgetApprovalWorkflow/Lists/BudgetRequest/">BudgetRequest List</a>

              |

    <a href="/BudgetApprovalWorkflow/Lists/BudgetRequest/">WorkflowTask List</a>

  </div>
Now you can deploy the app to the desired developer SharePoint site by right-clicking on the project and selecting Deploy Solution. Check the output window of the deployment and you'll be able to find the app URL, as shown in Figure 11.
 [Click on image for larger view.]
Figure 11. Deploying the Solution
[Click on image for larger view.]
Figure 11. Deploying the Solution
Testing the App
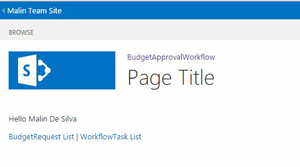
The landing page of the app will be displayed as shown in Figure 12.
 [Click on image for larger view.]
Figure 12. Workflow App Landing Page
[Click on image for larger view.]
Figure 12. Workflow App Landing Page
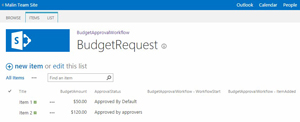
Now, go to the app homepage and click on the BudgetRequest List URL. You'll be taken to the list, where you can add new items. Try adding 50 as the BudgetAmount and what you'll see is the ApprovalStatus column will be updated to Approved By Default. Then add a new item with the value 120. A task will be created in the task list, which you can navigate to through the WorkflowTask List link in the app homepage (Default.aspx). Meanwhile, the ApprovalStatus column of the list should be updated as "Pending approval from approvers." Next, go to the task list and approve the task related to the added item. The related item of the BudgetRequest list will then show its ApprovalStatus column value as "Approved by approvers" (see Figure 13).
 [Click on image for larger view.]
Figure 13. Testing the App -- If It Works, Column Displays "Approved by approvers"
[Click on image for larger view.]
Figure 13. Testing the App -- If It Works, Column Displays "Approved by approvers"
That's an App
I showed a sequential workflow deployed as a SharePoint app, but you can also create state machine workflows and deploy any of them as farm solutions. The possibilities are endless with SharePoint.