Tips and Tricks
Build a Windows Phone App for Consuming SharePoint 2013 Data
SharePoint 2013 offers several ways to interact with the SharePoint data, one of which is through the SharePoint SDK for Windows Phone 8. Malin De Silva walks through the process.
- By Malin De Silva
- 06/10/2015
For quite some time, IT has taken seriously the use of mobile devices for real work within the enterprise. Microsoft has been moving in the direction of providing developers with the ability to create mobile apps to handle serious business processes, and those capabilities are in SharePoint. Microsoft recently released some enhanced functionality to allow SharePoint data to be easily accessed and integrated into Windows Phone application. In this article, I'll show how to work with the SharePoint integration templates to perform basic operations within a Windows Phone application.
To develop a Windows Phone application, you need to have an accessible SharePoint 2013 environment or a SharePoint online account. If you don't have any, you can simply sign up for a trial account.
The client machine that you'll use to develop the Windows Phone application will need to have Windows 8 or Windows 8.1. Then you need to install the Windows Phone SDK 8.0, as you'll be using Visual Studio 2012 Express Edition for Windows Phone. If you have another Visual Studio version, you can add Windows Phone development tools into the installation. Also make sure you stay up to date with the Visual Studio installation or you may end up with compatibility issues with the emulators.
Finally, you need to install Microsoft SharePoint SDK for Windows Phone 8. The installation process will add two Windows Phone templates: Windows Phone SharePoint List Application Template and Windows Phone Empty SharePoint Application template. This installation will include the required runtime assemblies along with SharePoint 2013 CSOM libraries and SharePoint 2013 authentication library.
Let's walk through a simple business requirement. I have a SharePoint list created with a custom list template named TestCustomList in one of my SharePoint online sites. This list has two columns that are editable through the new and edit forms:
- Title: Single line of text column
- Description: Multiple lines of text column
My requirement is to make sure that I can view the list items and add new list items through my Windows Phone application.
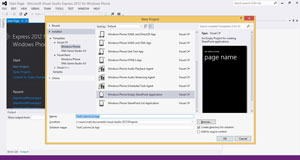
With Visual Studio Express for Windows Phone installed in my development machine, I start by creating a new project with the Windows Phone Empty SharePoint Application template located under Templates | Visual C# | Windows Phone. Name the project TestCustomList.App as shown in Figure 1. SharePoint application templates for Windows Phone are not yet available for VB.net.
 [Click on image for larger view.]
Figure 1: TestCustomList.App
[Click on image for larger view.]
Figure 1: TestCustomList.App
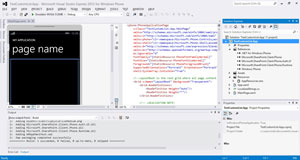
This will create a project with following assemblies referenced by default as shown in Figure 2.
- Microsoft.SharePoint.Client.Phone
- Microsoft.SharePoint.Client.Phone.Auth.UI
- Microsoft.SharePoint.Client.Phone.Runtime
 [Click on image for larger view.]
Figure 2: TestCustomList.App with Assemblies
[Click on image for larger view.]
Figure 2: TestCustomList.App with Assemblies
Apart from that the MainPage.xaml.cs file has included a using statement for Microsoft.SharePoint.Client namespace.
I can use the MainPage.xaml file to display the items in the TestCustomList list. I will create another page for adding a new list item. Right-click on the project in the Solution Explorer and Add | New Item and select Windows Phone Portrait Page with the name AddItem.xaml.
Next I need to add a C# entity class that represents a TestCustomList item. Right-click on the project in the solution explorer and Add | New Item and select Class with the name CustomListEntity.cs. Replace the content inside the class with this code:
class CustomListEntity
{
public string Title { get; set; }
public string Description { get; set; }

public CustomListEntity(ListItem item)
{
this.Title = item["Title"].ToString();
this.Description = item["Description"].ToString();
}
}
You will also need to add the using statement for referencing the Microsoft.SharePoint.Client namespace.
Enabling Authentication
SharePoint needs authentication that will be only necessary one time. You can access the SharePoint site if it is online or when you are available within the network. The task I have to do is really simple. Go to the App.xaml.cs file and add this code snippet for getting the context:
//Private instance of ClientContext
private static ClientContext _mContext;
//Public property returning client context
public static ClientContext Context
{
get
       {
       	if (_mContext != null)
              	return _mContext;
              //Create object of ClientContext by passing SharePoint Site URL
              _mContext = new ClientContext("<<SharePoint site url>>");
              //Create authenticator which will hold authentication data for context
              var at = new Authenticator { CookieCachingEnabled = true };
              //Use at.AuthenticationMode property to set auth mode. Nothing for default
              //Set authenticator to context
              _mContext.Credentials = at;
              return _mContext;
        }
}
You will need to add a using to reference the Microsoft.SharePoint.Client namespace. Depending on the authentication mode that needs to be resolved, you can set the authentication mode of the Authenticator. By default it is set to Default, but these are the other vailable authentication modes:
- Anonymous
- FormsAuthentication
- MicrosoftOnline
Given the CookieCachingEnabled property to true, this will not keep requesting for credentials every time I make a request for the context. Replace <<SharePoint site url>> in the code snippet with the url string for the SharePoint site in order to make this functional.
Reading SharePoint List Items
As I mentioned, MainPage will be responsible for reading the list items available within the TestCustomList. MainPage reads from the SharePoint list and binds the two values, the Title and Description column values, to a ListBox available.
Replace the content for Grid and name it LayoutRoot, as shown in Listing 1.
Listing 1: LayoutRoot Template
<Grid x:Name="LayoutRoot" Background="Transparent">
        <Grid.RowDefinitions>
            <RowDefinition Height="Auto"/>
            <RowDefinition Height="*"/>
        </Grid.RowDefinitions>

        <StackPanel x:Name="TitlePanel" Grid.Row="0" Margin="12,17,0,28">
            <TextBlock Text="SharePoint Data" Style="{StaticResource PhoneTextNormalStyle}" Margin="12,0"/>
            <TextBlock Text="Read List" Margin="9,-7,0,0" Style="{StaticResource PhoneTextTitle1Style}"/>
        </StackPanel>

        <Grid x:Name="ContentPanel" Grid.Row="1" Margin="12,0,12,0">
            <ListBox x:Name="DemoList">
                <ListBox.ItemTemplate>
                    <DataTemplate>
                        <StackPanel>
                            <TextBlock FontSize="30" Text="{Binding Title}" />
                            <TextBlock TextWrapping="Wrap" FontSize="15" Text="{Binding Description}" />
                        </StackPanel>
                    </DataTemplate>
                </ListBox.ItemTemplate>
            </ListBox>
        </Grid>
    </Grid>
This is the template available for displaying the list items.
Now let's add the code required to set the values for the list items.
First add two private variables with a type list and a list item collection:
private List Customlist;
private ListItemCollection ListItemcollection;
Then add a method that will execute when the page is loaded by adding the following code to the constructor:
Loaded += MainPage_Loaded;
In the MainPage_Loaded method add the following code to load the list items from the TestCustomList. This will load the list items to the ListItemcollection private variable available at the class, as shown in Listing 2.
Listing 2: MainPage_Loaded
void MainPage_Loaded(object sender, RoutedEventArgs e)
{
//Get the top level Web site
       var web = App.Context.Web;
       //Fetch the desired list by title inside the web selected above
       Customlist = web.Lists.GetByTitle("TestCustomList");
       //Create a query to load all items/fields in that list
       var camlQuery = CamlQuery.CreateAllItemsQuery();
       //Fetch the items from that list using above query
       ListItemcollection = Customlist.GetItems(camlQuery);
       //Load the web app
       App.Context.Load(web);
       //Load the collection
       App.Context.Load(ListItemcollection);
       //Execute the query NOW providing Success & Failure callbacks
       App.Context.ExecuteQueryAsync(SucceededCallback, FailedCallback);
}
Listing 3 is an asynchronous call, which has two callbacks for success and failure. We need to bind the list items to the ListBox on the query execution success and show an error message on the fail callback.
Listing 3: Callbacks for Success or Failure
private void FailedCallback(object sender, ClientRequestFailedEventArgs args)
{
MessageBox.Show("Request Failed");
}

private void SucceededCallback(object sender, ClientRequestSucceededEventArgs args)
{
//Create temp list to hold items
       var list = new List<CustomListEntity>();
       //Iterate through all the items
       foreach (var item in ListItemcollection)
       {
       	//Get title and add to temp list
              list.Add(new CustomListEntity(item));
}
       //On UI thread bind temp list to ListBox
       this.Dispatcher.BeginInvoke(() =>
       {
       	DemoList.ItemsSource = list;
});
}
Here I have created a collection of CustomListEntity which is a type of List (not SharePoint). Then I am binding them as the Item source for the ListBox named DemoList. Given the CustomListEntity type has two properties named Title and Description, they will be bound to the ListBox available in the MainPage.xaml.
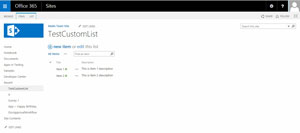
Just before running the application, check out the result of my SharePoint list in Figure 3. It has two list items I added manually through the browser UI.
 [Click on image for larger view.]
Figure 3: SharePoint List Results
[Click on image for larger view.]
Figure 3: SharePoint List Results
Given we have done the functionality required for displaying the list items, let's run the Windows Phone Application.
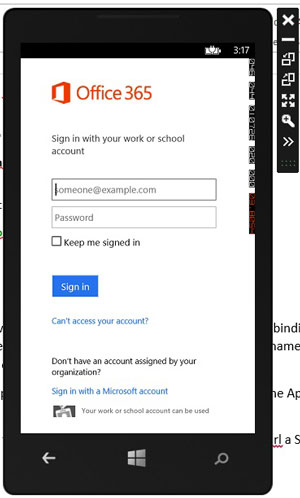
As shown in Figure 4 it prompts for the credentials to the SharePoint online site as I have set the site url to a specific SharePoint online site. Once I entered them, they will be cached and the app will not prompt for it again.
 [Click on image for larger view.]
Figure 4: Prompting for Credentials
[Click on image for larger view.]
Figure 4: Prompting for Credentials
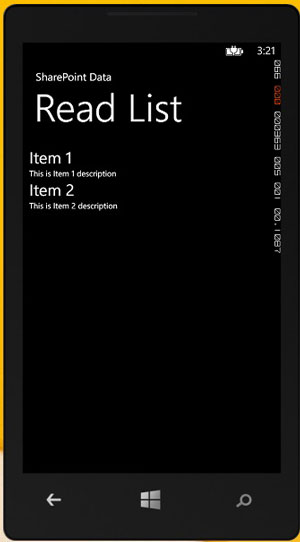
After a successful login I can see the two items that were available in the list within the Windows Phone application as shown in Figure 5.
 [Click on image for larger view.]
Figure 5: App Now Shows Two New Items
[Click on image for larger view.]
Figure 5: App Now Shows Two New Items
Let's move on and focus on adding new items to the list through the Windows Phone app.
There is a method call to the BuildLocalizedApplicationBar method in the default constructor of the MainPage.xaml.cs. First uncomment it:
BuildLocalizedApplicationBar();
Replace the BuildLocalizedApplicationBar method with the following:
private void BuildLocalizedApplicationBar()
{
ApplicationBar = new ApplicationBar();

       ApplicationBarMenuItem appBarMenuItem = new ApplicationBarMenuItem(AppResources.AppBarButtonText);
appBarMenuItem.Click += appBarMenuItem_Click;
       ApplicationBar.MenuItems.Add(appBarMenuItem);
}
Then add the appBarMenuItem_Click event to the same class by adding the following code:
void appBarMenuItem_Click(object sender, EventArgs e)
{
NavigationService.Navigate(new Uri("/AddItem.xaml", UriKind.Relative));
}
This will add an app bar menu item in the MainPage.xaml page that will navigate to the AddItem.xaml page when that menu item is clicked.
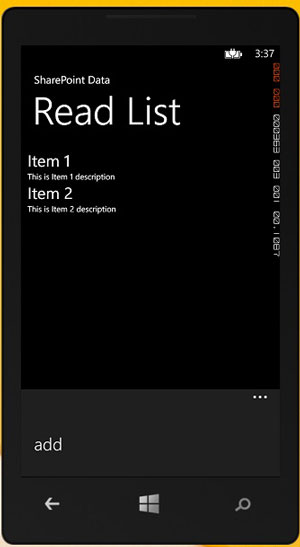
Run the application and make sure the menu item appears and navigates when it is clicked; it should look like Figure 6.
 [Click on image for larger view.]
Figure 6: Menu Item Should Now Appear When Clicked
[Click on image for larger view.]
Figure 6: Menu Item Should Now Appear When Clicked
Now we'll add the functionality to add items to the list. Open the previously added AddItem.xaml file from Solution Explorer and replace the content inside the Grid element named LayoutRoot with the code in Listing 4.
Listing 4: Adding Two Text Boxes for Title and Description
<Grid x:Name="LayoutRoot" Background="Transparent">
        <Grid.RowDefinitions>
            <RowDefinition Height="Auto"/>
            <RowDefinition Height="*"/>
        </Grid.RowDefinitions>

        <!--TitlePanel contains the name of the application and page title-->
        <StackPanel x:Name="TitlePanel" Grid.Row="0" Margin="12,17,0,28">
            <TextBlock Text="SharePoint Data" Style="{StaticResource PhoneTextNormalStyle}" Margin="12,0"/>
            <TextBlock Text="Add Item" Margin="9,-7,0,0" Style="{StaticResource PhoneTextTitle1Style}"/>
        </StackPanel>

        <!--ContentPanel - place additional content here-->
        <StackPanel x:Name="ContentPanel" Grid.Row="1" Margin="12,0,12,0">
            <TextBlock Text="TITLE" Style="{StaticResource PhoneTextNormalStyle}"/>
            <TextBox Name="TitleTextBox" />
            <TextBlock Text="DESCRIPTION" Style="{StaticResource PhoneTextNormalStyle}"/>
            <TextBox Name="DescriptionTextBox" />
            <Button Name="AddButton" Content="Add Item" Click="AddButton_Click"/>
        </StackPanel>
    </Grid>
This will add two textboxes for setting the title and description to match the columns in the TestCustomList list. It also provides a button named AddButton which will have an event named AddButton_Click attached to the click event. The the button is clicked, it will take the values from the textboxes and create a new list item, and then navigate back to the MainPage.xaml file.
Now populate the AddButton_Click event and the success and fail callbacks through the following code within the AddItems.xaml.cs, as shown in Listing 5.
Listing 5: Populating the AddButton_Click Event
private void AddButton_Click(object sender, RoutedEventArgs e)
{
var web = App.Context.Web;
       List Customlist = web.Lists.GetByTitle("TestCustomList");
       ListItemCreationInformation itemCreateInfo = new ListItemCreationInformation();
       ListItem oListItem = Customlist.AddItem(itemCreateInfo);
       oListItem["Title"] = TitleTextBox.Text;
       oListItem["Description"] = DescriptionTextBox.Text;
       oListItem.Update();
       App.Context.ExecuteQueryAsync(SucceededCallback, FailedCallback);

       NavigationService.Navigate(new Uri("/MainPage.xaml", UriKind.Relative));
}

private void FailedCallback(object sender, ClientRequestFailedEventArgs args)
{
MessageBox.Show("Request Failed");
}

private void SucceededCallback(object sender, ClientRequestSucceededEventArgs args)
{
}
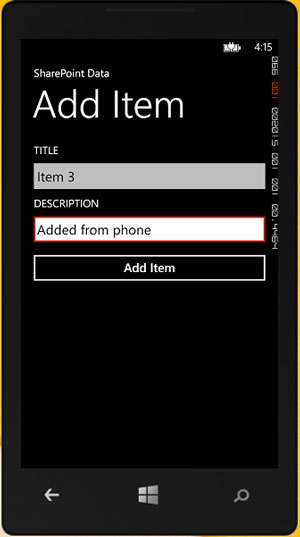
Now run the application and navigate to the AddItem.xaml file from the add menu item in the MainPage.xaml file. Add values to Title and Description, as shown in Figure 7.
 [Click on image for larger view.]
Figure 7: Adding Values to Title and Description
[Click on image for larger view.]
Figure 7: Adding Values to Title and Description
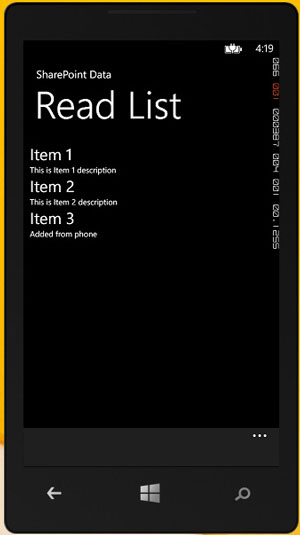
Once the page is navigated to the MainPage.xaml file, you will see a third item added as shown in Figure 8.
 [Click on image for larger view.]
Figure 8: Finally, the Third Menu Item
[Click on image for larger view.]
Figure 8: Finally, the Third Menu Item
And that's it. With this app, we can perform all the CRUD operations with the help of a client side object model in C#. Apart from the list operations, almost all other operations can be performed thanks to the enhanced SharePoint integrations built into Windows Phone.