Mobile Corner
Building UWP Apps Using Xamarin.Forms
One of the hardest challenges of mobile development is how to minimize the cost of building the same application for multiple platforms. Nick shows how to use Xamarin.Forms to develop a cross-platform application that also targets the Universal Windows Platform.
- By Nick Randolph
- 02/03/2016
There are many potential options when it comes to building cross-platform applications. They offer varying level of code reuse and usually an inverse level of device capabilities. The tools offered by Xamarin have been one of the front-runners, giving developers the ability to reuse all their business logic, whilst still being able to leverage any platform features.
Xamarin.Forms offers yet another level of reuse, this time allowing developers to build a UI that works across iOS, Android, Windows Phone and now the Universal Windows Platform (UWP). In this article I'll show how to get started with Xamarin.Forms and how to add support for UWP.
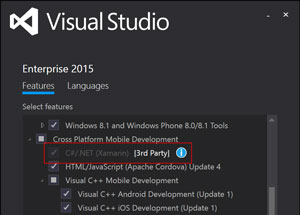
To get started with Xamarin.Forms you'll need to install the Xamarin developer tools. This can be done by either visiting going to the Xamarin Web site or by selecting the C#/.NET (Xamarin) option from the Visual Studio 2015 installer (shown in Figure 1).
 [Click on image for larger view.]
Figure 1. Xamarin via the Visual Studio 2015 Installer
[Click on image for larger view.]
Figure 1. Xamarin via the Visual Studio 2015 Installer
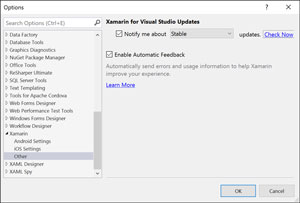
If you've already installed the Xamarin tools, it's important you check for updates. The support for UWP is very recent, so you'll need the latest version of Xamarin tools. In Visual Studio, checking for updates can be done from the Xamarin node in the Options dialog (from the Tools menu), as shown in Figure 2.
 [Click on image for larger view.]
Figure 2. Updating Xamarin for Visual Studio
[Click on image for larger view.]
Figure 2. Updating Xamarin for Visual Studio
Checking for updates and development of Xamarin.Forms applications can also be done via Xamarin Studio. However, Xamarin Studio doesn't currently support building UWP apps, so for the remainder of this article I'll focus on Visual Studio.
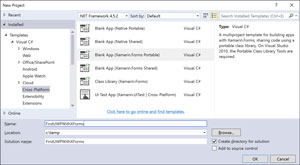
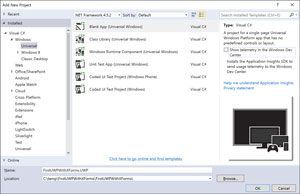
To get started building a UWP app using Xamarin.Forms (XForms), I'll select the Blank App (Xamarin.Forms Portable) template under the Cross-Platform node in the New Project dialog (see Figure 3).
 [Click on image for larger view.]
Figure 3. Creating an XForms Application
[Click on image for larger view.]
Figure 3. Creating an XForms Application
Once the new project has been created I have a new solution made up of four projects. There are three projects that represent the three platforms the application is currently supporting: iOS, Android and Windows Phone (8.0), and then there's a portable class library which is where the shared business logic and UI code will go. To add support for UWP I need to add another project, a standard UWP app that will be used to host the XForms content, in the same way the other platform projects do currently.
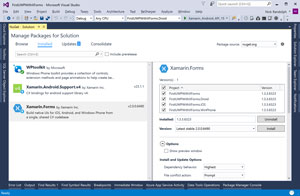
However, before I add support for UWP, I first need to update the XForms references to point to the latest stable version, available via NuGet. From the Solution Explorer window, I right-click the solution node and select Manage NuGet Packages for Solution. Figure 4 shows the latest NuGet package management interface, which was updated in Update 1 for Visual Studio 2015. It's highly recommended that you install this update because the package management interface is significantly improved.
 [Click on image for larger view.]
Figure 4. Updating to Latest XForms
[Click on image for larger view.]
Figure 4. Updating to Latest XForms
After selecting the Xamarin.Forms item in the left pane, I check each of the projects in the right pane. From the Version dropdown I select the Latest stable (at time of writing this was 2.0.0.6490, but I try to keep package versions up-to-date, so select whatever the latest stable version is). Within the Install and Update Options section, make sure the Depedency behavior is set to Highest. Now I can proceed by clicking the Install button, which is to the right of the Version dropdown.
Note: I've seen a number of issues with the NuGet package manager where it throws an exception in the Package Manager Console (which will be displayed while it attempts to update the package versions). In some cases, this relates to the Windows Powershell host not being initialized correctly. If you see an exception when attempting to update packages, one solution is to restart Visual Studio, open the Package Manager Console window (View menu | Other Windows | Package Manager Console) and wait for the Windows Powershell host to initialize. Once the Windows Powershell host has initialized, then you should be able to open your solution and successfully update to the latest NuGet packages.
With the NuGet packages updated, I can go ahead and add a new UWP project <see Figure 5) by right-clicking on the solution node in the Solution Explorer window and selecting Add | New Project. From the Visual C#, Windows, Universal node in the Add New Project dialog I select a Blank App (Universal Windows) and give the project an appropriate name. My preference is to use the UWP suffix to differentiate the UWP project from the other platform specific projects. I would also recommend adjusting the Location as by default it places the new project at the solution level, which isn't consistent with how the existing XForms solution has been structured.
 [Click on image for larger view.]
Figure 5. Creating a New UWP Project
[Click on image for larger view.]
Figure 5. Creating a New UWP Project
After the UWP project has been created, I make sure the new project builds correctly by right-clicking on the project and selecting Rebuild. With Visual Studio 2015, the Rebuild action will make sure all NuGet references are correctly restored, as well as performing the usual build activities. You might be wondering why I do this, because the project has only just been created. The reason is that sometimes things can go wrong during project creation and it's important that you validate each action you carry out before moving on. Otherwise, when you come to build later on, if it fails, you have no idea where you went wrong along the way.
Having successfully verified that my new UWP project builds, I can proceed with adding support for XForms. There are three steps to be done in order to add XForms support to my UWP project. The first thing to do is to add a NuGet reference to the Xamarin.Forms NuGet package. I could right-click on either the UWP project or the solution node in Solution Explorer and then select Manage NuGet packages. The advantage of doing this at the solution level is that I already have the Xamarin.Forms package installed in other projects in the solution, so it will appear in the list of installed packages. If I had selected to manage the packages for just the UWP project, I'd have to search the NuGet catalog in order to locate and install the Xamarin.Forms package. In the NuGet package manager, select the Xamarin.Forms package, check the box next to the UWP package and click the Install button.
The second step is to add a reference to the portable class library (PCL) project to my UWP project. Because all the UI and business logic of my application will be in the PCL project, it needs to be referenced by all the platform-specific projects.
The last step is to modify the existing logic of the UWP app to initialize and then load content using XForms. This requires adding code to App.xaml.cs, MainPage.xaml and MainPage.xaml.cs. In App.xaml.cs, add a call to Forms.Init after the Frame has been created, as shown here:
Frame rootFrame = Window.Current.Content as Frame;
  // Do not repeat app initialization when the window already has content,
  // just ensure the window is active
  if (rootFrame – null>
  {
    // Create a Frame to act as the navigation context and navigate to the first page
    rootFrame = new Frame();
    rootFrame.NavigationFailed += OnNavigationFailed;
    Xamarin.Forms.Forms.Init(e);
In order to host XForms content, the MainPage needs to inherit from Xamarin.Forms.Platform.UWP.WindowsPage, so I need to change the first element in MainPage.xaml to be WindowsPage instead of Page. This requires a corresponding change in the codebehind file MainPage.xaml.cs. I could either change the class declaration to inherit from WindowsPage, or I can just omit the inheritance. The two files, MainPage.xaml and MainPage.xaml.cs, each declare partial classes that are combined during compilation. This means that the inheritance listed in the MainPage.xaml.cs is redundant and can be omitted.
After the call to InitializeComponent in the constructor for MainPage, I need to add a call to LoadApplication, which takes a new instance of my XForms App class. The completed code is shown here:
public sealed partial class MainPage
{
  1 reference
  public MainPage()
  {
    this.InitializeComponent();
    LoadApplication(new FirstUWPWithXForms.App());

    }
  }
My UWP app is now ready to be run. However, simply selecting the UWP project as the startup project (that is, right-click the UWP project in Solution Explorer and select Set as Startup project) and clicking the run button, or pressing F5, won't work. By default, the UWP project wasn't set to build and deploy as part of the build configurations. To fix this I need to right-click on the solution node in Solution Explorer and select Configuration Manager. I need to make sure the UWP project is set to build and deploy, for each build definition. Once done, I can press F5 and the UWP app will be deployed and run.
Currently my XForms application is relatively uninteresting, as it just displays text in the middle of the screen saying, "Welcome to Xamarin Forms!" The content for the main page of the application is defined in code in App.cs within the constructor of the App class (within the PCL and not to be confused with the App class that's defined for the UWP app itself). We'll amend this to demonstrate the power of XForms. Most of this will be familiar for anyone who's worked with XAML, although you'll notice that a lot of the elements have slightly different names.
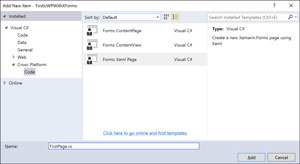
I'm going to define two pages but I'm going to use XAML to declaratively define the pages, rather than dynamically create them in code. I right-click on the PCL project and select Add | New Item, and then from the Add New Item dialog I select the Forms Xaml Page under the Cross-Platform node (see Figure 6).
 [Click on image for larger view.]
Figure 6. Creating a XAML Page
[Click on image for larger view.]
Figure 6. Creating a XAML Page
I'll add two pages, FirstPage and SecondPage, to my PCL project. Each page is made up of both a XAML and a XAML.cs page, similar to what you'd expect in any other XAML platform (Silverlight, Windows Presentation Foundation, Windows Phone and so on). Listings 1, 2, 3 and 4 includes the XAML for both FirstPage and SecondPage, as well as the codebehind for both pages.
Listing 1: FirstPage.xaml
<?xml version="1.0" encoding="utf-8" ?>
<ContentPage xmlns="http://xamarin.com/schemas/2014/forms"
             xmlns:x="http://schemas.microsoft.com/winfx/2009/xaml"
             x:Class="FirstUWPWithXForms.FirstPage">
  <StackLayout>
    <Label Text="First Page"
           VerticalOptions="Center"
           HorizontalOptions="Center" />
    <Button Text="Click me"
            Clicked="Button_OnClicked"/>
  </StackLayout>
</ContentPage>
Listing 2: FirstPage.xaml.cs
public partial class FirstPage : ContentPage
{
  public FirstPage()
  {
    InitializeComponent();
  }

  private void Button_OnClicked(object sender, EventArgs e)
  {
    Navigation.PushAsync(new SecondPage());
  }
}
Listing 3: SecondPage.xaml
<?xml version="1.0" encoding="utf-8" ?>
<ContentPage xmlns="http://xamarin.com/schemas/2014/forms"
             xmlns:x="http://schemas.microsoft.com/winfx/2009/xaml"
             x:Class="FirstUWPWithXForms.SecondPage">
  <Grid>
    <Grid.RowDefinitions>
      <RowDefinition Height="Auto"/>
      <RowDefinition />
    </Grid.RowDefinitions>
    <Label Text="Second Page" VerticalOptions="Center" HorizontalOptions="Center" />
    <ListView x:Name="PeopleList" Grid.Row="1">
      <ListView.ItemTemplate>
        <DataTemplate>
          <ViewCell>
          <Label Text="{Binding}"/>
          </ViewCell>
        </DataTemplate>
      </ListView.ItemTemplate>
    </ListView>
  </Grid>
</ContentPage>
Listing 4: SecondPage.xaml.cs
public partial class SecondPage : ContentPage
{
  public SecondPage()
  {
    InitializeComponent();
  }

  protected override void OnAppearing()
  {
    base.OnAppearing();

    var people = new[] {"Fred", "Bob", "Julie", "Sarah"};
    PeopleList.ItemsSource = people;
  }
}
FirstPage includes a Label and a Button arranged in a vertical stack using a StackLayout. Clicking the Button displays the second page by calling PushAsync onto the Navigation object. SecondPage uses a Grid to arrange a Label and a ListView. In the codebehind for SecondPage, the OnAppearing method has been overridden in order to populate the ListView by setting the ItemsSource property.
In this code I navigate between using the Navigation property on the FirstPage. This property is only populated if I set the MainPage property of the Application to be an instance of the NavigationPage class, as shown in the following code:
public App()
{
  MainPage = new NavigationPage(new FirstPage());
}
Using the PushAsync method to navigate to another page automatically wires up the correct behavior for the hardware back button when the UWP app is run on a Windows Phone, and the virtual hardware back button when run on a desktop Windows device. Alternatively, calling PushModalAsync will display the page without providing the default navigation metaphors.
The ListView on SecondPage uses an ItemTemplate to determine how each item is displayed. While the XAML for specifying the ItemTemplate is similar to a regular UWP app, it differs by requiring an extra node within the DataTemplate that specifies the type of cell to use. In this case I'm using a ViewCell as it allows me to fully customize the layout of each cell. I could have achieved a similar effect by using a TextCell and simply specifying the Text attribute and no child elements.
To Sum Up …
I've stepped through getting started with Xamarin.Forms and adding support for a UWP app that's able to run across any supported Windows device. XForms supports many of the rich features of XAML such as styles and resources, as well as data-binding support.
So while XForms allows for the UI to be defined in a way that it can be run on any platform, the actual interface that's displayed is tailored to the design language employed by each platform. The default styling is adequate for rapid prototyping but in most cases you'll want to customize the layout. This can be done across all platforms using the support for Styles, or it can be done on a platform-by-platform basis.
XForms, is under heavy investment by Xamarin and is already up to version 2. As the platform matures it'll become easier for developers to build powerful applications with minimal effort.