Cross Platform C#
Pressure Is On with 3D Touch in iOS Apps
Add pressure-based interactions in your apps in just a few minutes.
- By Greg Shackles
- 04/27/2016
With the release of the iPhone 6S and 6S Plus, together with the iOS 9 operating system, Apple introduced 3D Touch. What it allows is the addition of pressure-based interactions into your apps, which can be added in a variety of ways.
In this article I'll introduce a couple built-in standard 3D Touch interaction models, but iOS also provides a direct API to the pressure sensors, allowing you to leverage the data in any way that makes sense in your apps.
Quick Actions
The first interaction mode is referred to as Quick Actions. These allow you to provide shortcuts to various actions in your app directly off the app's icon on the home screen. Pressing down on the icon will reveal a menu of these actions you define. Conceptually you can think of these in the same way you would a right-click menu in a Windows application. These actions can provide shortcuts to different areas of your app, perform specific actions, or anything else that makes sense for your users.
Static Quick Actions
For actions that should always be available you can list them directly in the app's Info.plist file, instead of having to define them in code. Listing 1 shows the Info.plist file where I define a couple quick actions for an app.
Listing 1: Defining Some Quick Actions
<key>UIApplicationShortcutItems</key>
<array>
  <dict>
    <key>UIApplicationShortcutItemIconType</key>
    <string>UIApplicationShortcutIconTypeLove</string>
    <key>UIApplicationShortcutItemSubtitle</key>
    <string>View your favorite posts</string>
    <key>UIApplicationShortcutItemTitle</key>
    <string>Your Favorites</string>
    <key>UIApplicationShortcutItemType</key>
    <string>com.gregshackles.threedtouchdemo.shortcut_favorites</string>
  </dict>
  <dict>
    <key>UIApplicationShortcutItemIconType</key>
    <string>UIApplicationShortcutIconTypeCompose</string>
    <key>UIApplicationShortcutItemSubtitle</key>
    <string>Start writing a new post</string>
    <key>UIApplicationShortcutItemTitle</key>
    <string>New Post</string>
    <key>UIApplicationShortcutItemType</key>
    <string>com.gregshackles.threedtouchdemo.shortcut_post</string>
  </dict>
</array>
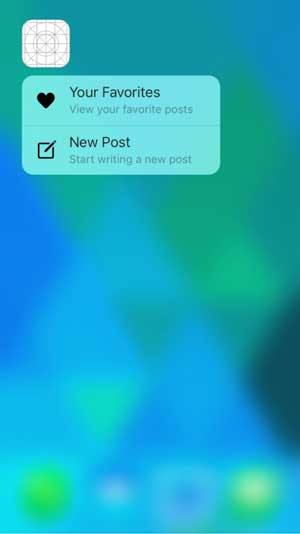
For each item I provide a title, subtitle, icon, and an identifier so that the app can determine which action was triggered when it launches. In this case I'm just using some of the built-in icons made available by iOS via UIApplicationShortcutIconType, but you also have the option of providing your own as well. With these defined you can now access the quick actions list by pressing on the app's icon (Figure 1).
 [Click on image for larger view.]
Figure 1: Menu of Quick Actions a User Can Take
[Click on image for larger view.]
Figure 1: Menu of Quick Actions a User Can Take
Now that the actions are defined, the app needs to be updated to process them. I'll do that in the AppDelegate class, which needs to be updated to handle both when the action triggered a fresh app launch as well as when it gets resumed from the background.
First, I'll handle a fresh app launch, shown in Listing 2.
Listing 2: Fresh App Launch
private UIApplicationShortcutItem _lastShortcutItem;

public override bool FinishedLaunching(UIApplication application, NSDictionary launchOptions)
{
    if (launchOptions != null)
    {
        _lastShortcutItem = launchOptions[UIApplication.LaunchOptionsShortcutItemKey] as UIApplicationShortcutItem;

        return _lastShortcutItem == null;
    }

    return true;
}

public override void OnActivated(UIApplication application)
{
    handleShortcut(_lastShortcutItem);
}
When the app launches it checks if it was launched from a shortcut item, calling a handleShortcut method if it was, which will be defined shortly. Before I do that, I also need to handle when the app is being resumed from the background:
public override void PerformActionForShortcutItem(UIApplication application, UIApplicationShortcutItem shortcutItem, UIOperationHandler completionHandler)
{
    handleShortcut(shortcutItem);

    completionHandler(true);
}
That's all the code needed to catch the incoming quick actions, so all that's left is actually handling those actions, shown in Listing 3.
Listing 3: Handling Quick Actions
private void handleShortcut(UIApplicationShortcutItem shortcut)
{
    if (shortcut == null)
        return;

    var alert = UIAlertController.Create(
        $"Shortcut: {shortcut.LocalizedTitle}",
        shortcut.Type,
        UIAlertControllerStyle.Alert);
    alert.AddAction(UIAlertAction.Create("Ok", UIAlertActionStyle.Default, null));

    Window.RootViewController.PresentViewController(alert, true, null);
}
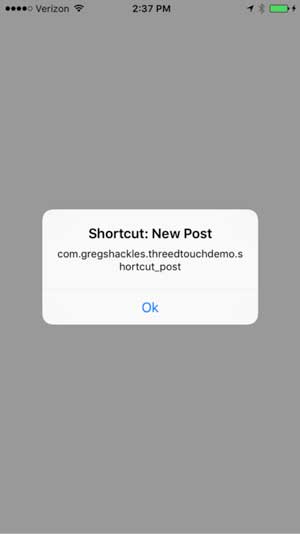
When a quick action comes in, the app will create and display an alert showing the action's title and its identifier (Figure 2). In a real application you could imagine code that switches based on the identifier and triggers a navigation to some part of the app, or initiates some sort of action.
 [Click on image for larger view.]
Figure 2: Handling and Displaying the Quick Action
[Click on image for larger view.]
Figure 2: Handling and Displaying the Quick Action
Dynamic Quick Actions
For actions you want to enable based on knowledge inside of your app, you can also easily manipulate the list of quick actions from code. To do that, I'll add a short block of code shown in Listing 4 to the AppDelegate's FinishedLaunching method that was defined earlier.
Listing 4: FinishedLaunching
if (!application.ShortcutItems.Any())
{
    application.ShortcutItems = new UIApplicationShortcutItem[]
    {
        new UIMutableApplicationShortcutItem(
            "com.gregshackles.com.shortcut_photo",
            "Post a photo",
            "Capture the moment",
            UIApplicationShortcutIcon.FromType(UIApplicationShortcutIconType.CapturePhoto),
            null)
    };
}
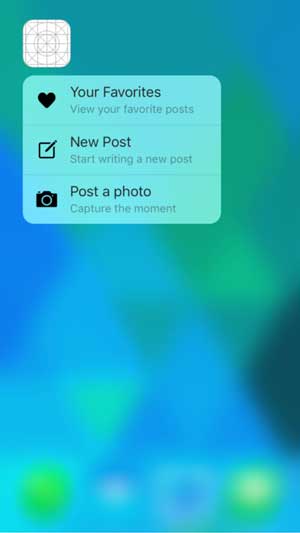
If the list of dynamic shortcut items is empty, it gets updated to contain one new quick action. This item won't be available in the quick action menu until after the app is launched for the first time, but once it is run the menu will look like Figure 3. This is a great way to enable quick actions based on personalized user data or actions a user may have taken previously in the app.
 [Click on image for larger view.]
Figure 3: Quick Action Menu Contains Both Static and Dynamic Actions
[Click on image for larger view.]
Figure 3: Quick Action Menu Contains Both Static and Dynamic Actions
Peek and Pop
One other fantastic interaction you can enable with 3D Touch is referred to as peeking and popping. This allows users to press down on items to reveal a preview of the content beyond item without having to actually switch contexts and leave their current place in the app. Releasing the item will leave them in the same place they started, or they can press down with more pressure in order to actually pop fully into that content. Some examples of this that ship with iOS are in Safari, where you can peek at a link to preview the content behind it, or in Mail where you can do the same for specific e-mails.
You can also provide a list of actions as part of the peek that is exposed by swiping up while peeking. For example, the Mail app uses this to expose actions like marking an e-mail as read or replying to it. This is a great way to empower users to accomplish their tasks through just a few quick gestures.
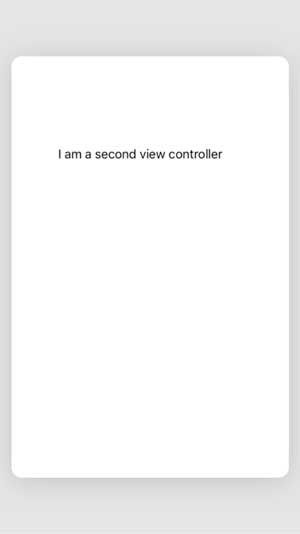
Peek and pop can really make for an immersive and compelling user experience, and luckily Apple made it really simple to add to your apps. To set the stage, I'll add a button to the app's main view controller named PeekPopButton (Figure 4), and also add another view controller named SecondViewController that can be peeked and popped by this button.
With those defined, I'll need to create an implementation of UIViewControllerPreviewingDelegate (see Listing 5) which defines the actual previewing behavior.
Listing 5: UIViewControllerPreviewingDelegate
private class PreviewingDelegate : UIViewControllerPreviewingDelegate
{
    private readonly ViewController _viewController;

    public PreviewingDelegate(ViewController viewController)
    {
        _viewController = viewController;
    }

    public PreviewingDelegate(NSObjectFlag t) : base(t) { }
    public PreviewingDelegate(IntPtr handle) : base(handle) { }

    public override void CommitViewController(IUIViewControllerPreviewing previewingContext, UIViewController viewControllerToCommit) =>
      _viewController.ShowViewController(viewControllerToCommit, this);

    public override UIViewController GetViewControllerForPreview(IUIViewControllerPreviewing previewingContext, CGPoint location) =>
      _viewController.Storyboard.InstantiateViewController("SecondViewController") as SecondViewController;
}
When the preview view controller is requested it instantiates a new instance of SecondViewController from the storyboard, and when the user triggers the pop interaction it will show the full version of that view controller.
All that's left is registering the delegate for the button, shown in Listing 6.
Listing 6: Register the Delegate
public override void ViewDidLoad()
{
  base.ViewDidLoad();

  if (TraitCollection.ForceTouchCapability == UIForceTouchCapability.Available)
    RegisterForPreviewingWithDelegate(new PreviewingDelegate(this), PeekPopButton);
}
The key thing here is checking that the device supports 3D Touch before registering the delegate. This is currently supported on the iPhone 6S and 6S Plus, but iOS 9 also runs on many devices that do not support the feature -- it's important to check for support before attempting to use it. With the registration in place, pressing down on the button will reveal a preview of the SecondViewController in a modal popup (see Figure 5). Releasing the button will dismiss the preview, and pressing down with more pressure will pop the view controller into full view.
 [Click on image for larger view.]
Figure 4: User Interface Before Triggering the Peek
[Click on image for larger view.]
Figure 4: User Interface Before Triggering the Peek
 [Click on image for larger view.]
Figure 5: UI Showing the Peek into a Second View Controller
[Click on image for larger view.]
Figure 5: UI Showing the Peek into a Second View Controller
So Sensitive
With the introduction of 3D Touch, iOS added a whole new dimension of interactivity that you can leverage in your apps. It takes very little code to get started in providing a much more contextual experience for your users, giving them shortcuts to prominent actions in the app or allowing them to preview content without being taken out of the flow they're in, instead giving the option to opt-in to the full view of that content if they decide to.
You also have the freedom to take it further as well, leveraging the pressure APIs directly to create pressure-based interactions that make sense in your app. In addition to any efficiency gained by enabling these gestures it can also just make for a much more enjoyable user experience, and is certainly worth considering in any iOS apps you have that will be deployed on newer iPhones.