Mobile Corner
Build Data Applications for the Universal Windows Platform Using Entity Framework and SQLite
Saving and retrieving data is a fundamental part of all but the simplest of applications. In this article, Nick walks through getting started using Entity Framework with SQLite to persist application data.
- By Nick Randolph
- 12/15/2016
In all but the simplest of applications, it's necessary to be able to save and retrieve data. This might be just settings or it might be data that users have entered. The Universal Windows Platform (UWP) has support for working directly with files, as well as support for storing data in a SQLite database. However, to save and retrieve data easily, developers working with SQLite often have to rely on third-party NuGet packages.
In parallel, Microsoft has released many versions of Entity Framework for connecting to server-side databases, such as SQL Server. Entity Framework is an ORM, providing the translation between the object world of .NET and the underlying data store. By releasing Entity Framework for SQLite, Microsoft has significantly reduced the effort required for developers to work with data within UWP apps.
It's worth noting that Entity Framework is compatible with .NET Standard 1.3, meaning that it can be used across a wide range of platforms, such as Xamarin, making it great for cross-platform applications.
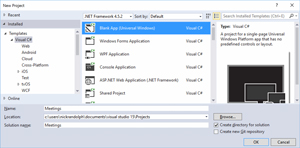
In this article I'll put together a simple application that will record meeting notes and attendees. I'll start by creating a new UWP app, Meetings, by selecting the Blank App (Universal Windows) template in the New Project dialog (shown in Figure 1).
 [Click on image for larger view.]
Figure 1. Creating a New Project
[Click on image for larger view.]
Figure 1. Creating a New Project
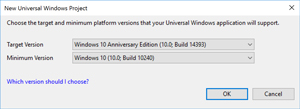
Since the original release of Windows 10 (Build 10240) there have been two version updates, Build 10586 and Build 14393. When creating a new UWP app I'm prompted to select the Target and Minimum versions (Figure 2). In this case, to ensure the maximum reach of the application, I've selected Build 10240 as the Minimum Version.
 [Click on image for larger view.]
Figure 2. Target and Minimum Versions
[Click on image for larger view.]
Figure 2. Target and Minimum Versions
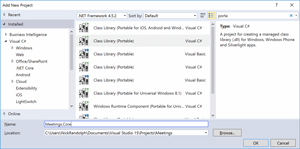
Even though in this scenario I'm only building a UWP app, it's important that I separate the UI (that is, the UWP app itself) from the application logic. This allows for the application logic to be used if I target another platform, but it also helps ensure a clear separation of concerns and aids in making the application logic easier to test. To this end I'm going to add a new project, Meetings.Core, based on the Class Library (Portable) template (Figure 3).
 [Click on image for larger view.]
Figure 3. Adding a Class Library
[Click on image for larger view.]
Figure 3. Adding a Class Library
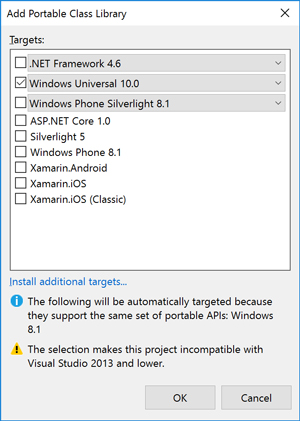
When creating a portable class library (PCL) I'm prompted to select which platforms I want to target. Figure 4 illustrates that I've only selected the Windows Universal 10.0 platform. In fact, what I select at this point is irrelevant, as I'll show in the next step.
 [Click on image for larger view.]
Figure 4. Selecting a Target Platform
[Click on image for larger view.]
Figure 4. Selecting a Target Platform
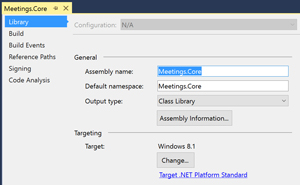
After creating the library, I need to change the Targeting from being based on a PCL Profile (that is, by selecting target platforms) to being based on .NET Standard. Double-clicking the Properties node under the Meetings.Core node in the Solution Explorer window opens the Meetings.Core project properties, shown in Figure 5.
 [Click on image for larger view.]
Figure 5. Targeting a PCL Profile
[Click on image for larger view.]
Figure 5. Targeting a PCL Profile
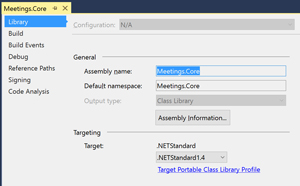
Figure 5 illustrates that the Meetings.Core library currently targets the Windows platform. Clicking the Target .NET Platform Standard link at the bottom of the Targeting section of the Library tab allows me to configure the Meetings.Core library to conform to one of the .NET Standards. Figure 6 shows how the Targeting section now appears -- note that I've selected .NETStandard 1.3, which is the minimum level required to support Entity Framework for SQLite.
 [Click on image for larger view.]
Figure 6. Targeting a .NET Standard
[Click on image for larger view.]
Figure 6. Targeting a .NET Standard
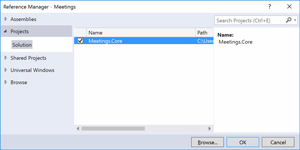
To complete the process of adding the Meetings.Core library I need to add it as a reference to the UWP project itself. The Reference Manager can be opened by right-clicking on the UWP project, Meetings, in Solution Explorer and selecting Add | Reference.
To get started with Entity Framework for SQLite I need to add a reference to the appropriate NuGet packages. Before doing this I recommend upgrading all existing NuGet packages for both the UWP app and the library to the latest stable version. As a general rule of thumb it's a good idea to upgrade the NuGet packages an application references to take advantage of improvements, bug fixes and new features that are added to NuGet packages. Doing this periodically avoids having to make major changes in the future when multiple NuGet packages change, or if you're forced to upgrade for some reason (for example, if you add a new NuGet package that requires a newer version of a package your application is already referencing). In the case of the Meetings application it's both the .NET Standard Library and Microsoft.NETCore.UniversalWindowsPlatform NuGet packages that requires updating (the latter is required before adding a reference to the Entity Framework SQLite package).
 [Click on image for larger view.]
Figure 7. Adding a Reference
[Click on image for larger view.]
Figure 7. Adding a Reference
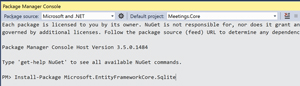
The main NuGet package required for Entity Framework for SQLite is Microsoft.EntityFrameworkCore.Sqlite, which can be added either by going to Manage Packages for the Solution (or Project), or via the Package Manager Console. To open the management interface for NuGet, right-click on the solution node in Solution Explorer and select Manage NuGet Packages for the Solution. Alternatively, the Package Manager Console can be opened from the Other Windows item on the View menu.
At the time of this writing the Microsoft.EntityFrameworkCore.Sqlite package wasn't appearing when searching the Microsoft and .NET package source -- if you're using the Manage Packages UI to search for the package, make sure you set the Package source to nuget.org.
I'm going to add a reference to Microsoft.EntityFrameworkCore.Sqlite via the Package Manager Console, shown in Figure 8:
Install-Package Microsoft.EntityFrameworkCore.Sqlite
 [Click on image for larger view.]
Figure 8. Installing Entity Framework for SQLite
[Click on image for larger view.]
Figure 8. Installing Entity Framework for SQLite
Note that I've set the Default project to Meetings.Core, rather than the UWP project, Meetings.
Entity Framework has a number of associated tools that can be invoked from the Package Manager Console that assist with creating and updating the database schema for the application. To use these tools, they first need to be installed into the UWP project. In the Package Manager Console I need to set the Default project back to Meetings and then install the Microsoft.EntityFrameworkCore.Tools package. This package is still in preview, so I need to append the -Pre flag:
Install-Package Microsoft.EntityFrameworkCore.Tools -Pre
Alternatively in the Manage Package user interface, you need to check the "Include prerelease" option to see the Tools package in the search results.
At the time of writing the prerelease version of the Tools has a known issue, preventing the tools from working without assembly binding redirects specified in an app.config file. I need to add the app.config file in Listing 1 to the UWP project, Meetings.
Listing 1: Configuration File for Meetings App
<configuration>
  <runtime>
    <assemblyBinding xmlns="urn:schemas-microsoft-com:asm.v1">
      <dependentAssembly>
        <assemblyIdentity name="System.IO.FileSystem.Primitives"
          publicKeyToken="b03f5f7f11d50a3a" culture="neutral" />
        <bindingRedirect oldVersion="4.0.0.0" newVersion="4.0.1.0"/>
      </dependentAssembly>
      <dependentAssembly>
        <assemblyIdentity name="System.Threading.Overlapped"
          publicKeyToken="b03f5f7f11d50a3a" culture="neutral" />
        <bindingRedirect oldVersion="4.0.0.0" newVersion="4.0.1.0"/>
      </dependentAssembly>
      <dependentAssembly>
        <assemblyIdentity name="Microsoft.EntityFrameworkCore"
          publicKeyToken="adb9793829ddae60" culture="neutral" />
        <bindingRedirect oldVersion="1.0.0.0" newVersion="1.0.1.0"/>
      </dependentAssembly>
      <dependentAssembly>
        <assemblyIdentity name="Microsoft.EntityFrameworkCore.Relational"
          publicKeyToken="adb9793829ddae60" culture="neutral" />
        <bindingRedirect oldVersion="1.0.0.0" newVersion="1.0.1.0"/>
      </dependentAssembly>
    </assemblyBinding>
  </runtime>
</configuration>
I've finished setting up the solution structure, so now I can get on with building the application. I'll start by removing the template class, Class1.cs, from the Meetings.Core project. In its place I'll add a Model folder and within the folder create two entity classes, Meeting and Person (see Listing 2).
Listing 2: Meeting and Person Classes
public class Meeting
{
  public int Id { get; set; }
  public string Subject { get; set; }

  public DateTimeOffset MeetingTime { get; set; } = DateTimeOffset.Now;

  public string Notes { get; set; }

  public ObservableCollection<Person> Attendees { get; set; } =
    new ObservableCollection<Person>();
}

public class Person
{
  public int Id { get; set; }
  public string Name { get; set; }
  public string Position { get; set; }

  public int MeetingId { get; set; }
   public Meeting Meeting { get; set; }
}
In the Model folder I'll also create a MeetingsContext class, which will be used to wrap the interactions with the SQLite database (the OnConfiguring method defines the name of the SQLite database file to use):
public class MeetingsContext : DbContext
{
  public DbSet<Meeting> Meetings { get; set; }
  public DbSet<Person> People { get; set; }

  protected override void OnConfiguring(DbContextOptionsBuilder optionsBuilder)
  {
    optionsBuilder.UseSqlite("Filename=Meetings.db");
  }
}
The MeetingsContext entity will be used to manage instances of the Meeting and Person classes that are stored and retrieved from the SQLite database.
So far I’ve defined the entity structure that will be populated when working with the SQLite database. However, I need to define what the underlying database schema will be. For this I will use the Entity Framework tools to generate migration code that will define and create the schema for the database. In the Package Manager Console window, I select the Meetings.Core as the Default Project and then invoke the following to generate the migration code:
Add-Migration 'Initial Database Creation'
This will create a Migrations folder and add two files that define the database schema.
It's not a good practice to use the same entity for interacting with the database as well as data binding. Instead, for each page within the application I'll create a corresponding viewmodel. I'll add a ViewModels folder, and subsequently a MainViewModel class, which will hold an instance of the MeetingsContext used to load Meetings from the database. You can see that in Listing 3.
Listing 3: MainViewModel Class
public class MainViewModel:INotifyPropertyChanged
{
  private MeetingsContext Context { get; } = new MeetingsContext();

  public ObservableCollection<Meeting> Meetings { get; } =
    new ObservableCollection<Meeting>();

  private Meeting selectedMeeting = new Meeting();

  public Meeting SelectedMeeting
  {
    get { return selectedMeeting; }
    set
    {
      if (value == null)
      {
        value = new Meeting();
      }
      selectedMeeting = value;
      OnPropertyChanged();
    }
  }
  public async Task Init()
  {
    await Context.Database.MigrateAsync();
  }

  public async Task Load()
  {
    Meetings.Clear();
    await Context.Meetings.Include(meeting => meeting.Attendees).ForEachAsync(Meetings.Add);
    SelectedMeeting=new Meeting();
  }

  public async Task SaveMeeting()
  {
    if (SelectedMeeting.Id == 0)
    {
      Context.Meetings.Add(SelectedMeeting);
    }
    await Context.SaveChangesAsync();
    await Load();
  }

  public async Task CancelMeeting()
  {
    RejectChanges();
    await Load();
  }


  public void RejectChanges()
  {
    foreach (var entry in Context.ChangeTracker.Entries())
    {
      switch (entry.State)
      {
        case EntityState.Modified:
        case EntityState.Deleted:
          entry.State = EntityState.Modified; //Revert changes made to deleted entity.
          entry.State = EntityState.Unchanged;
          break;
        case EntityState.Added:
          entry.State = EntityState.Detached;
          break;
      }
    }
  }


  public event PropertyChangedEventHandler PropertyChanged;

  protected virtual void OnPropertyChanged([CallerMemberName] string propertyName = null)
  {
    PropertyChanged?.Invoke(this, new PropertyChangedEventArgs(propertyName));
  }
}
There are a couple of points worth observing about this code. First, the Load method retrieves the current Meetings in the database, as well as their associated Person objects via the Attendees property. This is done by adding the .Include(meeting=>meeting.Attendees) method call as part of retrieving the Meeting entities in the Load method.
The SaveMeeting method simply adds a new Meeting (that is, a Meeting with an Id of 0) to the Meetings DBSet exposed by the MeetingsContext. The built-in change tracking then saves the new Meeting or changes to any existing Meeting to the database when SaveChangesAsync is invoked.
There's no built-in method to reject all current changes. Instead, it's necessary to iterate over the entities in the change tracker and reset their state. This is done in the RejectChanges method.
Next, I need to create the UI to view and add meetings by adding the XAML in Listing 4 to MainPage.XAML.
Listing 4: Additional XAML To Add to MainPage.XAML
<Page
  x:Class="Meetings.MainPage"
  xmlns="http://schemas.microsoft.com/winfx/2006/xaml/presentation"
  xmlns:x="http://schemas.microsoft.com/winfx/2006/xaml"
  xmlns:d="http://schemas.microsoft.com/expression/blend/2008"
  xmlns:mc="http://schemas.openxmlformats.org/markup-compatibility/2006"
  xmlns:model="using:Meetings.Core.Model"
  mc:Ignorable="d">

  <Grid Background="{ThemeResource ApplicationPageBackgroundThemeBrush}">
    <Grid.ColumnDefinitions>
      <ColumnDefinition Width="*" />
      <ColumnDefinition Width="*" />
      <ColumnDefinition Width="*" />
    </Grid.ColumnDefinitions>
    <ListView ItemsSource="{x:Bind ViewModel.Meetings}"
              SelectionChanged="SelectMeeting">
      <ListView.ItemTemplate>
        <DataTemplate x:DataType="model:Meeting">
          <TextBlock Text="{x:Bind Subject}"></TextBlock>
        </DataTemplate>
      </ListView.ItemTemplate>
    </ListView>
    <Grid Grid.Column="1">
      <Grid.RowDefinitions>
        <RowDefinition Height="Auto" />
        <RowDefinition />
        <RowDefinition Height="Auto" />
      </Grid.RowDefinitions>
      <StackPanel>
        <TextBlock Text="Meeting Date" />
        <DatePicker Date="{x:Bind ViewModel.SelectedMeeting.MeetingTime, Mode=TwoWay}" />
        <TextBlock Text="Subject"
                   Margin="0,10,0,0" />
        <TextBox Text="{x:Bind ViewModel.SelectedMeeting.Subject, Mode=TwoWay}" />
        <TextBlock Text="Notes"
                   Margin="0,10,0,0" />
        <TextBox Text="{x:Bind ViewModel.SelectedMeeting.Notes, Mode=TwoWay}" />
        <TextBlock Text="Attendees"
                   Margin="0,10,0,0" />
      </StackPanel>
      <StackPanel Orientation="Horizontal"
        Grid.Row="2">
        <Button Content="Save"
                Margin="0,10,0,0"
          Click="{x:Bind ViewModel.SaveMeeting}"></Button>
        <Button Content="Cancel"
                Margin="10,10,0,0"
                Click="{x:Bind ViewModel.CancelMeeting}"></Button>
      </StackPanel>

    </Grid>
  </Grid>
</Page>
I also need to add an event handler for the SelectionChanged event on the ListView, to the MainPage.xaml.cs:
private void SelectMeeting(object sender, SelectionChangedEventArgs e)
{
  ViewModel.SelectedMeeting = (sender as ListView)?.SelectedItem as Meeting;
}
I also need to add to MainPage.xaml.cs the logic to create and initialize the MainViewModel:
public sealed partial class MainPage
{
  public MainViewModel ViewModel { get; } = new MainViewModel();

  public MainPage()
  {
    InitializeComponent();
  }

  protected override async void OnNavigatedTo(NavigationEventArgs e)
  {
    base.OnNavigatedTo(e);

    await ViewModel.Init();

    await ViewModel.Load();
  }
}
At this point I can run the application and I'm able to add and change meetings. If I rerun the application, the meetings I previously created are loaded and are available for me to change or add to.
To complete the interface I need the ability to add and remove attendees. I'll start by adding a SelectedAttendee property and methods to add and remove attendees (see Listing 5) to the MainViewModel class.
Listing 5: Methods for Adding, Removing Attendees
private Person selectedAttendee = new Person();
public Person SelectedAttendee
{
  get { return selectedAttendee; }
  set
  {
    if (value == null)
    {
      value = new Person();
    }
    selectedAttendee = value;
    OnPropertyChanged();
  }
}

public void AddAttendee()
{
  if (SelectedAttendee.Id == 0)
  {
    SelectedMeeting.Attendees.Add(SelectedAttendee);
  }
  SelectedAttendee=new Person();
}

public void RemoveAttendee()
{
  if (SelectedAttendee == null) return;

  if (SelectedAttendee.Id > 0)
  {
    Context.People.Remove(SelectedAttendee);
  }

  if (SelectedMeeting.Attendees.Contains(SelectedAttendee))
  {
    SelectedMeeting.Attendees.Remove(SelectedAttendee);
  }

  SelectedAttendee = new Person();
}
I also need to update the UI to include both the list of attendees and the fields required to add and change an attendee (Listing 6).
Listing 6: Updating UI Code for Adding, Changing an Attendee
<Page
  x:Class="Meetings.MainPage"
  xmlns="http://schemas.microsoft.com/winfx/2006/xaml/presentation"
  xmlns:x="http://schemas.microsoft.com/winfx/2006/xaml"
  xmlns:d="http://schemas.microsoft.com/expression/blend/2008"
  xmlns:mc="http://schemas.openxmlformats.org/markup-compatibility/2006"
  xmlns:model="using:Meetings.Core.Model"
  mc:Ignorable="d">

  <Grid Background="{ThemeResource ApplicationPageBackgroundThemeBrush}">
    <Grid.ColumnDefinitions>
      <ColumnDefinition Width="*" />
      <ColumnDefinition Width="*" />
      <ColumnDefinition Width="*" />
    </Grid.ColumnDefinitions>
    <ListView ItemsSource="{x:Bind ViewModel.Meetings}"
              SelectionChanged="SelectMeeting">
      <ListView.ItemTemplate>
        <DataTemplate x:DataType="model:Meeting">
          <TextBlock Text="{x:Bind Subject}"></TextBlock>
        </DataTemplate>
      </ListView.ItemTemplate>
    </ListView>
    <Grid Grid.Column="1">
      <Grid.RowDefinitions>
        <RowDefinition Height="Auto" />
        <RowDefinition />
        <RowDefinition Height="Auto" />
      </Grid.RowDefinitions>
      <StackPanel>
        <TextBlock Text="Meeting Date" />
        <DatePicker Date="{x:Bind ViewModel.SelectedMeeting.MeetingTime, Mode=TwoWay}" />
        <TextBlock Text="Subject"
                   Margin="0,10,0,0" />
        <TextBox Text="{x:Bind ViewModel.SelectedMeeting.Subject, Mode=TwoWay}" />
        <TextBlock Text="Notes"
                   Margin="0,10,0,0" />
        <TextBox Text="{x:Bind ViewModel.SelectedMeeting.Notes, Mode=TwoWay}" />
        <TextBlock Text="Attendees"
                   Margin="0,10,0,0" />
      </StackPanel>

      <ListView Grid.Row="1"
                SelectionChanged="SelectAttendee"
                ItemsSource="{x:Bind ViewModel.SelectedMeeting.Attendees, Mode=OneWay}">
        <ListView.ItemTemplate>
          <DataTemplate x:DataType="model:Person">
            <TextBlock Text="{x:Bind Name}" />
            </DataTemplate>
        </ListView.ItemTemplate>

      </ListView>

      <StackPanel Orientation="Horizontal"
                  Grid.Row="2">
        <Button Content="Save"
                Margin="0,10,0,0"
                Click="{x:Bind ViewModel.SaveMeeting}"></Button>
        <Button Content="Cancel"
                Margin="10,10,0,0"
                Click="{x:Bind ViewModel.CancelMeeting}"></Button>
      </StackPanel>

    </Grid>

    <StackPanel Grid.Column="2">
      <TextBlock Text="Name" />
      <TextBox Text="{x:Bind ViewModel.SelectedAttendee.Name, Mode=TwoWay}" />
      <TextBlock Text="Position"
                 Margin="0,10,0,0" />
      <TextBox Text="{x:Bind ViewModel.SelectedAttendee.Position, Mode=TwoWay}" />


      <StackPanel Orientation="Horizontal">
        <Button Content="Add"
                Margin="0,10,0,0"
                Click="{x:Bind ViewModel.AddAttendee}"></Button>
        <Button Content="Remove"
                Margin="10,10,0,0"
                Click="{x:Bind ViewModel.RemoveAttendee}"></Button>
      </StackPanel>
    </StackPanel>
  </Grid>
</Page>
As I did for the list of meetings, I also need to add a SelectChanged event handler to the ListView that lists the attendees:
private void SelectAttendee(object sender, SelectionChangedEventArgs e)
{
  ViewModel.SelectedAttendee = (sender as ListView)?.SelectedItem as Person;

}
Now when I run the application I can add and remove attendees from a meeting. However, I noticed that at this point it's easy to make changes to a meeting, such as adding or removing an attendee, and then not commit those changes by clicking the Save button. (Note that the Save button saves changes to both meetings and attendees as they're all managed by the same MeetingsContext instance.) As the user switches between meetings, I want to detect if they've made any changes, and force them to either Save or Cancel changes.
I first need to detect if there are any changes that haven't been saved. To do this I'll expose a HasChanges property on the MainViewModel that looks in the MeetingsContext to determine if any of the entities have changed:
public bool HasChanges
{
  get
  {
    Context.ChangeTracker.DetectChanges();
    return Context.ChangeTracker.Entries().Any(entry => entry.State != EntityState.Unchanged);
  }
}
Note that there are cases where the automatic change tracker doesn't always detect changes, such as when an attendee is removed from a meeting. As such, it's necessary to force a call to DetectChanges.
In order to prevent the user from switching to a different meeting when there are unsaved changes, I'll add a call to the HasChanges property in the SelectionChanged event handler for the meeting ListView (that is, in MainPage.xaml.cs):
private async void SelectMeeting(object sender, SelectionChangedEventArgs e)
{
  var meetingsList = sender as ListView;
  if (meetingsList == null || meetingsList.SelectedItem==ViewModel.SelectedMeeting) return;

  if (ViewModel.HasChanges)
  {
    var msg = new MessageDialog("You have unsaved changes. Please click Save or Cancel",
      "Unsaved changes");
    await msg.ShowAsync();
    meetingsList.SelectedItem = ViewModel.SelectedMeeting;
    return;
  }
  ViewModel.SelectedMeeting = meetingsList.SelectedItem as Meeting;
}
When you add this code and attempt to run the application you might run into a build error complaining about a missing GetAwaiter method (Figure 9).
 [Click on image for larger view.]
Figure 9. Missing GetAwaiter Method
[Click on image for larger view.]
Figure 9. Missing GetAwaiter Method
To resolve the build error shown in Figure 9, add a using statement to the System namespace:
using System;
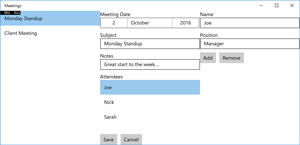
Running the application now shows a basic interface (Figure 10) that allows meetings and their corresponding attendees to be entered.
 [Click on image for larger view.]
Figure 10. A Basic Meetings Interface
[Click on image for larger view.]
Figure 10. A Basic Meetings Interface
I've walked through how to get started using Entity Framework for SQLite in order to build a very basic interface for entering meeting information. There are a few data concepts, such as validation, which could be added, and of course a much nicer interface would be highly desirable. This example can be used as a starting point to understand and begin working with Entity Framework for SQLite in your UWP apps.