Mobile Corner
Consuming REST Services from Your Mobile Application Using Swagger and AutoRest
Consuming services is something every application needs to do. In this article, Nick demonstrates how to document a REST service using Swagger in order to make it easy to consume from a Universal Windows Application.
- By Nick Randolph
- 06/12/2017
In all but the simplest mobile applications, it’s necessary to send or receive data from one or more services. There are a variety of technologies that can be used to define back-end services and a variety of encoding choices available for sending data to and from the services.
SOAP services were quite popular because the structure of the payload was in XML, which made it somewhat self-describing. More recently, REST services have become popular because in addition to being less verbose, and thus smaller payloads, the services also made better use of the different HTTP verbs. One of the weaknesses of REST services is that there isn’t any agreed mechanism for specifying the schema of both requests and responses for a set of services.
In this article, I’ll look at how Swagger can be used in an ASP.NET Core project to document Web API services, and how AutoRest can be used to generate code for consuming the services with a Universal Windows Platform (UWP) app.
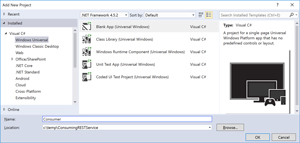
To get started, I’ll create a new ASP.NET Core application in Visual Studio 2017, called ConsumingRESTServices, based on the ASP.NET Core Web Application (.NET Core) project template, shown in Figure 1.
 [Click on image for larger view.]
Figure 1. Creating an ASP.NET Core Web Application
[Click on image for larger view.]
Figure 1. Creating an ASP.NET Core Web Application
When creating the ASP.NET Core Web Application, make sure that ASP.NET Core 1.1 is selected and select Web API when prompted to select the template to use. If you’ve worked with ASP.NET Core in Visual Studio 2015, you’ll see that the project structure has changed; it’s back to being a csproj and the project.json file is nowhere to be seen.
The Web API template creates an initial controller, ValuesController, which serves up an array of strings in response to a GET request. For example, GET http://localhost:2155/api/values would return an array of strings. I’ll begin with calling this endpoint before I move on to returning more interesting results.
Next, I’ll create and setup the structure for the UWP app by adding a project based on the Blank App (Universal Windows) template (Figure 2), called Consumer.
 [Click on image for larger view.]
Figure 2. Creating the UWP App
[Click on image for larger view.]
Figure 2. Creating the UWP App
In addition to the UWP app itself, I’m also going to create a separate library that will contain all the business logic for the application. If you’re using Model-View-ViewModel (MVVM), this library would also contain your view models. For this, I’m going to use the Class Library (.NET Standard) template to create a project called Consumer.Core.
Note that in Visual Studio 2015, in order to create a .NET Standard library you’d have had to create a portable class library (PCL) and then convert it to a .NET Standard library. Visual Studio 2017 has new project templates that allow you to create a .NET Standard library that defaults to .NET Standard 1.4, which can easily be changed via the project properties dialog. After creating the library I’ll add a reference to it within the UWP app.
I’ll rename the default Class1.cs that’s created within the new Consumer.Core project to MainViewModel.cs, and accept the prompt to update the class name. I’m going to create an instance of this class and set it as the DataContext for the MainPage of the UWP app:
public MainPage()
{
  InitializeComponent();

  DataContext = new MainViewModel();
}
protected override void OnNavigatedTo(NavigationEventArgs e)
{
  base.OnNavigatedTo(e);

  (DataContext as MainViewModel)?.Load();
}
When the page is navigated to, I’ll invoke the Load method on the MainViewModel. The Load method will simply invoke a GET request on the ValuesController endpoint:
public async void Load()
{
  using (var client = new HttpClient())
  {
    var data = await client.GetStringAsync("http://localhost:2155/api/values");
    var strings = JsonConvert.DeserializeObject<string[]>(data);
    Debug.WriteLine(strings);
  }
}
This code relies on the Newtonsoft.Json NuGet package -- this can be added to the Consumer.Core project by right-clicking on the project in Solution Explorer and selecting Manage NuGet Packages.
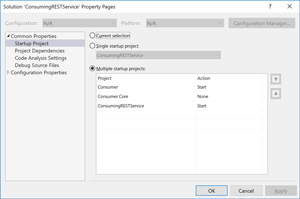
After completing this code, I can run up the application and check that it’s returning data. To do this, I need both the UWP app and the ASP.NET Core Web API to run at the same time. Right-clicking on the solution node in Solution Explorer and selecting Set Startup Projects lets me set both the Consumer and ConsumingRESTService to Start (Figure 3).
 [Click on image for larger view.]
Figure 3. Debugging both UWP and ASP.NET Core Services
[Click on image for larger view.]
Figure 3. Debugging both UWP and ASP.NET Core Services
The code for retrieving data from the ValuesController endpoint creates an HttpClient instance, downloads the data and then decodes the data. This is a very trivial example, as there are no query string parameters. As the complexity of the services grows and it uses a combination of different HTTP verbs, you can see how complex the code might become.
Simplifying this code comes in two phases: providing a schema for services and then consuming the schema in the UWP app.
In order to define a schema for the endpoints exposed by the ASP.NET Core Web API project, I’m going to make use of an open source library, Swashbuckle.AspNetCore, which is available as a NuGet package. After adding this package there are some changes required to the startup flow of the ASP.NET Core project, which configure the generation of the swagger JSON document that will define the schema for the services, and enables a landing page that provides a nice visual layout for the data. Listing 1 shows the ConfigureServices and Configure methods from Startup.cs, with the additional lines added to wire up the swagger generation middleware.
Listing 1: ConfigureServices and Configure Methods
public void ConfigureServices(IServiceCollection services)
{
  services.AddSwaggerGen(c =>
  {
    c.SwaggerDoc("1.0", new Info { Title = "My API", Version = "1.0" });
  });
  services.AddMvc();
}

public void Configure(IApplicationBuilder app, IHostingEnvironment env,
                      ILoggerFactory loggerFactory)
{
  loggerFactory.AddConsole(Configuration.GetSection("Logging"));
  loggerFactory.AddDebug();

  app.UseSwagger();
  app.UseSwaggerUI(c =>
  {
    c.SwaggerEndpoint($"/swagger/1.0/swagger.json", "My API");
  });

  app.UseMvc();
}
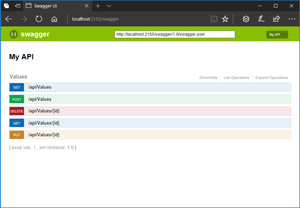
Figure 4 shows the Swagger interface that’s available when I navigate to /swagger. It also indicates that going to /swagger/1.0/swagger.json will return the swagger JSON schema for this service. The Swagger interface simply presents the JSON schema in a way that it’s easily read.
 [Click on image for larger view.]
Figure 4. The Swagger UI
[Click on image for larger view.]
Figure 4. The Swagger UI
Now that the schema is being generated I can use AutoRest to generate code that will provide a strongly typed wrapper around consuming the services. There are a couple of different ways to retrieve AutoRest, but the easiest is to add it as a NuGet package to the Consumer.Core project. Adding AutoRest as a NuGet package causes it to be downloaded and the executable is then available in user’s NuGet folder, for example:
C:\Users\[username]\.nuget\packages\AutoRest\0.17.3\tools\AutoRest.exe
The easiest way to run AutoRest is to open a command prompt, navigate to the project folder of the Consumer.Core project and then run AutoRest, providing the URL of the swagger JSON file as the Input parameter:
C:\Users\[username]\.nuget\packages\AutoRest\0.17.3\tools\AutoRest.exe -Namespace Consumer.Core -Input http://localhost:2155/swagger/1.0/swagger.json
The output of running this command is a folder called Generated, which includes three files that contain wrapper methods for accessing the services defined by the swagger JSON schema. By default, these files will automatically be added to the Consumer.Core project, which is a change in behavior in Visual Studio 2017 from previous versions. I also had to add a reference to the Microsoft.Rest.ClientRuntime NuGet package in order to get the code to compile. Rewriting the code from earlier, it’s now much cleaner:
public async void Load()
{
  var api = new MyAPI(new Uri("http://localhost:2155/"));
  var strings = await api.ApiValuesGetAsync();
  Debug.WriteLine(strings);
}
So far the service being called has been very simple with only a primitive type being returned. I’m going to add another controller to the ASP.NET Core Web API project, which will return a list of objects of a particular type, in order to demonstrate how to share class information between the client and service projects. I’ll start by adding a new controller called MyEntitiesController, shown in Listing 2.
Listing 2: MyEntitiesController Method
public class CustomEntity
{
  public string Name { get; set; }
  public int Age { get; set; }
}

[Route("api/[controller]")]
public class MyEntitiesController : Controller
{
  [HttpGet]
  public IEnumerable<CustomEntity> Get()
  {
    return new[]
    {
      new CustomEntity{Name = "Fred", Age = 24},
      new CustomEntity{Name = "Julia", Age = 36}
    };
  }
}
The GET operation on the MyEntitiesController returns two instances of the CustomEntity class. Running AutoRest again will update the MyAPI class and interface, and will also add an additional folder, Models, which contains the CustomEntity class. In some cases it makes sense to have the classes defined both in the service code and the client code, particularly if the codebases belong to different systems, or owned by different organizations. In this case, because we want to maintain compatibility between the client and service code, it’d be useful to be able to share the class definition itself between the projects.
Rather than simply using the class definition from either the Consumer.Core or ConsumingRESTService projects, and then having a direct reference between client and service projects, it’s preferable to move the class (and other classes in the future) into a separate library that can be referenced by both projects. To do this I’ll create another .NET Standard library, called Consumer.Core.Models, move the CustomEntity class into it, and reference the library from both projects. I’ll also have to exclude the Models folder from the Consumer.Core project.
The last thing to do is to update the Load method to retrieve the CutomEntity instances by calling the MyEntities controller:
public async void Load()
{
  var api = new MyAPI(new Uri("http://localhost:2155/"));
  var entities = await api.ApiMyEntitiesGetAsync();
  foreach (var entity in entities)
  {
    Debug.WriteLine($"Name: {entity.Name}  Age: {entity.Age}");
  }
}
See? It's easy to set up an ASP.NET Core Web API project to expose a swagger JSON schema and then to consume it within a UWP app using a .NET Standard library to house all the business logic.
The solution structure allows for sharing classes between the service definition and the client libraries, ensuring the two stay in sync. As the solution evolves, the services will grow; each time, AutoRest can be run in order to update the wrapper classes for easy access within the client library.
About the Author
Nick Randolph runs Built to Roam, a consulting company that specializes in training, mentoring and assisting other companies build mobile applications. With a heritage in rich client applications for both the desktop and a variety of mobile platforms, Nick currently presents, writes and educates on the Windows Phone platform.