In-Depth
Cloud Development in Visual Studio 2010
Visual Studio 2010 provides familiar tooling and resources for developers who want to put their applications up in the cloud. Here's how to do it.
Imagine building an application that could have essentially infinite storage and unlimited processing power. Now, add in the ability to dynamically scale that application depending on how many resources you want to consume -- or how much you're willing and able to spend. Add a dash of maintainability that gives you this power without the need to manage racks of machines.
Finally, imagine we sweeten the pot by removing the need for you to deal with installing Service Packs or updates, and you've got a pretty interesting recipe coming together. We call this dish Windows Azure, and with Microsoft Visual Studio 2010 you're the chef.
This article is a no-nonsense walkthrough of how to use your existing ASP.NET skills to build cloud services and applications. It's possible to build Windows Azure applications with Visual Studio 2008 or Visual Studio 2010, but Visual Studio 2010 gets you out of the gate faster and generally has a more deeply integrated experience; hence, it's the focus of this article. If you're interested in using Visual Studio 2008, much of the content is applicable, but you'll need to download Windows Azure Tools for Microsoft Visual Studio.
Getting Out the Door
If you have Visual Studio 2010 installed, then we're ready to get started. If you don't, go install it now -- we'll wait. The Cloud Tools team has made every effort to make the experience of building a cloud application as similar as possible to building an ASP.NET application. There are some differences of course, but if you're already an ASP.NET guru, your skills will translate remarkably well.
The first thing we're going to do is get Visual Studio set up to build these types of applications. Simply click on File | New Project, select the Visual C# or Visual Basic top-level nodes, and find the Cloud node that appears in the Installed templates pane on the right. Once this node is selected you'll see only a single project template that says "Enable Windows Azure Tools." Go ahead and double-click on that template; the name and location that you choose don't matter in this case. You'll end up with an HTML document opened in a tab, which provides instructions on downloading Windows Azure Tools. Follow the directions; this is something that you'll only have to do the first time that you create a Cloud Service with Visual Studio.
Windows Azure Tools have a couple of additional installation requirements outside of what Visual Studio 2010 requires by default. In particular, you'll need to enable IIS on your development machine. The page that has instructions for installation lists the process for doing this. We hope to eventually remove this requirement.
Creating Your First Cloud Service
After the tools have been installed, the "Enable Windows Azure Tools" project template will be replaced by a project template named "Cloud Service." In order to create your first Cloud Service project, double-click on this project template (off of the File | New Project... | Visual C# | Cloud node) and you'll be taken to a new dialog. This dialog allows you to configure the roles associated with your Cloud Service. Roles are a new concept introduced with Windows Azure. The easiest way to think about them is that they're the individual, scalable units of code. You can create any number of instances of roles, and then load balance work among them.
There are two types of roles: Worker roles and Web roles. A Web role is simply a Web application running on IIS. It's able to communicate to the outside world through an HTTP or HTTPS endpoint. In general, a Web role will respond to requests, perform actions and then wait for the request. A Worker role is a background--processing application that runs arbitrary Microsoft .NET Framework code. These are usually used for work that should be scheduled, long running tasks and so on.
The dialog that appears will show a list of templates -- split between Web and Worker roles -- on the right. These templates can be double-clicked in order to add them to the right pane. A Cloud Service can consist of any number of Worker roles and any number of Web roles.
In this case, we'll double-click on a Visual C# ASP.NET Web Role. Once the Web role appears in the right pane (see Figure 1), you may rename the role by either clicking on the pencil icon that appears when the role is hovered over, or by selecting the role and pressing F2. Let's rename the role to "MyASPNETRole" and then click OK.
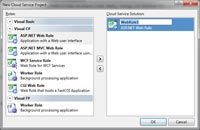
[Click on image for larger view.] |
| Figure 1. Adding roles to a new Cloud Service project. |
At this point Visual Studio will go through the process of creating a solution that contains two projects. The first project is a Cloud Service project. This project contains all of the configuration information needed in order to run your service in the cloud. The second project is really just a slightly modified ASP.NET application. In addition to the normal ASP.NET goodness, the project contains certain Windows Azure-specific references:
- Microsoft.WindowsAzure.Diagnostics (diagnostics and logging APIs)
- Microsoft.WindowsAzure.ServiceRuntime (environment and runtime APIs)
- Microsoft.WindowsAzure.StorageClient (.NET API to access the Windows Azure storage services for blobs, tables and queues)
The file WebRole.cs contains code to set up logging and diagnostics as well as a trace listener in the web.config/app.config that enables using the standard .NET logging API on Windows Azure.
The cloud service project acts as a deployment project. It provides Windows Azure-specific run, debug and publish functionality. You may notice it's marked as the startup project for the solution (it's bold). It's important to keep it this way; this makes it so that when you hit F5, your application is run in a local simulation environment for the cloud known as the Development Fabric.
After you've created the composition of the solution, it's pretty straightforward to make changes. If you want to add another role, just right-click on the Roles node in solution explorer and select the appropriate command. Each of the roles listed under the Roles node also contain properties that can be set to control the behavior of how they run in the cloud. To set these properties, simply double-click on the role itself and you'll be presented with a user interface reminiscent of the Project Designer.
Data in the Cloud
We now have a very simple Cloud Service. We could debug the application at this point by hitting F5, though all you would see is a blank Internet Explorer window. As you're coding, it's important to consider the Windows Azure model for making your application scalable. In order to handle additional traffic to your application, you increase the number of instances for each role. That means requests will be load-balanced across your roles, and that will affect how you design and implement your application.
In particular, this dictates how you access and store your data. Many known data storage and retrieval methods aren't scalable, and therefore aren't cloud-friendly. For example, storing data on the local file system shouldn't be used in the cloud because it doesn't scale.
To achieve the scaling nature of the cloud, you need to be aware of the new storage services. Windows Azure Storage provides scalable blob, queue and table storage services, and Microsoft SQL Azure provides a cloud-based relational database service built on Microsoft SQL Server technologies. Blobs are used for storage of named files along with metadata. The queue service provides reliable storage and delivery of messages. The table service gives you structured storage, where a table is a set of entities that each contains a set of properties.
To help use these services there's a local emulation environment called the Development Storage that simulates the way these storage services run in the cloud. You can write your application to target the Development Storage services using the same APIs that target the cloud storage services.
Discussing the correct way to use the various storage services that Windows Azure offers would take too long to explain in this article; however, there are numerous samples available at tiny-url.com/ yfkxb86, and these offer good examples of building applications using these APIs. In addition, the usual support for learning APIs is built into the tools. You can use Object Browser to view the new assemblies -- IntelliSense will show all of the types and APIs, including their XML documentation -- and F1 will navigate you from a type to the online version of its help.
Debugging
To demonstrate running and debugging on Windows Azure locally, let's use one of the samples from the MSDN Code Gallery page mentioned previously.
Go to the samples page and download the samples for Visual Studio 2010. Then, extract all the files to an accessible location such as your Documents folder.
Run Visual Studio 2010 as an administrator and then open the thumbnails solution of your extracted samples. The thumbnails sample is a service that demonstrates the use of a Web role and a Worker role along with the blob and queue services.
The Web role provides a front-end application for the user to upload photos. It then adds a work item to a queue. The Worker role fetches the work item from the queue and creates thumbnails in the designated directory.
Once you open the solution, you'll notice there are three projects. Thumbnails is the cloud service that associates two roles, Thumbnails_Web-Role and Thumbnails_WorkerRole. Thumbnails_WebRole is the Web role project that provides a front-end application to the user to upload photos and adds a work item to the queue. Thumbnails_WorkerRole is the Worker role project that fetches the work item from the queue and creates thumbnails in the designated directory.
This sample demonstrates the use of the StorageClient library to interact with both the queue and blob services.
Add a breakpoint to the submitButton_Click method in the Default.aspx.cs file. This breakpoint will get hit when the user selects an image and clicks on Submit on the page:
protected void submitButton_Click(
 object sender, EventArgs e) {
 if (upload.HasFile) {
  var name = string.Format("{0:10}", DateTime.Now.Ticks,
   Guid.NewGuid());
  GetPhotoGalleryContainer().GetBlockBlob(name).UploadFromStream(upload.FileContent);
Second, add a breakpoint in the Run method of the worker file, WorkerRole.cs, right after the code retrieves a message from the queue and checks if one exists. This breakpoint will get hit when the Web role puts a message in the queue that is retrieved by the worker:
while (true) {
 try {
  CloudQueueMessage msg = queue.GetMessage();
  if (msg != null) {
   string path = msg.AsString
To debug the application, go to the Debug menu and select Start Debugging. Visual Studio will build your project, start the Development Fabric, initialize the Development Storage (if run for the first time), package the deployment, attach to all role instances and then launch the browser pointing to the Web role.
At this point you'll notice that the browser launched pointing to your Web role and the Development Fabric is started in the notifications area of the taskbar. The Development Fabric is a simulation environment that simulates running role instances on your machine similar to how they run in the real cloud.
Right-click on the Windows Azure notification icon in the taskbar and click on Show Development Fabric UI. This will launch the Development Fabric application that allows you to perform various operations on your deployments, such as viewing the logs as well as restarting and deleting deployments (see Figure 2). You should also notice that the Development Fabric contains a new deployment that hosts one Web role instance and one Worker role instance.
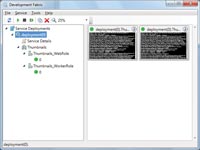
[Click on image for larger view.] |
| Figure 2. The Development Fabric. |
By looking at the processes that Visual Studio attached to (Debug/Windows/Processes), notice that there are three processes: WaWebHost.exe, WaWorkerHost.exe and iexplore.exe.
WaWebHost (Windows Azure Web instance Host) and WaWorker-Host (Windows Azure Worker instance Host) host your Web role and Worker role instances, respectively. In the cloud, each instance is hosted in its own virtual machine, whereas on the local development simulation each role instance is hosted in a separate process and Visual Studio will attach to all of them.
By default, Visual Studio uses the script engine to attach to IE. To debug Microsoft Silverlight applications, you need to enable the Silverlight debugger from the Web role project Properties.
Browse to an image you'd like to upload and click Submit. Visual Studio will break at the breakpoint you set inside the submit-Button_Click method, giving you all of the debugging features that you'd expect from Visual Studio. Hit F5 to continue. The submitButton_Click method generates a unique name for the file, uploads the image stream to blob storage and adds a message on the queue that contains the file name. Now Visual Studio will break at the breakpoint set in the Worker role, which means that the Worker received a message from the queue and it's ready to process the image.
Hit F5 to continue. The Worker will get the file name from the message queue, retrieve the image stream from the blob service, create a thumbnail image and upload the new thumbnail image to the blob service's thumbnails directory, which will be shown by the Web role.
Deployment
Now that you've created, edited and debugged your application locally, you're ready to deploy it to the cloud. The following is a good process for deploying an application to Windows Azure:
- Get your application running locally in the Windows Azure Development Fabric using local storage.
- Run your application locally in the Development Fabric using a Windows Azure Storage Account.
- Run your application on Windows Azure using a Windows Azure Storage Account.
In the first stage, you can do all your development on your local machine using the Development Fabric and Development Storage as surrogates for the Windows Azure cloud infrastructure. You don't even need a network connection -- you can develop and debug your Windows Azure application or service completely offline.
In the second stage, you replace the local storage surrogate with the real deal, Windows Azure Storage, but retain the debugging and diagnostic advantages of executing your Windows Azure application code in the local Development Fabric. You can set breakpoints in source code, step through source code line-by-line, evaluate expressions and examine call stacks while your Windows Azure app interacts with cloud storage. You'll probably spend 20 percent to 25 percent of your project cycle in this stage, refining your code and testing against real-world asynchronous operations.
In the third stage, your main focus is testing and performance tuning. With your Windows Azure application executing in the Windows Azure cloud, you won't have the luxury of source code debugging, so you'll have to fall back to diagnostic logging.
You probably don't want your app to be seen by the whole world on your target URL the instant you upload it to the Windows Azure cloud. The Windows Azure Hosted Service has the option of multiple deployments within the same hosted service. Each Windows Azure hosted service has a private staging deployment area where you can quietly test your code in the cloud, and a public production deployment area where you release tested code for your customers to use.
Staging deployments can only be accessed via a unique URL that's prefixed by a globally unique identifier (GUID) assigned by the system. Production deployments can be the target of custom domain name mappings for easy access.
Moving to Windows Azure Storage
Now that the Thumbnails service is running on a local machine in the Developer Fabric, let's upgrade it to work against a Windows Azure Storage account in the cloud. This involves getting a storage account and making the configuration changes to run the Thumbnails service against your storage account. Executing locally but using cloud storage for data is a great way to ensure that your code will run when hosted on Windows Azure.
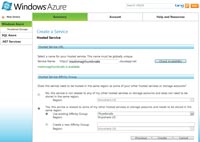
Start by navigating to the Windows Azure Developer Portal (windows.azure.com) and sign in with your Windows Live ID. From the page, select New Service and click on Storage Account. In the Create a Service page, fill in a friendly name for the storage account. Then fill in the service/domain name on the next page (see Figure 3). This domain name is global so you may need to fiddle with it a bit to get a name that's not already in use by another service.
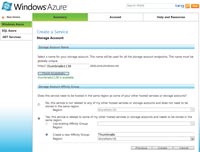
[Click on image for larger view.] |
| Figure 3. Configuring a storage domain. |
It's a good idea to create an affinity group to ensure that your storage and hosted services that use it are located in the same data center whenever possible. Affinity groups can also specify a preference for a geographical region so that service and storage are as close to your target audience as possible to minimize network transit time.
Click on Create and you'll see a summary page for your new storage account. Now you need to tell your Thumbnails service to use your new storage account to store its thumbnails and images.
Double click on the Thumbnails_WebRole node under Roles in the Visual Studio Solution Explorer to open its properties page. Select the Settings tab, select DataConnectionString and click on the Edit button on the far right of the grid row. This brings up the Storage Connection String dialog, shown in Figure 4.
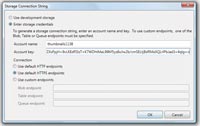
[Click on image for larger view.] |
| Figure 4. Storage Connection String dialog. |
"Use development storage" is the default for new Windows Azure projects. Click on "Enter storage credentials" and then enter your storage service details.
In the AccountName field, enter the service/domain name you entered when creating your storage service. This is the first part of your domain (thumbnails1138, all lower case, in the example).
In the AccountSharedKey field, enter the Primary Access Key displayed on your storage service summary Web page. You can select the key text in the browser, copy it and paste it into the AccountSharedKey edit box.
Note that the Secondary Access Key provides the same access to your storage account as the Primary Access Key and is generated as a backup should your Primary Access Key be compromised.
Regenerating a key invalidates the old key, shutting down storage access to anyone still using the old key.
Leave the connection endpoints set to use the default HTTPS endpoints and click on OK.
Repeat these steps for the Thumbnails_WorkerRole under Roles as well, so that the Web role will be talking to the same storage service as the Worker role.
Once you have switched the Web and Worker roles to use Windows Azure Storage, press F5 in Visual Studio to debug your cloud service and ensure that everything works correctly.
You'll see that the Web page URL you're debugging is still locally hosted, but the URLs of the thumbnails (visible in their Properties dialogs) now point to Windows Azure Storage.
Note that this stage of development -- local services with cloud storage -- will most likely have the worst performance of the three stages of deployment. Stage one (local/local) will be pretty snappy because everything is in the same box and has a total audience of one. Stage three (cloud/cloud) will have the benefit of cloud-scale hardware and data center affinity. Stage two (local/cloud), however, will be executing code that reasonably assumes its storage is nearby -- but in fact the data is probably many network hops away from the local execution environment.
Don't evaluate the performance of your application in stage two. You can turn that network lag into your advantage, though: use this stage as a stress test to see how your code handles exaggerated response times from its storage service. If you've done something with a synchronous call that should really be asynchronous, you'll probably notice it pretty quickly.
Once you have everything working in the local/cloud configuration, you're ready to deploy your code to a Windows Azure hosted service.
Creating a Hosted Service
To create the fully hosted service, go back to the Windows Azure Developer Portal and sign in with your Live ID. Click on New Service, and then click on Hosted Services.
This will take you to a page where you can specify the project-friendly name and description used by the developer portal. Enter a service label. Click on Next. Now you can enter a domain name for your hosted service project (see Figure 5). Set the affinity group to match the Thumbnails affinity group created earlier with the storage service. After the project is created, you'll see a summary page for your project.
[Click on image for larger view.] |
| Figure 5. Configuring a hosted service. |
To deploy the project from Visual Studio, right click on the Thumbnails project node in Solution Explorer and select Publish. This command builds a package of your Windows Azure application binaries and related files, opens Windows Explorer to show the local directory where the package was built, and launches your default Web browser to browse to the developer portal.
From the developer portal Web page, navigate to the Thumbnails Hosted Service summary page and click on Deploy from under Staging to bring up the Staging Deployment page. This is where you specify the package and the configuration file to upload.
You can copy the path from the Windows Explorer window that Visual Studio opened into this File Open dialog, which will make it easy for you to select the Service Package (.cspkg) and Service Configuration files.
The portal will then upload the package and deploy your cloud service to staging. This puts your roles in the Allocated state. This means your Windows Azure application has been provisioned with data center hardware, but it's not scheduled to run.
To test your Cloud Service in the Staging area, you need to run it. Click on Run. This will put your Web role in the Initializing state. When the Web role is ready, the state will change to Started. Once your roles have been started you can test by navigating to the staging URL, which is the cloudapp.net URL that begins with a GUID.
Provisioning an application in the data center involves a lot of heavy lifting behind the scenes. Allow at least 10 minutes for your app to transition from Initializing to Started. After you're happy with your cloud service on staging, you can promote it to production by clicking on the button shown in Figure 6.
 |
| Figure 6. The promotion button. |
When the details of your deployment show up on the Production side of the page, your service will be up and running at its final URL.
Note that multiple deployments will default to using the same storage service; if you need data isolation between production and staging (for example, so staging can wipe its database without affecting production data), you'll need to modify your storage bindings for each deployment before you deploy them. This is typically done by using two sets of storage and migrating production data to staging before promoting staging to production.
Familiar Tools
Visual Studio 2010 makes it easy to create, edit, configure, debug and deploy applications that run on Windows Azure. In particular, it's possible to make use of the better part of your existing skill set with both Visual Studio and ASP.NET. Windows Azure presents huge efficiency, stability and cost-saving opportunities, and Visual Studio 2010 is a fast way to get an application up and running on the platform.
For the latest news and information about Windows Azure, make sure to visit windowsazure.com and blogs.msdn.com/jnak.