In-Depth
Background Tasks in Windows Store Apps
A new feature of Windows Store apps, utilizing background tasks will not only help circumvent some challenges from the Windows Store app lifecycle, but they can keep your app responsive to what's going on with the user's device.
- By Tony Champion
- 05/02/2013
Developing Windows Store apps is a change of pace for a lot of developers. Unless you've migrated from the Silverlight, Windows Phone 7 or Windows Phone 8 world, the sandboxed and controlled environment might call for a bit of an adjustment. One feature you'll have to contend with is the lifecycle of a Windows Store app. In traditional desktop development, the user controls when an application's running. He can choose to run one or 20 applications at once, and each application continues to have access to system resources and the CPU.
In the world of Windows Store apps, things have changed. If an app isn't actively running on the user's screen, at any given time Windows can suspend that app in order to maintain performance and preserve system resources.
What does this mean for you? This means that if your app isn't currently on the screen, you can assume it's in a suspended state and no longer running. If your app is expecting to do periodic data polling or is real time, you're going to have to look for a workaround. Fortunately, the Windows Runtime (WinRT) includes a collection of background tasks your app can utilize to construct a workflow that will work with the new lifecycle.
>What Is a Background Task?
In its simplest form, a background task is a class that implements the IBackgroundTask interface located in the Windows.ApplicationModel.Background namespace. The IBackgroundTask includes a single Run method that passes in an IBackgroundTaskInstance that allows the task to interact with the current run process. Here's a basic implementation of IBackgroundTask:
public class SampleBackgroundTask : IBackgroundTask
{
  public void Run(IBackgroundTaskInstance taskInstance)
  {
    // Insert runtime code
  }
}
When registering a background task to execute, it must be assigned to a single trigger that's responsible for determining when and how frequently a task will be executed. Windows Runtime currently includes five different types of triggers, which are shown in Table 1. A Control Channel trigger is used for high-availability, real-time apps that maintain open socket connections. A Control Channel trigger allows the app to run in a low-power mode until data is received across the socket. The Push Notification trigger allows an app to respond when a raw notification is received from the Windows Notification Service. The Maintenance and Timer triggers are both time-based triggers that fire at a given time interval. The difference between the two is that the Maintenance trigger will only fire if the device is plugged into a power source, and the Timer trigger requires the app to be added to the lock screen to function.
| Trigger |
Description |
| Control Channel |
Incoming message on a control channel (socket) |
| Push Notification |
Raw notification from Windows Push Notification Services |
| Maintenance |
Time trigger for maintenance tasks |
| Time |
Time event occurs |
| System Event |
Responds to a predefined system event |
Table 1. Available trigger types.
|
The last trigger type, System Event trigger, is one of the most interesting and versatile triggers. A System Event trigger allows you to register a background task to a variety of predefined system events. For instance, you can register a background task to run anytime an Internet connection becomes available. There are currently 12 available system events, which are listed in Table 2.
| Internet Available |
Servicing Complete * |
| Lock Screen Application Added |
Session Connected * |
| Lock Screen Application Removed |
Sms Received |
| Control Channel Reset * |
Time Zone Change |
| Network State Change |
User Away * |
| Online Id Connected State Change |
User Present * |
| * Requires app to be on the user's lock screen before it will be triggered. |
Table 2. Available events exposed as a System Event trigger.
|
The final piece of a background task is an optional collection of one or more conditions. There are six different conditions that can be applied to your background task:
- Internet Available
- Internet Not Available
- Session Connected
- Session Disconnected
- User Not Present
- User Present
Using conditions allows you to ensure that your background task is successful, and also prevents unnecessary usage of system resources. For instance, using the Internet Available condition comes in handy if your background task requires Internet access.
It's important to consider the combination of trigger and conditions used when registering a background task, to avoid creating a condition that will prevent your task from ever running. Combining an Internet Not Available condition with an Internet Available trigger, for instance, will result in your task failing to ever run.
Background Tasks and the Lock Screen
Before adding background tasks to your Windows Store app, take into account the impact of the lock screen on background tasks. A user can place up to seven apps on his lock screen. Once an app is added to the lock screen, it gets a higher priority over other apps. This higher priority has a direct affect on background tasks. I mentioned earlier that the app must be on the lock screen before the Timer trigger would work. In fact, the Control Channel and Push Notification triggers also require the app to be on the lock screen. Similarly, several of the System Event triggers also require the app to be added to the lock screen.
In addition to having more triggers available, apps placed on the lock screen get more system resources for their background tasks. Each background task associated with a lock screen app is given a two-second CPU quota and can be refreshed every 15 minutes. Apps not on the lock screen only have a one-second quota with a two-hour refresh. Data throughput is scaled based on the average network speed of the device, but lock screen apps are allowed approximately six times more throughput than others.
Thus, when designing the workflow for your background tasks, it's imperative to consider whether the lock screen will play an important role. If your app does rely on being on the lock screen, it's important to include a workflow that handles when the app isn't on the lock screen. This could involve notifying the user that certain features will be disabled, or having an alternate workflow to implement when the app has been removed from the lock screen. Fortunately, there are two system events that you can attach a background task to in order to manage this: Lock Screen Application Added or Lock Screen Application Removed.
Adding a Background Task
While this article implements background tasks using C#, background tasks can also be used in Visual Basic, C++ and JavaScript apps. To begin, create a new C# Windows Store app in Visual Studio 2012 using the Blank (XAML) template and title it BackgroundTaskDemo.
The actual implementations of IBackgroundTask must reside in a WinRT component library. If included in the app project itself or a standard class library, they won't successfully register or run. After the solution is generated, right-click the Solution node in the Solution Explorer and select Add | New Project. In the New Project Dialog, select Windows Runtime component and title the new project BackgroundTasks.
It's extremely important to add a reference to the new project from your app, because the main app never actually calls the background task directly. A compile-time error won't be generated without a reference, but your app will crash once the trigger is fired. To add the reference to your app, right-click on the References folder under the BackgroundTaskDemo project in the Solutions Explorer and select Add Reference. In the left column, under Solution, select Projects. Check the BackgroundTasks project and select OK.
Now your solution should have a new BackgroundTasks library containing a single class, Class1. Rename Class1 to MyBackgroundTask and implement the background task shown in Listing 1.
Listing 1. The MyBackgroundTask implementation.
public sealed class MyBackgroundTask : IBackgroundTask
{
  public void Run(IBackgroundTaskInstance taskInstance)
  {
    UpdateStatusAndTime();
  }

  private void UpdateStatusAndTime()
  {
    var tileContent = TileUpdateManager.GetTemplateContent(
      TileTemplateType.TileSquareText03);

    var tileLines = tileContent.SelectNodes("tile/visual/binding/text");

    var networkStatus =
      Windows.Networking.Connectivity.NetworkInformation.GetInternetConnectionProfile();

    tileLines[0].InnerText = (networkStatus == null) ?
      "No network" :
      networkStatus.GetNetworkConnectivityLevel().ToString();

    tileLines[1].InnerText = DateTime.Now.ToString("MM/dd/yyyy");
    tileLines[2].InnerText = DateTime.Now.ToString("HH:mm:ss");

    var notification = new TileNotification(tileContent);

    var updater = TileUpdateManager.CreateTileUpdaterForApplication();
    updater.Update(notification);

  }
}
Each time the background task is triggered, it will execute the Run method. In this case, the Run method calls a private UpdateStatusAndTime method that will update the app's live tile with the current network connectivity level of the machine, as well as the date and time of the update. The end result is a live tile that displays your device's current network connectivity. It's important to note that this class is a sealed class -- all public classes within a WinRT component are required to be sealed, so your background tasks will always be a sealed class.
Now it's time to register your background task with Windows. This is done through the BackgroundTaskBuilder class. The role of the BackgroundTaskBuilder is to match an implementation of IBackgroundTask with a trigger, a unique name and any optional conditions. Each registered task must have a unique name within the scope of the app. You don't need to worry about maintaining uniqueness between apps. For the purpose of this example, you'll add the background registration code to the OnNavigatedTo method within the MainPage.xaml.cs. Listing 2 shows the modified OnNavigatedTo method.
Listing 2. The OnNavigatedTo method with the background registration code added.
protected override void OnNavigatedTo(NavigationEventArgs e)
{
  foreach (var task in BackgroundTaskRegistration.AllTasks)
  {
    task.Value.Unregister(true);
  }

  var builder = new BackgroundTaskBuilder();
  builder.Name = "MySampleTask";
  builder.TaskEntryPoint = "BackgroundTasks.MyBackgroundTask";
  builder.SetTrigger(new SystemTrigger(SystemTriggerType.NetworkStateChange, false));
  var ret = builder.Register();

}
Once the BackgroundTaskBuilder is created, it's assigned the unique name MySampleTask. The TaskEntryPoint is set to the full path to your implementation of IBackgroundTask, which is the namespace followed by the class name. For the demo (available in the accompanying code download), the TaskEntryPoint is BackgroundTasks.MyBackgroundTask. A Network State Change system trigger is added to the task by the SetTrigger method. The SystemTrigger constructor also has a second parameter in addition to the trigger type, OneShot, which allows you to specify if this task will be fired more than once. There are no conditions in this example, but you can easily add them through the SetCondition method.
After your background task has been configured, a call to the Register method will register the task with Windows. You can use the same instance of BackgroundTaskBuilder to register more than one task, but remember to set the Name property to a new identifier.
The final step to adding a background task to your solution is to declare it in the App Manifest. Open the App Manifest Designer by double-clicking the Package.appxmanifest file found in the BackgroundTaskDemo project. At the top of the design, select the Declarations tab. Each class that implements IBackgroundTask must be declared before Windows will give it permission to register.
To add a declaration, select Background Tasks from the Available Declarations dropdown and press the Add button. There are two pieces of information required:
- The supported task type. In this case you're only using the System event type. If you're using the same class in multiple instances, make sure all the appropriate types are selected.
- The app settings. In this case, you'll use the Entry Point property. This value should be set to the full path of the IBackgroundTask implementation, which is identical to the TaskEntryPoint previously set. Figure 1 shows what the final declaration should look like.
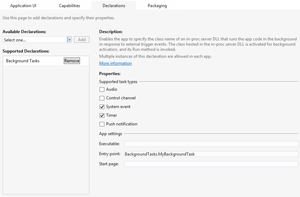 [Click on image for larger view.]
Figure 1. The Declarations page.
[Click on image for larger view.]
Figure 1. The Declarations page.
Typically, each background task is executed in a special system process called BackgroundTaskHost.exe. This means the executing code isn't actually running in the context of your app. However, for some triggers, running in the context of your app makes more sense (for instance, a Control Channel trigger). When this is the case, setting the Executable property to your app's executable will override the default behavior. Note that all background tasks will run in the system process for JavaScript apps. In addition, the Start page property is used to set the entry point of a background task in a JavaScript app.
With the declaration added to the project, you can now build and deploy the app to your device. Press F5 to build and run the project in debug mode. Once the app loads, you get an empty black screen because no visual elements have been added to the UI. However, in this case, you should be more concerned with the app's tile. Opening the Windows Start screen shows a new default tile added that looks similar to Figure 2.
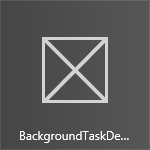 Figure 2. The default BackgroundTask tile.
To trigger the background task, you need to change the network status of the device. This can be done by turning off the Wi-Fi, unplugging the device from the network or turning on airplane mode. Regardless of the approach, you need to disconnect your device from the network. Once you've removed the machine from the network, return to the Start screen. The live tile for the app should now show the current network status and a date and time stamp. Because Windows controls the timing of live tile updates, it might take several seconds before the new tile appears. Figure 3 shows an example of the new tile. You now have an app that provides the user with the device's current network status.
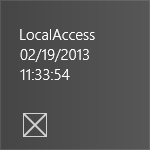 Figure 3. The BackgroundTask tile with a date and time stamp.
Long-Running and Asynchronous Operations
By default, each background task will execute within a special process, BackgroundTaskHost.exe. Once the Run method completes, the task-executing stack is terminated and any asynchronous operations, like a Web call or file access, won't be completed. Also, each task is given a short period of time to complete its execution and will be terminated early if that time limit is reached. In order to address these situations, Windows Runtime includes a BackgroundTaskDeferral class.
The IBackgroundTaskInstance, which gets passed to the Run method of a background task, includes a GetDeferral method that returns a BackgroundTaskDeferral instance. Once the GetDeferral method is called, the executing code won't complete until the Complete method of the return BackgroundTaskDeferral is called. This provides an excellent way to extend the life of the background task. The following code shows the Run method of the MyBackgroundTask class, modified to use the BackgroundTaskDeferral:
public void Run(IBackgroundTaskInstance taskInstance)
{
  BackgroundTaskDeferral deferral = taskInstance.GetDeferral();

  UpdateStatusAndTime();

  deferral.Complete();
}
Accessing Registered Background Tasks
Once a task has been registered, you can access that task through the static property AllTasks of the BackgroundTaskRegistration class. The AllTasks properties return a collection of KeyValuePair objects, where the Key is a GUID assigned to your task and the Value is an IBackgroundTaskRegistration generated by the BackgroundTaskBuilder. The collection will only contain tasks for the current app, and not from any other app. The IBackgroundTaskRegistration allows you to do a couple of things.
First, the interface exposes two events: Completed and Progress. By attaching to these events, your app can respond to status changes of each background task during its execution. In order to effectively use the Progress event, your background task needs to update the Progress property of the IBackgroundTaskInstance passed into the Run method.
Second, the Unregister method allows you to remove the task from the app's registered tasks, preventing it from running. Listing 2 shows that the first few lines of code cycle through all of the registered tasks and unregisters them.
Debugging Background Tasks
If you're running the Windows Store app from within the Visual Studio debugger, placing a break point inside the Run method of the IBackgroundTask implementation will work as expected. However, there are certain cases when triggering the background task for testing purposes might be a bit challenging. For instance, the minimum refresh time you may set for a Time trigger is 15 minutes. Can you imagine having to wait 15 minutes each time you wanted to test a background test? While it might give you plenty of time to work on your Sudoku skills, it doesn't do much for productivity.
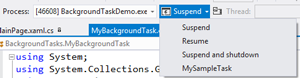
Thankfully, Visual Studio includes a Debug Location toolbar, which can manually trigger any background task registered for the app while it's running within the debugger. You can add the Debug Location toolbar by right-clicking on the Visual Studio toolbar and selecting Debug Location from the list of available toolbars. This toolbar is only available -- and will only be visible -- when an app is currently running inside the debugger.
Within this toolbar is a Suspend dropdown box. Expanding the dropdown reveals a list of all background tasks registered, as shown in Figure 4. The name listed will be the one you assigned each task in the BackgroundTaskBuilder. (On a side note, this toolbar is a great way to test app behavior when suspended and resumed by Windows.)
 [Click on image for larger view.]
Figure 4. All current background tasks, visible from the Suspend dropdown box.
[Click on image for larger view.]
Figure 4. All current background tasks, visible from the Suspend dropdown box.
Selecting a background task from this list will manually trigger the background task. To test this, put a break point in the Run method of the MyBackgroundTask class. From the Suspend dropdown, select MySampleTask. Visual Studio will trigger your background task and stop at the added break point.
Deep Background
Background tasks are an important part of many Windows Store apps. It's a necessary part of the architecture process to have a firm understanding of how a Windows Store app's lifecycle and system events can affect your app. By effectively using the background tasks API, you can provide your users with an always-connected experience, even when your app isn't running.