Cross Platform C#
How To Use SignalR in iOS and Android Apps
SignalR is well-known by .NET developers as a way to handle communications. Find out what it can do in your iOS and Android apps, too.
- By Greg Shackles
- 11/26/2013
SignalR has been taking the .NET world by storm, so there's a good chance you've seen it in action by now, or at least heard something about it. For those who haven't, SignalR is a library that makes it extremely easy to add real-time communication to your applications. This means your servers and their clients can push data back and forth to each other in real time. This opens up a whole new world of possibilities for applications that simply weren't feasible in the past, and allows you to interact with your users on a whole new level.
There are many different mechanisms under the hood for achieving this type of communication (depending on what the client supports), but SignalR abstracts all that away for you. Instead of dealing with that, you're provided with a simple API to develop against, letting you get started quickly and concentrate on the fun parts when building your applications. The transport mechanisms currently supported by SignalR, in order of preference, are:
- WebSockets
- Server Sent Events
- Forever Frame
- Long Polling
WebSockets is the most efficient mechanism, because it supports full two-way communication and is supported by most modern Web browsers; SignalR, however, will degrade automatically to the best option supported by the client. If you're running SignalR on top of IIS, it's worth noting that to take advantage of WebSockets, you need to be running at least IIS 8.
It's also important to remember that clients of SignalR applications aren't restricted to just Web browsers. SignalR provides client libraries for .NET, JavaScript, Silverlight, Windows Phone, Windows RT and even iOS and Android through Xamarin. To make the deal even sweeter, all client libraries based on C# -- all but the JavaScript client -- share a lot of code and provide a common API. This means that you can write SignalR client code that's portable across many different platforms, which is very powerful.
To demonstrate, I'm going to build a simple application that shares its SignalR client code across iOS and Android. I know it's a little bit of a cliché to demonstrate a real-time application by showing a chat application, but bear with me on this one. Seeing how little code is needed to achieve something so powerful is what makes SignalR compelling. It's also worth noting that when working with the iOS and Android clients, the best transport mechanism is currently Server Sent Events.
The Server Side
For the server-side component, I'll use a simple ASP.NET Web site to host SignalR. In Visual Studio, create a new empty ASP.NET project. To add SignalR to the project, simply add it through NuGet; everything else is taken care of. Next, all I need to do is create a simple chat endpoint for clients to connect to. To do that, add a new class named Chat to the project:
using Microsoft.AspNet.SignalR;

namespace ChatDemo
{
  public class Chat : Hub
  {
    public void Send(string platform, string message)
    {
      Clients.All.messageReceived(platform, message);
    }
  }
}
As you can see, there really isn't much code in here at all. In fact, most of those lines are just curly braces and ceremony, and there's only one line that actually requires a semicolon. In SignalR, a hub is a high-level API in the pipeline that provides an easy way to create a communication endpoint. It's possible to get more granular and closer to the metal if you need a higher level of customization in your applications, but for most uses, hubs take care of a lot of the details and keep things nice and easy.
In this case, I'll create a hub named Chat that exposes a method named Send to all of its clients. When that method's invoked, it triggers a messageReceived method to be invoked on any client that's listening. The hubs API takes advantage of the dynamic features in C#, which makes it very easy to express the methods you want to invoke on the client.
Remember when I said SignalR makes it easy to create real-time applications? That's all the code needed for the server-side part of this app. Now let's move over to the clients.
Shared Client Code
As mentioned earlier, the actual SignalR client code is pretty portable across platforms, so I'll leverage that in this example. To do that, I'll create a new class named Client that will be used by both iOS and Android, as shown in Listing 1.
Listing 1: Creating a Cross-Platform Chat Client Class
using System;
using System.Threading.Tasks;
using Microsoft.AspNet.SignalR.Client;

namespace ChatClient.Shared
{
    public class Client
    {
        private readonly string _platform;
        private readonly HubConnection _connection;
        private readonly IHubProxy _proxy;

        public event EventHandler<string> OnMessageReceived;

        public Client(string platform)
        {
            _platform = platform;
            _connection = new HubConnection("http://192.168.1.103");
            _proxy = _connection.CreateHubProxy("Chat");
        }

        public async Task Connect()
        {
            await _connection.Start();

            _proxy.On("messageReceived", (string platform, string message) =>
            {
                if (OnMessageReceived != null)
                    OnMessageReceived(this, string.Format("{0}: {1}", platform, message));
            });

            Send("Connected");
        }

        public Task Send(string message)
        {
            return _proxy.Invoke("Send", _platform, message);
        }
    }
}
Again, note how little code is required to interact with the SignalR API. In the constructor, I create a new connection to the SignalR server, and a proxy for the Chat hub created earlier. The constructor also takes in a string for the platform using it, just so I can easily distinguish between messages that come from iOS and Android later on. There is also an asynchronous Connect() method that connects to the hub, and registers a listener for the messageReceived message that raises an event when invoked. Once connected, it broadcasts a message through the hub that it has connected through the Send method.
You might also have noticed the use of "async" and "await" in this class. Since those keywords are fully supported in Xamarin, they're accessible on both platforms. It's likely that the IP address and port will be different than what's used here, so you'll want to update them accordingly.
The iOS Client
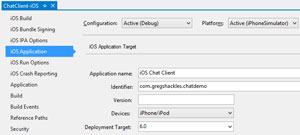
Now that the client libraries and SignalR client code are sorted out, let's see what's involved in creating an iOS chat client. Create a new Xamarin.iOS application and add a reference to the Client.cs file created earlier. It's also required to set an application name and identifier, which can be done through the project properties dialog under the iOS Application tab (see Figure 1).
 [Click on image for larger view.]
Figure 1. iOS application settings
[Click on image for larger view.]
Figure 1. iOS application settings
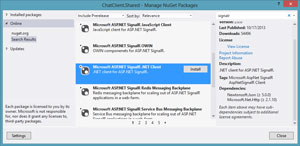
The easiest way to bring SignalR into the app is through Nuget, and the Microsoft ASP.NET SignalR .NET Client package (see Figure 2). Installing this package will add Portable Class Libraries for SignalR and its dependencies. PCL support in Xamarin is brand new, so some small changes are required after installing the package before things will work properly. I suspect this part will get smoother in the future, and that this won't be an ongoing requirement.
 [Click on image for larger view.]
Figure 2. Adding the SignalR Nuget package
[Click on image for larger view.]
Figure 2. Adding the SignalR Nuget package
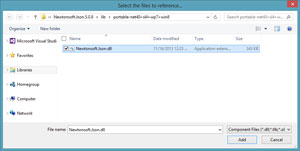
First, in the project's references I'll need to remove System.Runtime and System.Threading.Tasks, as they collide with those provided by Xamarin. Second, the version of Json.NET picked by default does not work properly with Xamarin. Fortunately, the Nuget package also includes another version that works correctly, so replace that reference with the one found in Json.NET's "portable-net40+sl4+wp7+win8" folder (see Figure 3).
 [Click on image for larger view.]
Figure 3. Updating the referenced version of Json.NET
[Click on image for larger view.]
Figure 3. Updating the referenced version of Json.NET
Open up MyViewController.cs, which contains the UI of the app, and update it as shown in Listing 2.
Listing 2: Creating the iOS Chat UI
using System;
using ChatClient.Shared;
using MonoTouch.Dialog;
using MonoTouch.UIKit;

namespace ChatClient.iOS
{
    public class MyViewController : DialogViewController
    {
        private readonly EntryElement _input;
        private readonly Section _messages;
        private readonly Client _client;

        public MyViewController()
            : base(UITableViewStyle.Grouped, null)
        {
            _input = new EntryElement(null, "Enter message", null)
                         {
                             ReturnKeyType = UIReturnKeyType.Send
                         };
            _messages = new Section();

            Root = new RootElement("Chat Client")
                       {
                           new Section {_input},
                           _messages
                       };

            _client = new Client("iOS");
        }

        public override async void ViewDidLoad()
        {
            base.ViewDidLoad();

            await _client.Connect();

            _input.ShouldReturn += () =>
            {
                _input.ResignFirstResponder(true);

                if (string.IsNullOrEmpty(_input.Value))
                    return true;

                _client.Send(_input.Value);

                _input.Value = "";

                return true;
            };

            _client.OnMessageReceived +=
                (sender, message) => InvokeOnMainThread(
                    () => _messages.Add(new StringElement(message)));
        }
    }
}
That may look like a good amount of code, but it's mostly boilerplate, so let's break it down. In order to create the UI for this screen, I'm using a library called MonoTouch.Dialog that ships in the box with Xamarin.iOS. This library makes it very easy to define table views programmatically in Xamarin.iOS applications. Table views are one of the most common UIs in iOS applications, and can really just be thought of as list views common on other platforms, despite using the word table. Table views typically require a lot of boilerplate code to wire up, so MonoTouch.Dialog abstracts a lot of that away, allowing you to express your UI more easily and concisely.
For this UI, there will be two sections to the table, created in the constructor. The first will just contain a text input that can be used to enter a chat message. The second section will contain a list of messages received through the SignalR hub, which will be empty to start with. References to both of these are kept so that I can use them later in the view's lifecycle.
Next, in the ViewDidLoad callback, I start wiring things up. After connecting to the SignalR hub, a listener is added to the ShouldReturn event in the text input, which will be called when the return action happens on the keyboard. When called, the keyboard is hidden and the input sent through the SignalR connection. Finally, when a new message is received through the SignalR client, it's added to the list of messages. That's all the code needed for the iOS app; let's move on to Android so that iOS has someone to talk to.
The Android Client
Create a new Xamarin.Android project, and just as with the iOS app, add a reference to the shared Client.cs file. The default activity file generated by the project template can be removed as well. Follow the same steps used in the iOS app for adding the SignalR Nuget package and fixing up the project references.
In the Resources/Layout folder, edit the Main.xml file, which contains the layout definition for our UI:
<?xml version="1.0" encoding="utf-8"?>
<LinearLayout xmlns:android="http://schemas.android.com/apk/res/android"
  android:orientation="vertical"
  android:layout_width="fill_parent"
  android:layout_height="fill_parent">
  <EditText
    android:layout_width="fill_parent"
    android:layout_height="wrap_content"
    android:id="@+id/Input" />
  <ListView
    android:layout_width="fill_parent"
    android:layout_height="wrap_content"
    android:id="@+id/Messages" />
</LinearLayout>
This UI is as simple as it gets. There's a LinearLayout, which is a layout container that simply places its contents in a row, either horizontally or vertically. If you're familiar with XAML, this is basically a StackPanel. Inside that container is a text box for inputting a chat message, and a list to contain the messages received from the hub.
Next, I'll create an Android activity to add behavior to this layout. Add a new class to the project named MainActivity, as shown in Listing 3:
Listing 3: Wiring Up the Android Chat UI
using System.Collections.Generic;
using Android.App;
using Android.OS;
using Android.Views.InputMethods;
using Android.Widget;
using ChatClient.Shared;

namespace ChatClient.Droid
{
  [Activity(Label = "Chat Client", MainLauncher = true, Icon = "@drawable/icon")]
  public class MainActivity : Activity
  {
    protected override async void OnCreate(Bundle bundle)
    {
      base.OnCreate(bundle);

      SetContentView(Resource.Layout.Main);

      var client = new Client("Android");

      var input = FindViewById<EditText>(Resource.Id.Input);
      var messages = FindViewById<ListView>(Resource.Id.Messages);

      var inputManager = (InputMethodManager)GetSystemService(InputMethodService);
      var adapter = new ArrayAdapter<string>(this, Android.Resource.Layout.SimpleListItem1, new List<string>());

      messages.Adapter = adapter;

      await client.Connect();

      input.EditorAction +=
        delegate
          {
            inputManager.HideSoftInputFromWindow(input.WindowToken, HideSoftInputFlags.None);

            if (string.IsNullOrEmpty(input.Text))
              return;

            client.Send(input.Text);

            input.Text = "";
          };

      client.OnMessageReceived +=
        (sender, message) => RunOnUiThread(() =>
          adapter.Add(message));
    }
  }
}
As with the iOS app, this code is mostly boilerplate. After setting the layout, I pull out references to the text box and message list so I can add behavior to them. I also set up a list adapter for the message list using a simple template built right into Android. This template will essentially take in strings and display them directly in the list. After the client connects to the SignalR hub, I hook up a handler for the text box's editor action, which will be called when the return key is pressed. When this happens, the message will be broadcast through the SignalR client, and the keyboard is hidden. Finally, when a message is received from the client, it's added to the list's adapter so that it will be displayed. That's it!
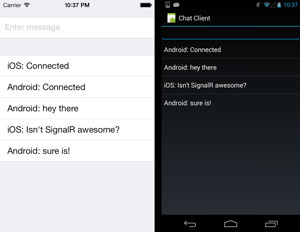
Now that both client apps are ready to go, fire them up. Once both are connected, you should be able to send messages back and forth, and see them instantly in both clients (see Figure 4). Easy, right?
 [Click on image for larger view.]
Figure 4. The completed applications, showing communication between iOS and Android devices.
[Click on image for larger view.]
Figure 4. The completed applications, showing communication between iOS and Android devices.
Real-Time, Scalable Communication
In the past, creating a real-time chat application would have required much more code, and would have relied on continuously polling the server for updates. This would provide a degraded user experience, given the delay between an event happening and it being shown to the user. This approach isn't good for the server, either; it would constantly be serving requests even if there was no new information to send, which makes for a scaling nightmare.
SignalR lets you easily weave real-time communication into your apps in a scalable way, with very little code. Basic chat between clients is just the tip of the iceberg for what you can do in your apps with these tools in your belt. With a rich, open connection between you and your users, the sky's the limit for the experiences you can provide for them.