Cross Platform C#
Xamarin How-To: Controls for Navigating Between Screens in iOS
Wally walks you through the two controls you can use to easily navigate your iOS apps.
Developers like to create simple examples. Typically, these examples are a screen of data and controls that users can work with. But rarely are real-world applications a single screen of data. iOS provides developers with several standard mechanisms to allow users to navigate between multiple screens of data. This article will examine two controls that developers can use to provide easy navigation for users: the UINavigationController and the UITabBarController.
UINavigationController
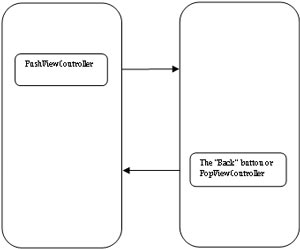
The UINavigationController class manages the navigation of hierarchical data. Figure 1 shows this at a high level.
 [Click on image for larger view.]
Figure 1. The general interaction of pushing a UIViewController onto the viewable stack and then popping it off.
[Click on image for larger view.]
Figure 1. The general interaction of pushing a UIViewController onto the viewable stack and then popping it off.
Think of a salesperson: They have client companies. Within each company, there are contacts, and each contact could have multiple areas of responsibility. The user can be presented with an initial list of companies. Selecting a company can result in the user being presented with a list of contacts at the company. Selecting a contact results in information about a specific contact. A navigation controller can be used to manage the navigation stack of this interaction. The navigation controller modifies the stack as the user navigates between the company listing, the contact listing and information about the contact.
The hierarchy of the navigation stack will be something like this:
- At the bottom of the hierarchy is the root view controller.
- On top of the root view controller is a listing of companies the current salesperson handles. A UIViewController provides the listing of companies. Our example just has a UILabel displayed on the View.
- When the user selects a company, a list of contacts is provided via another UIViewController. Our example has a UILabel displayed on the View.
- Once a contact is selected, another UIViewController is at the very top of the hierarchy with information about the contact. Our example has a UILabel displayed on the View.
The following is the UIApplicationDelegate code for setting up the UINavigationController. The steps are fairly simple:
- Create an instance of the UIViewController, representing the necessary screen.
- Pass the instance of the UIViewController as a parameter to the constructor of the UINavigationController.
- Set the windows root view controller to the instance of the UINavigationController to show the necessary screen:
[Register ("AppDelegate")] public partial class AppDelegate : UIApplicationDelegate {
  UIWindow window;   CompanyController cc;
  //   // You have 17 seconds to return from this method, or iOS will
  // terminate your application.   //   public override bool FinishedLaunching (UIApplication app, NSDictionary options)   {     // create a new window instance based on the screen size     window = new UIWindow (UIScreen.MainScreen.Bounds);     cc = new CompanyController ();
    // If you have defined a root view controller, set it here:     window.RootViewController = new UINavigationController (cc);
    // make the window visible     window.MakeKeyAndVisible ();
    return true;   } }
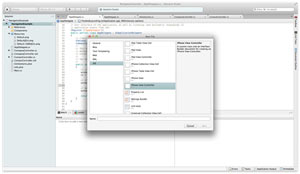
The above code is used in CompanyController. Developers will need to create a UI View Controller. This can be done in Xamarin Studio by going to File -> Add New -> iPhone View Controller (or iPad View Controller as well as the Universal View Controller, as shown in Figure 2.)
 [Click on image for larger view.]
Figure 2. How to find a UIViewController in Xamarin Studio.
[Click on image for larger view.]
Figure 2. How to find a UIViewController in Xamarin Studio.
Once the class file's created, the UIViewController can be configured in a number of different ways. The UI can be created programmatically, or in the XCode design surface. For more info on creating a user interface in iOS, check out the references for creating a user interface at the end of this article.
The following code is for the UIViewController. To load another UIViewController, a PushViewController method is called. To remove a ViewController, a call can be made to PopViewController if necessary:
public partial class CompanyController : UIViewController {   UIButton btn;   ContactController contact;   public CompanyController () : base ("CompanyController", null)   {   }
  public override void DidReceiveMemoryWarning ()   {
    base.DidReceiveMemoryWarning ();
  }    public override void ViewDidLoad ()   {     base.ViewDidLoad ();     this.Title = "My companies";     btn = UIButton.FromType (UIButtonType.System);     btn.Frame = new RectangleF (20, 200, 280, 44);     btn.SetTitle ("Open Company", UIControlState.Normal);     contact = new ContactController ();     btn.TouchUpInside += (object sender, EventArgs e) => {       this.NavigationController.PushViewController(contact, true);     };     this.Add (btn);     // Perform any additional setup after loading the view, typically from a nib.   } }
Figure 3 and Figure 4 show the results. The first image, Figure 3, shows the lowest level of the screen hierarchy. While this example has just a UIButton, it could have any number of controls, such as a UITableView/UITableViewController, to display data. There's also a title bar that can be configured. This can be a simple title or include a more complicated addition of buttons.
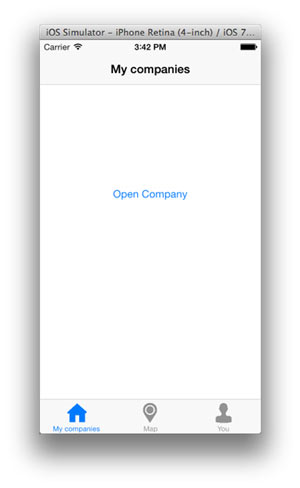
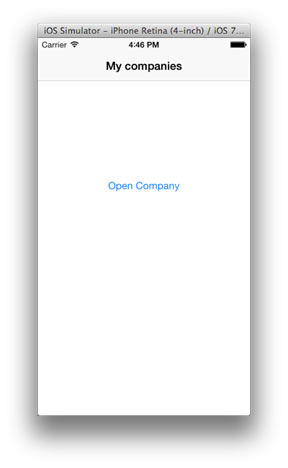 Figure 3. The initial screen in the example of using the UINavigationController.
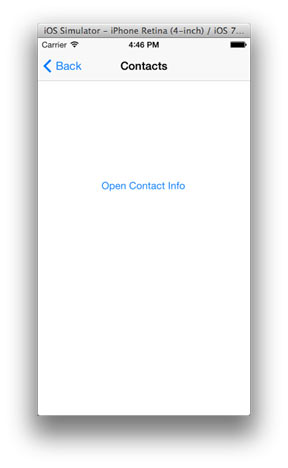 Figure 4. The second screen of the example using the UINavigationController.
Once a user selects a company (or the button in this specific example), the user's presented with another screen. While this example just has another button on it, this could be another UITableView/UITableViewController. In this screen, the user receives some user interface assistance, without the developer doing much. A back button's provided by default, with no additional programming by the developer. In case the developer would like to implement some custom functionality to go back in the stack, the PopViewControllerAnimated can be used. Called NavigationController.PopViewControllerAnimated(bool), this method will pop the currently displayed view controller off of the stack and remove it from the screen.
Figure 4 shows the next screen after the UIViewController's been added to the stack and displayed to the user.
Tabbed Interface
The UINavigationController works really well when an application has a single set of hierarchical data; however, many applications have several sets of hierarchical data that users will need quick access to. (This is how the current Twitter and Facebook social networking apps are designed.) There's a tab at the bottom of the screen, and the ability to drill into data then go back to the previous screen. This can be done via the UITabBarController, along with the UINavigationController.
The following code shows the setup of the UITabBarController, which is conceptually very similar to the UINavigationController. The sequences of steps to perform this in the AppDelegate:
- Create an instance of the UITabBarController and store it as a class-level variable, so that it's not garbage collected.
- An instance of each screen the developer wants to display is created and passed to the constructor of a UINavigationController.
- The ViewController property of the UITabBarController instance is filled with an array of the UINavigationControllers.
- Various properties of the tabs are set. In this example, the title and an icon are set.
- Finally, the UITabBarController instance is set to the RootViewController property of the window.
[Register ("AppDelegate")] public partial class AppDelegate : UIApplicationDelegate {   // class-level declarations   UIWindow window;   UITabBarController tabBarController;
  // You have 17 seconds to return from this method, or iOS will
  // terminate your application.   //   public override bool FinishedLaunching (UIApplication app, NSDictionary options)   {     // create a new window instance based on the screen size     window = new UIWindow (UIScreen.MainScreen.Bounds);      var vc1 = new CompanyController ();     var vc2 = new MapViewController ();     var vc3 = new UserSettingsController();      UINavigationController uinc1 = new UINavigationController(vc1);     UINavigationController uinc2 = new UINavigationController(vc2);     UINavigationController uinc3 = new UINavigationController (vc3);     tabBarController = new UITabBarController ();      tabBarController.ViewControllers = new UIViewController [] {       uinc1,       uinc2,       uinc3,     };     uinc1.Title = "Home";     uinc2.Title = "Map";     uinc3.Title = "You";     tabBarController.TabBar.Items [0].Image = UIImage.FromFile("./images/home.png");     tabBarController.TabBar.Items [1].Image = UIImage.FromFile("./images/mappin.png");     tabBarController.TabBar.Items [2].Image = UIImage.FromFile("./images/person.png");
    // If you have defined a root view controller, set it here:     window.RootViewController = tabBarController;
     // make the window visible     window.MakeKeyAndVisible ();          return true;   } }
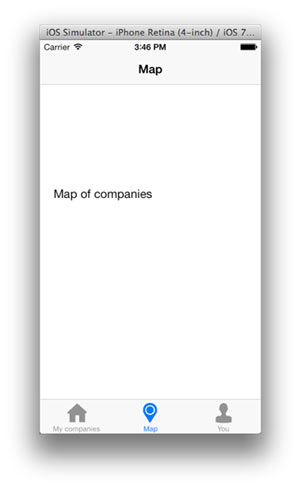
The resulting code is shown in Figure 5 and Figure 6. Since this example is a continuation, the user may drill into the company list -> contact list -> contact info hierarchy when the first tab is selected. If a user selects the map tab or the user tab, the UIViewController for those respective tabs is displayed. Figure 5 shows one of the tabs, which is the same as the UINavigationController in the previous example. Figure 6 shows the screen after the Map tab's been selected by the user. Note that the color of the selected tab changes to show the user the tab that's selected. This is provided to the application with no additional coding required by the developer.
 [Click on image for larger view.]
Figure 5. The initial screen of the example using the UITabBarController.
[Click on image for larger view.]
Figure 5. The initial screen of the example using the UITabBarController.
 [Click on image for larger view.]
Figure 6. A second screen of the example using the UITabBarController. This happens when the user touches the map icon in the tab bar.
[Click on image for larger view.]
Figure 6. A second screen of the example using the UITabBarController. This happens when the user touches the map icon in the tab bar.
Paging Choices
This article has looked at two UI paradigms in iOS: the UINavigationController and the UITabBarController. Both are shown in shipping apps for Twitter and Facebook. These aren't the only UI navigation paradigms in iOS, but they are popular ones due to their helpfulness in many situations.
About the Author
Wallace (Wally) B. McClure has authored books on iPhone programming with Mono/Monotouch, Android programming with Mono for Android, application architecture, ADO.NET, SQL Server and AJAX. He's a Microsoft MVP, an ASPInsider and a partner at Scalable Development Inc. He maintains a blog, and can be followed on Twitter.