Mobile Corner
Create a UWP-Based ChatBot Using the Microsoft Bot Framework Direct Line API
Chatbots are the new mobile application. In this article, Nick demonstrates how you can integrate a bot right into your Universal Windows Platform app via the Microsoft Bot Framework Direct Line API.
- By Nick Randolph
- 01/17/2017
There's no shortage of frameworks available for building chatbots (bots), and Microsoft has been working hard to ensure they make it easy for developers to build bots that work across a variety of messaging channels. The Microsoft Bot Framework, coupled with the recently announced Azure Bot Service, allows developers to create a bot and dynamically adjust the channels (that is, the messaging platforms) with which it integrates.
The creation of a bot using the Bot Framework is out of scope for this article -- check out dev.botframework.com for some great guidance on how to get started building your first bot. Instead, this article focuses on exposing your bot within a Universal Windows Platform (UWP) app. This is particularly relevant for support scenarios where your bot might be providing technical or account support for your application or service -- integrating with your application means that your user doesn't have to leave your application in order to request assistance.
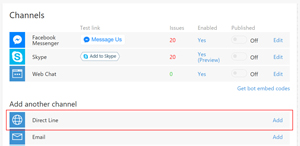
I've already got a bot that I'm going to integrate with -- it's probably the most annoying bot ever as it just returns "Hello!" whenever someone says anything. In order to access the bot from an app I have to enable the Direct Line channel, which essentially means that the bot will be accessible via the Direct Line API.
To do this, I navigate to the details of my bot in the bot developer portal at dev.botframework.com/bots, scroll down to the list of channels, and click the Add button alongside the Direct Line channel (see Figure 1).
 [Click on image for larger view.]
Figure 1. Adding the Direct Line Channel
[Click on image for larger view.]
Figure 1. Adding the Direct Line Channel
As you may want to access the bot from multiple applications or Web sites, it's possible to set each one up with its own secret key. This makes it possible to track and disable usage on a per-app basis.
When adding the Direct Line channel, I need to click the Add new site button, which will prompt me to give the site a name. I've named the site "UWP Application"; the name is just used within the bot developer portal, so you'll want to give it a name that's meaningful to you.
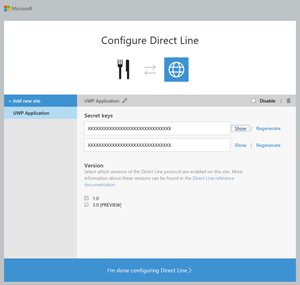
After creating the site, you'll see the configuration page for it (Figure 2) which allows you to enable/disable the site, control access via different versions of the Direct Line API, as well as control the secret keys used to access the site. Clicking the Show button alongside either of the secret keys will reveal the key so that it can be copied for use within the UWP app.
 [Click on image for larger view.]
Figure 2. Direct Line Site Configuration Page
[Click on image for larger view.]
Figure 2. Direct Line Site Configuration Page
That's all I need to do to start integrating my bot into a UWP app. In this case I'm going to create a new UWP app, but you can just as easily integrate your bot into an existing application.
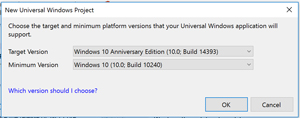
To get started, in Visual Studio I'll create a new project, BotMessaging, based on the Blank App (Universal Windows) project template. When prompted (Figure 3), I specify the Target and Minimum version that's going to give me maximum reach because it will be compatible with the original RTM version of Windows 10 (that is, build 10240).
 [Click on image for larger view.]
Figure 3. Selecting Target and Minimum Version
[Click on image for larger view.]
Figure 3. Selecting Target and Minimum Version
The logic for this app will all reside in a Portable Class Library (PCL), making it easily reusable if I were to build a cross-platform version of the app.
I'll go ahead and add another project, BotMessaging.Core, based on the Class Library (Portable) project template. The project creation wizard in Visual Studio for this template will display a prompt to select supported platforms, which I'll ignore and just accept the default selection. I'm going to switch from using PCL profiles across to .NET Standard (More information on the .NET Standard Libraries can be found at the ".NET Standard Library" documentation page, which will override any selection I make in the platform selection dialog.
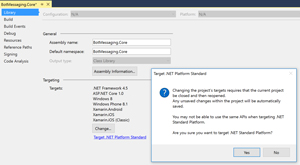
After the project has been created, I need to open the project properties and from the Library tab (Figure 4) click the "Target .NET Platform Standard" link and click Yes when warned about the side effects of making this change.
 [Click on image for larger view.]
Figure 4. Targeting .NET Platform Standard
[Click on image for larger view.]
Figure 4. Targeting .NET Platform Standard
After the BotMessaging.Core project has reloaded, I need to make sure that the correct .NETStandard version is selected. The Direct Line NuGet package I'm going to use requires at least version 1.3 of .NETStandard, so if the Target for the project is less than 1.3, I need to make that change.
I need to be able to access classes in the BotMessaging.Core library from the BotMessaging app, so I right-click on the UWP project in Solution Explorer and select Add Reference. From the Projects node, I make sure that the BotMessaging.Core project is checked and click OK.
Before doing anything more, I need to check that the solution builds and that there aren't any build issues from creating and configuring the two projects.
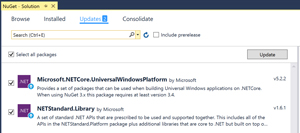
The Direct Line API is a simple set of REST APIs that you could easily access using basic Web request. However, Microsoft has made it easy for develops by creating a NuGet package that wraps the calls and exposes it using a strongly typed interface. In order to add a reference to the package I'll open up the package manager interface in Visual Studio by right-clicking on the solution node in Solution Explorer and selecting Manage NuGet Packages for Solution. I'll take this opportunity to make sure any existing NuGet references are using the latest package versions (Figure 5).
 [Click on image for larger view.]
Figure 5. Upgrading NuGet Packages
[Click on image for larger view.]
Figure 5. Upgrading NuGet Packages
Once I've upgraded any existing packages, I'll switch to the Browse tab and enter DirectLine in the search box. While technically not required, I'm going to add the Microsoft.Bot.Connector.DirectLine package to both projects -- I often find that with some packages there are platform-specific dependencies that don't get picked up if the package isn't added to the application project. Until NuGet works as I'd expect, I add packages to both projects by default.
Now that I've set up both projects and all the references I need, I'm going to start to build out the UX for the application. It's going to contain two pages, the MainPage, which will show a list of conversations and where the user can initiate a conversation; and the ConversationPage, which will show both sides of the conversation. Unlike a lot of applications where this would be structured as a single window, allowing the user to navigate back and forth, in this application I'm going to open a new window for each conversation that is started or joined.
Before I proceed, I need to add the ConversationPage to my application by right-clicking on the BotMessaging project, selecting Add, New Item, selecting the Blank Page template, giving the page the name ConversationPage.xaml and clicking Add.
I'll keep the layout of the MainPage quite simple. It contains a list of conversations that I've started with the Bot. As shown in Listing 1, the MainPage is broken into three rows that contain a heading, Conversations, a ListView, which will contain the list of conversations, and a StackPanel. The StackPanel contains a TextBox to allow the user to specify the title, or subject, of the conversation they're going to create and a Button to create the conversation.
Listing 1: BotMessaging Main Page
<Page x:Class="BotMessaging.MainPage"
      xmlns="http://schemas.microsoft.com/winfx/2006/xaml/presentation"
      xmlns:x="http://schemas.microsoft.com/winfx/2006/xaml"
      xmlns:local="using:BotMessaging"
      xmlns:d="http://schemas.microsoft.com/expression/blend/2008"
      xmlns:mc="http://schemas.openxmlformats.org/markup-compatibility/2006"
      mc:Ignorable="d">
  <Grid Background="{ThemeResource ApplicationPageBackgroundThemeBrush}">
    <Grid.RowDefinitions>
      <RowDefinition Height="Auto" />
      <RowDefinition />
      <RowDefinition Height="Auto" />
    </Grid.RowDefinitions>
    <TextBlock Text="Conversations"
               FontSize="30" />
    <ListView Grid.Row="1"
              IsItemClickEnabled="True"
              SelectionMode="None"
              ItemClick="OpenConversationClick"
              ItemsSource="{Binding Conversations}">
      <ListView.ItemTemplate>
        <DataTemplate>
          <TextBlock Text="{Binding Subject}"></TextBlock>
        </DataTemplate>
      </ListView.ItemTemplate>
    </ListView>
    <StackPanel Grid.Row="2">
      <Grid>
        <Grid.ColumnDefinitions>
          <ColumnDefinition Width="Auto" />
          <ColumnDefinition />
        </Grid.ColumnDefinitions>
        <TextBlock Text="Subject:"></TextBlock>
        <TextBox Grid.Column="1"
          Text="{Binding NewConversationSubject, Mode=TwoWay}"></TextBox>
        </Grid>
      <Button Content="New Conversation"
              Click="NewConversationClick"></Button>
    </StackPanel>
  </Grid>
</Page>
In Listing 2, I've created the event handlers for both when the user clicks on an item in the ListView, as well as when he clicks the Button. At this stage all this does is launch.
Listing 2: MainPage Class
public sealed partial class MainPage
{
  private MainViewModel ViewModel => DataContext as MainViewModel;
  public MainPage()
  {
    InitializeComponent();

    DataContext = new MainViewModel();
  }


  private void OpenConversationClick(object sender, ItemClickEventArgs e)
  {
    OpenConversation();
  }

  private async void OpenConversation()
  {
    var currentView = ApplicationView.GetForCurrentView();
    var newView = CoreApplication.CreateNewView();

    await newView.Dispatcher.RunAsync(
      CoreDispatcherPriority.Normal,
      async () =>
      {
        var newWindow = Window.Current;
        var newAppView = ApplicationView.GetForCurrentView();

        var frame = new Frame();
        frame.Navigate(typeof(ConversationPage));
        newWindow.Content = frame;

        newWindow.Activate();
        await ApplicationViewSwitcher.TryShowAsStandaloneAsync(newAppView.Id,
          ViewSizePreference.UseMinimum, currentView.Id, ViewSizePreference.UseMinimum);
      });
  }


  private async void NewConversationClick(object sender, RoutedEventArgs e)
  {
    OpenConversation();
  }
}
This code also makes reference to the MainViewModel class, which will hold the data for the page and carry out any tasks associated with sending and receiving data. I'll start off with a simple class and will add functionality as I begin to communicate with the bot:
public class MainViewModel
{
}
The DirectLine NuGet package provides a good abstraction away from the underlying REST API calls. In order to start communicating with the bot, I need to create an instance of the DirectLineClient using the secret key that I set up when configuring my bot, and then initiate a new conversation by calling the NewConversationWithHttpMessageAsync method.
In addition to the DirectLineClient and the generated Conversation, there are some additional parameters of which I'm going to need to keep track. For example, for each conversation, I need to keep track of which messages have been received; this is done by tracking a watermark and passing it to the DirectLine API when requesting messages. To keep track of this information I have two interfaces that wrap the calls to the DirectLineClient, IDirectLineService and help manage data associated with a conversation, IConversationManager, as shown in Listing 3.
Listing 3: Two Interfaces for DirectLineClient
public interface IDirectLineService
{
  void Connect(string connectionSecret);
  Task<IConversationManager> StartConversation(string subject);
  Task<Conversation> RenewConversation(Conversation conversation);
  Task<MessageSet> LoadMessages(Conversation conversation, string watermark = null);
  Task<bool> SendMessage(Conversation conversation, Message message);
}
public interface IConversationManager
{
  string Subject { get; }
  Task<bool> SendMessage(Message message);
  Task<IEnumerable<Message>> LoadMessages();
}
The implementation of the IDirectLineService in Listing 4 is relatively straightforward because it creates an instance of the DirectLineClient (in the Connect method) and then uses that instance to create, or renew, a new conversation, load message history and send messages to the bot.
Listing 4: DirectLineService Class
public class DirectLineService : IDirectLineService
{
  public IDirectLineClient DirectClient { get; private set; }
  public void Connect(string connectionSecret)
  {
    var client = new DirectLineClient(connectionSecret);
    DirectClient = client;
  }

  public async Task<IConversationManager> StartConversation(string subject)
  {
    var conversation =
      await DirectClient.Conversations.NewConversationWithHttpMessagesAsync();
    return new ConversationManager(subject, this, conversation?.Body as Conversation);
  }

  public async Task<Conversation> RenewConversation(Conversation conversation)
  {
    var newConversation =
      await DirectClient.Tokens.RenewTokenWithHttpMessagesAsync(conversation.ConversationId);
    return newConversation?.Body as Conversation;
  }

  public async Task<bool> SendMessage(Conversation conversation, Message message)
  {
    var sendResponse =
      await DirectClient.Conversations.PostMessageWithHttpMessagesAsync(
      conversation.ConversationId, message);
    return sendResponse?.Response?.StatusCode == HttpStatusCode.NoContent;
  }

  public async Task<MessageSet> LoadMessages(
    Conversation conversation, string watermark = null)
  {
    var sendResponse =
      await DirectClient.Conversations.GetMessagesWithHttpMessagesAsync(
      conversation.ConversationId, watermark);
    return sendResponse?.Body as MessageSet;
  }
}
The ConversationManager in Listing 5, which implements the IConversationManager interface, holds a reference to an IDirectLineService implementation in order to send and retrieve messages to the bot, as well as a reference to a Conversation object, which represents the conversation being managed.
Listing 5: ConversationManager
public class ConversationManager : IConversationManager
{
  public string Subject { get; set; }
  public IDirectLineService DirectService { get; }
  public Conversation Conversation { get; private set; }
  private DateTimeOffset TokenRenewedAt { get; set; }
  private string LastWatermark { get; set; }
  public List<Message> Messages { get; } = new List<Message>();

  private DateTimeOffset TokenExpiresAt =>
    TokenRenewedAt.AddMinutes(Constants.TokenExpirationTimeInMinutes);

  public ConversationManager(
    string subject, IDirectLineService directService, Conversation conversation)
  {
    Subject = subject;
    DirectService = directService;
    Conversation = conversation;
    TokenRenewedAt = DateTimeOffset.UtcNow;
  }

  private async Task<bool> EnsureTokenIsValid()
  {
    if (DirectService == null ||
       (string.IsNullOrWhiteSpace(Conversation?.Token) ||
         string.IsNullOrWhiteSpace(Conversation?.ConversationId))
      || DateTime.UtcNow >= TokenExpiresAt) return false;

    if (DateTime.UtcNow.AddMinutes(
      -Constants.TokenRenewalPeriodBeforeExpiryInMinutes) > TokenExpiresAt)
    {
      Conversation = await DirectService.RenewConversation(Conversation);
      TokenRenewedAt = DateTimeOffset.UtcNow;
    }
    return Conversation != null;
  }

  public async Task<bool> SendMessage(Message message)
  {
    if (message == null) return false;

    if (await EnsureTokenIsValid())
    {
      return await DirectService.SendMessage(Conversation, message);
    }

    return false;
  }

  public async Task<IEnumerable<Message>> LoadMessages()
  {
    if (await EnsureTokenIsValid())
    {

      var set = await DirectService.LoadMessages(Conversation, LastWatermark);
      Messages.AddRange(set.Messages);
      LastWatermark = set.Watermark;
      return set.Messages;
    }
    return null;
  }

  public IConversationManager Clone()
  {
    var cManager = this;
    return new ConversationManager(
      cManager.Subject, cManager.DirectService, cManager.Conversation);
  }
}
There are a couple of constants defined referenced by the ConversationManager that are held within the Constants class. This also includes the BotSecretKey constant that holds the secret key that I created when setting up the Direct Line API for my bot:
public static class Constants
{
  public const string BotSecretKey = "aMtY7ED…………thEercpUGg";

  public const int TokenExpirationTimeInMinutes = 30;
  public const int TokenRenewalPeriodBeforeExpiryInMinutes = 5;
}
Now, I can get on and implement the MainViewModel, which contains a collection of conversations and will be data-bound to the ListView on the MainPage. As the code in Listing 6shows, the MainViewModel accepts an instance of the IDirectLineService, which is then used to create new conversations. Each new conversation is represented by an IConversationManager, which is added to the Conversations collection.
Listing 6: Creating New Conversations
public class MainViewModel
{
  private IDirectLineService BotService { get; }
  public string NewConversationSubject { get; set; }
  public ObservableCollection<IConversationManager> Conversations { get; } =
    new ObservableCollection<IConversationManager>();

  public MainViewModel(IDirectLineService botService)
  {
    BotService = botService;
  }

  public async Task<IConversationManager> StartConversation()
  {
    BotService.Connect(Constants.BotSecretKey);

    var conversation = await BotService.StartConversation(NewConversationSubject);
    Conversations.Add(conversation);
    return conversation;
  }
}
I can now go back and complete the implementation of the MainPage (Listing 7) by passing in a new instance of the DirectLineService class into the MainViewModel constructor, as well as updating the event handlers for the ListView and Button to work with instances of the IConversationManager.
Listing 7: MainPage Class, Updated
public sealed partial class MainPage
{
  private MainViewModel ViewModel => DataContext as MainViewModel;
  public MainPage()
  {
    InitializeComponent();

    DataContext = new MainViewModel(new DirectLineService());
  }


  private void OpenConversationClick(object sender, ItemClickEventArgs e)
  {
    var cManager = e.ClickedItem as ConversationManager;
    OpenConversation(cManager?.Clone());
  }

  private async void OpenConversation(IConversationManager conversation)
  {
    var currentView = ApplicationView.GetForCurrentView();
    var newView = CoreApplication.CreateNewView();

    await newView.Dispatcher.RunAsync(
      CoreDispatcherPriority.Normal,
      async () =>
      {
        var newWindow = Window.Current;
        var newAppView = ApplicationView.GetForCurrentView();
        newAppView.Title = conversation.Subject;

        var frame = new Frame();
        frame.Navigate(typeof(ConversationPage), conversation);
        newWindow.Content = frame;

        newWindow.Activate();
        await ApplicationViewSwitcher.TryShowAsStandaloneAsync(newAppView.Id,
          ViewSizePreference.UseMinimum, currentView.Id, ViewSizePreference.UseMinimum);
      });
  }


  private async void NewConversationClick(object sender, RoutedEventArgs e)
  {
    var conversation = await ViewModel.StartConversation();
    OpenConversation(conversation);
  }
}
At this point I have an application where I can create new conversations, which will open in a new window, and I can click on existing conversations, which will also open a new window.
What's left to do is to do the layout for the conversation. I'll again keep this fairly minimal with the messages in the conversation simply appearing in a ListView, and a TextBox and Button in order to post a new message to the conversation (see Listing 8).
Listing 8: Laying It Out
<Page
  x:Class="BotMessaging.ConversationPage"
  xmlns="http://schemas.microsoft.com/winfx/2006/xaml/presentation"
  xmlns:x="http://schemas.microsoft.com/winfx/2006/xaml"
  xmlns:d="http://schemas.microsoft.com/expression/blend/2008"
  xmlns:mc="http://schemas.openxmlformats.org/markup-compatibility/2006"
  mc:Ignorable="d">

  <Grid Background="{ThemeResource ApplicationPageBackgroundThemeBrush}">
    <Grid.RowDefinitions>
      <RowDefinition Height="*" />
      <RowDefinition Height="Auto" />
    </Grid.RowDefinitions>
    <ListView ItemsSource="{Binding Messages}">
      <ListView.ItemTemplate>
        <DataTemplate>
          <TextBlock Text="{Binding Text}"></TextBlock>
        </DataTemplate>
      </ListView.ItemTemplate>
    </ListView>
    <StackPanel Grid.Row="1">
      <TextBox Text="{Binding NewMessage, Mode=TwoWay}"></TextBox>
      <Button Content="Send" Click="SendClick"></Button>
    </StackPanel>
  </Grid>
</Page>
The corresponding codebehind file creates an instance of the ConversationViewModel, which will handle communicating with the bot for the specific conversation passed in via the OnNavigatedTo method (see Listing 9).
Listing 9: ConversationPage Class for Communicating with Bot via OnNavigatedTo Method
public sealed partial class ConversationPage
{
  public ConversationViewModel ViewModel => DataContext as ConversationViewModel;
  public ConversationPage()
  {
    this.InitializeComponent();

    DataContext = new ConversationViewModel();
  }

  protected override void OnNavigatedTo(NavigationEventArgs e)
  {
    base.OnNavigatedTo(e);

    ViewModel.StartListeningToConversation(e.Parameter as ConversationManager);
  }

  private async void SendClick(object sender, RoutedEventArgs e)
  {
    await ViewModel.SendMessage();
  }
}
The ConversationViewModel in Listing 10 accepts the instance of the IConversationManager from the ConversationPage in order to start listening for updates to the conversation.
Listing 10: The ConversationViewModel Listens for Conversation Updates
public class ConversationViewModel
{
  public IConversationManager Conversation { get; private set; }

  public ObservableCollection<Message> Messages { get; } =
    new ObservableCollection<Message>();

  public string NewMessage { get; set; }


  public async void StartListeningToConversation(IConversationManager conversation)
  {
    Conversation = conversation;
    try
    {
      while (true)
      {
        var messages = await Task.Run(async ()=> await Conversation.LoadMessages());
        if (messages?.Any() ?? false)
        {
          foreach (var msg in messages)
          {
            Messages.Add(msg);
          }
        }
        await Task.Delay(1000);
      }
    }
    catch (TaskCanceledException ex)
    {
      Debug.WriteLine(ex.Message);
    }
  }

  public async Task SendMessage()
  {
    var msg = new Message
    {
      Text = NewMessage
    };
    await Conversation.SendMessage(msg);
  }
}
After all this, I now have an application that's able to send and receive messages as part of a conversation with a bot. The next steps would be to refine the conversation page to include more information about the message, as well as a chat-style layout making it easier to see who's created each message.
Bots are a great stepping-stone into a world of automation and new, more-natural interfaces. When setting up and creating your bot, don't forget that you might want to keep the bot interface simple; where possible, look for ways to make it easier for the user to send messages back to the bot. Adding an interface to your bot into your application is a great way to provide a more interactive feedback mechanism, and in fact some applications are being designed and built with a chat-style interface as the primary interface of the application.
About the Author
Nick Randolph runs Built to Roam, a consulting company that specializes in training, mentoring and assisting other companies build mobile applications. With a heritage in rich client applications for both the desktop and a variety of mobile platforms, Nick currently presents, writes and educates on the Windows Phone platform.