In-Depth
Building RESTful Services Using ASP.NET Core
ASP.NET Core makes building RESTful services easy and comfortable, says Joydip Kanjilal, who shows how to do just that in this article, complete with code samples and screenshots.
ASP.NET Core is a fast, lean framework from Microsoft that can be used to build applications that can run on multiple platforms: Windows, Linux and MacOS. This free, modular and high-performance framework is a good fit for building modern Web applications. This article shows how to build RESTful services using ASP.NET Core.
Prerequisites
To build and execute the programs in this article, you should have Visual Studio 2017 and ASP.NET Core 2.1 or later installed in your system. If you don't have Visual Studio installed, you can get a copy here.
Creating a New ASP.NET Core Application
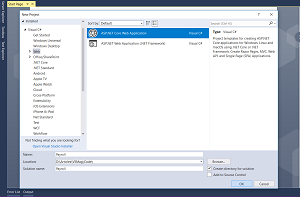
Assuming the prerequisites are installed, let's get started by first creating a new ASP.NET Core Web application in Visual Studio. Let us name it as Payroll as shown in Figure 1 below.
 [Click on image for larger view.]
Figure 1. Creating a New ASP.NET Core Web Application in Visual Studio
[Click on image for larger view.]
Figure 1. Creating a New ASP.NET Core Web Application in Visual Studio
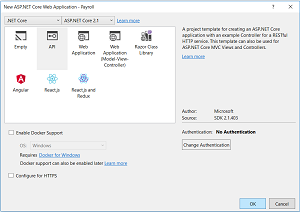
When you click on OK, the window appears shown in Figure 2 appears.
 [Click on image for larger view.]
Figure 2. Preparing the Project
[Click on image for larger view.]
Figure 2. Preparing the Project
Select API as the project template and select the framework as ".NET Core" and "ASP.NET Core 2.1" from the dropdown controls as shown in Figure 2. Ensure that "Enable Docker Support" and "Configure for HTTPS" checkboxes are de-selected as we will not need any of these. We don't need authentication either, so, let the authentication mode be "No Authentication" as shown. Click OK when done. A new ASP.NET Core project will be created -- you can now start using it.
Creating the Model and Data Layer
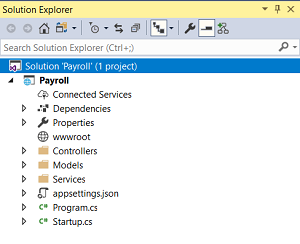
In the Solution Explorer window, select the project, right-click and click "Add -> New Folder" to create a solution folder to store the models we will use. Name the solution folder "Models." Similarly, create a folder named "Services." Here's how the project should now look in the Solution Explorer window.
 [Click on image for larger view.]
Figure 3. The Project in Solution Explorer
[Click on image for larger view.]
Figure 3. The Project in Solution Explorer
Next, select the Models folder, right-click and create a new class named Employee. Here's what the Employee class with its properties should look like:
public class Employee
{
  public int Id { get; set; }
  public string FirstName { get; set; }
  public string LastName { get; set; }
  public string Address { get; set; }
}
For simplicity, we have just four properties in the Employee class. Following the same steps, create an interface in the "Services" folder named IDataService. The IDataService interface should look like this:
public interface IDataService
{
  List<Employee> Get();
  Employee GetById(int id);
}
Next, create a class named DataService inside the Services solution folder. The DataService class should implement the IDataService interface as shown in the code snippet below:
public class DataService : IDataService
{
  public List<Employee> Get()
  {
    return null;
  }
  public Employee GetById(int id)
  {
  return null;
  }
}
Let's now implement the methods of the DataService class. The DataService will deal with data -- so, it should support CRUD operations. For the sake of simplicity, we will implement only two methods in the DataService class: one that returns all the Employee records and another that searches for an Employee record by Id and returns it. The DataService class also holds a list of Employee records -- the data here is hardcoded for illustration purposes only. Here's the complete source code of the DataService class:
public class DataService : IDataService
{
  private readonly List<Employee> lstEmployee = new List<Employee>();
  public DataService()
  {
    Employee employee = new Employee();
    employee.Id = 1;
    employee.FirstName = "Joydip";
    employee.LastName = "Kanjilal";
    employee.Address = "India";
    lstEmployee.Add(employee);
  }
  public List<Employee> Get()
  {
    if (lstEmployee.Count > 0)
      return lstEmployee;
    return null;
  }
  public Employee GetById(int id)
  {
    foreach (var emp in lstEmployee)
    {
      if (emp.Id == id)
        return emp;
    }
    return null;
  }
}
Using DI to Inject the DataService
ASP.NET Core provides built-in support for dependency injection (DI), that is, DI is at the core of ASP.NET Core for improved testability and maintainability. It has a built-in container that provides basic features for registering and resolving services or dependencies. For registering the services with the container, ASP.NET Core also provides various extension methods. We will take advantage of this built-in container to register our DataService. To do this, we need to write the code to register our service in the ConfigureServices (IServiceCollection services) method of the Startup class. The IServiceCollection interface here represents a list of dependencies -- here's how it looks:
public interface IServiceCollection: IList<ServiceDescriptor>, ICollection<ServiceDescriptor>,
IEnumerable<ServiceDescriptor>, IEnumerable
{
}
The following code snippet illustrates how we can add our service to the container. Note that this method is called by the runtime automatically when the application is executed:
public void ConfigureServices(IServiceCollection services)
{
  services.AddTransient<IDataService, DataService>();
  services.AddMvc().SetCompatibilityVersion
  (CompatibilityVersion.Version_2_1);
 }
Note the usage of the AddTransient method in the code snippet above. There are three ways to register dependencies: AddTransient, AddScoped and AddSingleton. These methods correspond to Transient, Scoped and Singleton lifetimes of the dependencies. In this example, we are calling the AddTransient method when registering the service with the container. In doing so, the component will be re-created for every request; that is, it would represent a stateless service.
Building the RESTful Service
Representational State Transfer (REST) is a popular architectural paradigm for designing and architecting applications that can communicate using the stateless HTTP protocol. REST is defined not as a technology or a set of standards -- it is rather a set of constraints and is based on a cacheable, stateless communication protocol. A RESTful API is defined as one that adheres to the REST principles and uses HTTP verbs to operate on the data.
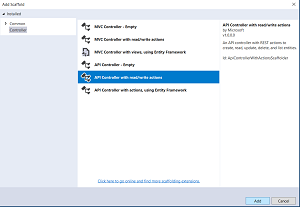
So far so good, so let's now create the RESTful service. To do this, select the "Controllers" solution folder in the Solution Explorer window and click on "Add -> Controller...." This will launch the "Add Scaffold" window. Here's where you can specify the template you would like to use. Select "API Controller with read/write actions" and click on Add. Refer to Figure 4 below.
 [Click on image for larger view.]
Figure 4. Specifying the Template to Use
[Click on image for larger view.]
Figure 4. Specifying the Template to Use
Specify the controller name as EmployeeController when prompted and click Add to complete the process. Once the scaffolding process and code generation is over, the EmployeeController class with a few default controller methods is created. The code snippet below shows how the EmployeeController class would look. Note that this class extends the ControllerBase class -- the base class for any MVC controller:
 [Route("api/[controller]")]
  [ApiController]
  public class EmployeeController : ControllerBase
  {
    [HttpGet]
    public IEnumerable<string> Get()
    {
      return new string[] { "value1", "value2" };
    }
    [HttpGet("{id}", Name = "Get")]
    public string Get(int id)
    {
      return "value";
    }
    [HttpPost]
    public void Post([FromBody] string value)
    {
    }
    [HttpPut("{id}")]
    public void Put(int id, [FromBody] string value)
    {
    }
    [HttpDelete("{id}")]
    public void Delete(int id)
    {
    }
  }
Let's now modify this code to create our RESTful service. The following code snippet illustrates how we can take advantage of constructor injection to inject an instance of type IDataService:
 public class EmployeeController : ControllerBase
  {
    private readonly IDataService _dataService;
    public EmployeeController(IDataService dataService)
    {
      _dataService = dataService;
    }
  }
Once this instance is available, we can use it to call the methods of DataService class and retrieve data. The following controller method retrieves all Employee records and returns the list:
[HttpGet]
  public IActionResult Get()
  {
    var records = _dataService.Get();
    if(records !=null)
      if(records.Count > 0)
      return Ok(records);
    return NotFound();
  }
Note the usage of IActionResult in the method above. ASP.NET Core provides you three ways to return data from an action method: an instance of a specific type, an instance of type IActionResult and an instance of the generic type IActionResult<T>. IActionResult helps you to return error or status codes of an operation.
Here's another action method -- this one accepts an integer value (the employee id) as an argument and returns, searches for a record with the given id and if found returns the employee record:
[HttpGet("{id}", Name = "Get")]
    public IActionResult Get(int id)
    {
      var data = _dataService.GetById(id);
      if (data != null)
        return Ok(data);
      return NotFound();
    }
Now you can run the API in the Web browser using this URL:
http://localhost:8273/api/Employee
To retrieve a specific record, the URL should be this:
http://localhost:8273/api/Employee/1
Here's the complete code listing of the controller class for your convenience:
[Route("api/[controller]")]
  [ApiController]
  public class EmployeeController : ControllerBase
  {
    private readonly IDataService _dataService;
    public EmployeeController(IDataService dataService)
    {
      _dataService = dataService;
    }
    [HttpGet]
    public IActionResult Get()
    {
      var records = _dataService.Get();
      if(records !=null)
        if(records.Count > 0)
        return Ok(records);
      return NotFound();
    }
    [HttpGet("{id}", Name = "Get")]
    public IActionResult Get(int id)
    {
      var data = _dataService.GetById(id);
      if (data != null)
        return Ok(data);
      return NotFound();
    }
    [HttpPost]
    public void Post([FromBody] string value)
    {
      //TODO: Write code here to create an employee record.
    }
    [HttpPut("{id}")]
    public void Put(int id, [FromBody] string value)
    {
      //TODO: Write code here to update an employee record.
    }
    [HttpDelete("{id}")]
    public void Delete(int id)
    {
      //TODO: Write code here to delete an employee record.
    }
  }
Summary
RESTful services are much faster compared to SOAP services and they consume much less bandwidth. ASP.NET Core makes building RESTful services easy and comfortable. In this article we examined how we can build a simple RESTful service using ASP.NET Core.
About the Author
Joydip Kanjilal, a Microsoft MVP in ASP.NET (2007 - 2012), is a speaker and author of eight books and more than 500 articles. He's been working in IT industry for more than 20 years with more than 16 years in .NET and its related technologies. He blogs at https://www.infoworld.com/blog/microsoft-coder/.