Mono for Android
Juice Up Your Android App UI
Make your Android app's design more inviting to users by enhancing things like keyboards and forms, so they'll keep coming back to it.
You never get a second chance to make a first impression. For an application, that first impression is how your user will interact with your application. Users want to get into an application, do some work and then get out (unless your application is a game). Users have other things to do in their lives. This article will examine how to provide some simple enhancements to your application's UI, which will allow users to get things done quicker.
How Bad?
We've all heard about the dangers of texting and driving. A few years ago, I remember seeing a news report about a woman who fell into a fountain at the mall while texting. One of the worst things that applications can do is merely put a series of EditText views in front of the user and expect them to gladly type in each control. How can we make life easier for our users? Here are some general strategies for UIs:
- Whatever an application is doing, it needs to only ask for the minimum amount of data from the user. Don't ask for a user to input too much data. For example, why ask for a user to input his address if it isn't needed?
- Don't design an application UI because that's the way an application UI is designed on other platforms. A Web interface for a desktop browser typically has a table with a label on the left-hand side and the input control on the right-hand side. Unfortunately, there isn't enough screen real estate for a tabular layout on a phone. You need a UI layout that makes sense for the platform you're users are using.
Improving the UI
There are several general rules you can use to help build an improved UI. These are:
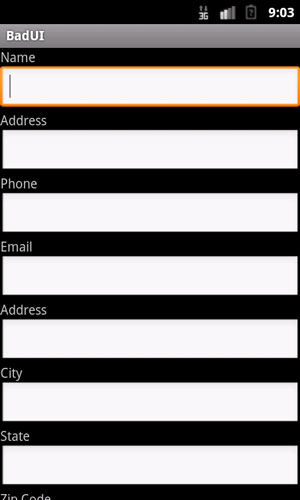
- Don't require a user to input a lot of data at one time. If a user is presented a screen with 10 EditText views, and he is supposed to input data into each one to continue, the user might get frustrated and quit the application. No one should be required to input data that many times into a single phone screen. An example of this EditText overload is shown in Figure 1.
 [Click on image for larger view.]
Figure 1. An example of too many text fields for a user to fill in.
[Click on image for larger view.]
Figure 1. An example of too many text fields for a user to fill in.
- Use screen elements that don't require typing. If an application requires the user's state, for example, use a spinner control so the user can select the appropriate state much more easily. The application will get better data, too.
- When there's no other alternative but to require a user to input data into an EditText, the application must help the user as much as possible. To do this, the application should take advantage of the UI capabilities of Android, specifically the custom keyboard.
- Phone applications are real estate-constrained. Applications should not use a TextView to describe an input field. This is another situation where Android can help out with its hint attribute.
- Another mechanism is for an application to take advantage of the device to get additional information. If an application must present the user with a signup form, you can help the user by providing as much information as possible. For example, the address could be pre-filled based on reverse geo-location lookup.
- Remember that not all phones are the same. There might be a need to scroll the application due to the number of controls on the screen. What displays on a 4.65-inch screen might not display on a 3.7-inch screen.
Now that these issues have been mentioned, let's take a look at some code to help improve UIs.
Custom Keyboards
What happens when a user is asked to type in a textbox? A user should be presented with a virtual keyboard. A question that developers need to think about is: For what type of data is the EditText view being used? Depending on the data that's being requested from the user, the virtual keyboard should change to help the user input data. Here are several examples:
- If a view is for an e-mail address, a keyboard with the "@" symbol easily available should be displayed.
- If a view is to be used for a Web address, a keyboard with a ".com" button would be a good idea.
- If a view is to be used for a numeric input, a keyboard with numbers should be displayed to the user.
Let's look at some displays in the Android emulator:
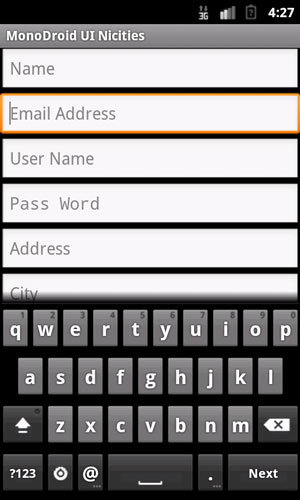
- Figure 2 shows a basic keyboard for entering a name. Because first names and last names are typically capitalized, this EditText is set up to capitalize each word by default.
-
 [Click on image for larger view.]
Figure 2. A basic keyboard for entering a name.
Figure 3 shows a keyboard optimized for a user to enter an e-mail address. This keyboard has an "@" key. In addition, a physical device will most likely have a ".com" button as well. Note that the keyboards displayed in the Android emulator will look different than the keyboards on a touchscreen Android device.
[Click on image for larger view.]
Figure 2. A basic keyboard for entering a name.
Figure 3 shows a keyboard optimized for a user to enter an e-mail address. This keyboard has an "@" key. In addition, a physical device will most likely have a ".com" button as well. Note that the keyboards displayed in the Android emulator will look different than the keyboards on a touchscreen Android device.
 [Click on image for larger view.]
Figure 3. A keyboard optimized for a user to enter an e-mail address.
[Click on image for larger view.]
Figure 3. A keyboard optimized for a user to enter an e-mail address.
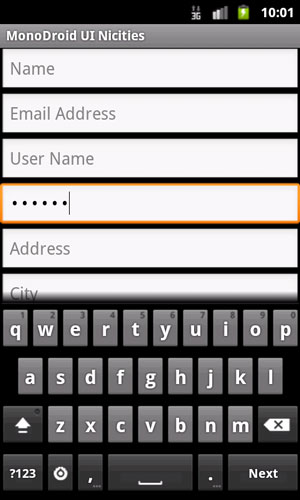
- Figure 4 shows the virtual keyboard and input field for a password. Notice that the keyboard looks standard, though the EditText contents are masked.
 [Click on image for larger view.]
Figure 4. The virtual keyboard and input field for a password.
[Click on image for larger view.]
Figure 4. The virtual keyboard and input field for a password.
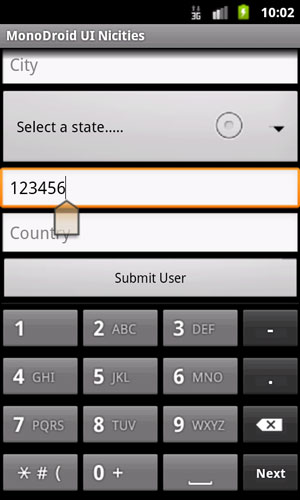
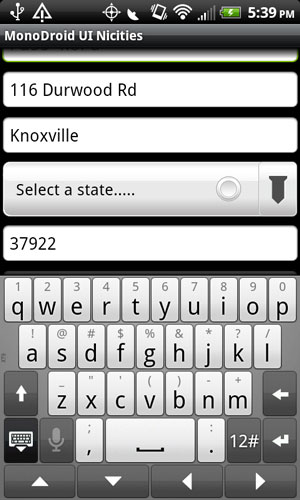
- Figure 5 shows a possible keyboard configuration for a numeric field. In this example, the ZIP code field is set for numeric input as an example.
 [Click on image for larger view.]
Figure 5. A possible keyboard configuration for a numeric field.
[Click on image for larger view.]
Figure 5. A possible keyboard configuration for a numeric field.
Now, let's look at the XML layout code for this, which is shown in Listing 1. You'll notice the attribute android:inputType. This attribute is the one that's used to control the type of keyboard displayed as well as the behavior of the EditText (for example, the attribute value textCapWords is used to capitalize each word in the Name EditText by default).
Listing 1. XML Layout Code
        <EditText
            android:id="@+id/Name"
            android:layout_width="fill_parent"
            android:layout_height="wrap_content"
            android:inputType="text|textCapWords"
            android:hint="@string/Name" />
        <EditText
            android:id="@+id/Email"
            android:layout_width="fill_parent"
            android:layout_height="wrap_content"
            android:inputType="text|textEmailAddress"
            android:hint="@string/Email" />
        <EditText
            android:id="@+id/UserName"
            android:layout_width="fill_parent"
            android:layout_height="wrap_content"
            android:hint="@string/UserName" />
        <EditText
            android:id="@+id/PassWord"
            android:layout_width="fill_parent"
            android:layout_height="wrap_content"
            android:inputType="text|textPassword"
            android:hint="@string/PassWord" />
        <EditText
            android:id="@+id/Address"
            android:layout_width="fill_parent"
            android:layout_height="wrap_content"
            android:hint="@string/Address" />
        <EditText
            android:id="@+id/City"
            android:layout_width="fill_parent"
            android:layout_height="wrap_content"
            android:hint="@string/City" />
Android supports numerous different types of default keyboards and behaviors. For a full and complete list, see the article, "Mono for Android UI Blueprint.".
Other Device Features
There are other device features that can be used to help. In my example registration screen, there's a good possibility that the user is filling out the form for the location appropriate for a user. In this situation, the code will turn on the location manager to get the current latitude and longitude of the device, then use reverse geo-coding to get the current address.
In the example application, the geo-location services of the device can be used to help the user. The user may not be at the address that he wants to use for the application, but he is most likely close. By using the phone's GPS chip, the application will get the user's current latitude and longitude, then perform a reverse geo-code, and finally place the resulting address in the EditText view. Once the address is available in the EditText view, the user can change the address to the one that he desires. The worst-case scenario is that the user will have to change all of the address entries. This is the worst case, and is no different than if the views were left blank.
Figure 6 shows the output of the example application.
 [Click on image for larger view.]
Figure 6. The output of the example application.
[Click on image for larger view.]
Figure 6. The output of the example application.
Now let's take a look at the code. Listing 2 shows the entire activity. The key steps are:
- Implement the ILocationListener interface. Along with that interface, there are several methods that must be implemented.
- Get an instance of the LocationManager system service on the device and begin listening for location updates.
- When a location change is detected, the OnLocationChange method is called. This method is called on a background thread -- therefore, calls made to the UI below this level will need to be done through RunOnUIThread.
- Unfortunately, things don't work properly in Android all the time. You must be able to "skin a cat" in more than one way. Android has a built-in reverse geo-coder, but it doesn't always work correctly. I have an example that has worked in the past, but in the lead-up to this article, it has stopped working. Therefore, I've used the MapQuest reverse geo-coding API to get the address (a later article will examine locations in Mono for Android and reverse geo-coding that's built-in to Android).
Listing 2. Using Geo-Location Services
    [Activity(Label = "MonoDroid UI Nicities", MainLauncher = true)]
    public class Activity1 : Activity, ILocationListener
    {
      private string BestProvider;
      private Spinner States;
      private Button button;
      private EditText etAddress;
      private EditText etCity;
      private EditText etZipCode;
      private AutoCompleteTextView actvCountry;
      private LocationManager lm;
      protected override void OnCreate(Bundle bundle)
      {
        base.OnCreate(bundle);

        SetContentView(Resource.Layout.ui);
        try
        {
          button = FindViewById<Button>(Resource.Id.Submit);
          button.Click += new EventHandler(button_Click);
          States = FindViewById<Spinner>(Resource.Id.State);
          var fAdapter = ArrayAdapter.CreateFromResource(this, Resource.Array.states,
          Android.Resource.Layout.SimpleSpinnerDropDownItem);
          int spinner_dd_item = Android.Resource.Layout.SimpleDropDownItem1Line;
          fAdapter.SetDropDownViewResource(spinner_dd_item);
          States.Adapter = fAdapter;
          Criteria cr = new Criteria();
          cr.Accuracy = Accuracy.Fine;
          cr.AltitudeRequired = false;
          cr.BearingRequired = false;
          cr.SpeedRequired = false;
          cr.CostAllowed = true;
          String serviceString = Context.LocationService;
          lm = (LocationManager)GetSystemService(serviceString);
          BestProvider = lm.GetBestProvider(cr, false);
          actvCountry = FindViewById<AutoCompleteTextView>(Resource.Id.Country);
          etAddress = FindViewById<EditText>(Resource.Id.Address);
          etCity = FindViewById<EditText>(Resource.Id.City);
          etZipCode = FindViewById<EditText>(Resource.Id.Zip);
          string[] countries = Resources.GetStringArray(Resource.Array.Countries);
          var adapter = new ArrayAdapter<String>(this, Resource.Layout.ListItem, countries);
          actvCountry.Adapter = adapter;
          lm.RequestLocationUpdates(BestProvider, 5000, 1f, this);
        }
        catch (System.Exception sysExc)
        {
          Toast.MakeText(this, sysExc.Message, ToastLength.Short).Show();
        }
      }
      protected override void OnPause()
      {
        base.OnPause();
        lm.RemoveUpdates(this);
      }
      protected override void OnResume()
      {
        base.OnResume();
        lm.RequestLocationUpdates(BestProvider, 5000, 1f, this);
      }

      public void PerformReverseGeocodeLookup(double Lat, double Lon)
      {
        object[] items = { Lat, Lon };
        string SearchUrl = String.Format("http://www.mapquestapi.com/geocoding/v1/reverse?key=Fmjtd|luub29a22h%2Ca0%3Do5-96z010&lat={0}&lng={1}", items);
        string Url = String.Format(SearchUrl, items);
        HttpWebRequest request = WebRequest.Create(Url) as HttpWebRequest;
        request.Method = "GET";
        var res = request.GetResponse().GetResponseStream();
        var jA = (System.Json.JsonArray.Load(res));
        var street0 = jA["results"][0]["locations"][0]["street"].ToString().Replace("\"", String.Empty);
        var city0 = jA["results"][0]["locations"][0]["adminArea5"].ToString().Replace("\"", String.Empty);
        var zipCode0 = jA["results"][0]["locations"][0]["postalCode"].ToString().Replace("\"", String.Empty);
        RunOnUiThread(() => {
          etCity.Text = city0;
          etAddress.Text = street0;
          etZipCode.Text = zipCode0;
        });
        lm.RemoveUpdates(this);
      }

      void button_Click(object sender, EventArgs e)
      {
        EditText et = FindViewById<EditText>(Resource.Id.Name);
        string message = String.Format("Your values will now be processed. Name: {0}", et.TextFormatted);
        Toast.MakeText(this, message, ToastLength.Long).Show();
      }
      public void OnLocationChanged(Location location)
      {
        PerformReverseGeocodeLookup(location.Latitude, location.Longitude);
      }
      public void OnProviderDisabled(string provider)
      {
      }
      public void OnProviderEnabled(string provider)
      {
      }
      public void OnStatusChanged(string provider, Android.Locations.Availability status, Bundle extras)
      {
      }
    }
AutoCompleteTextView
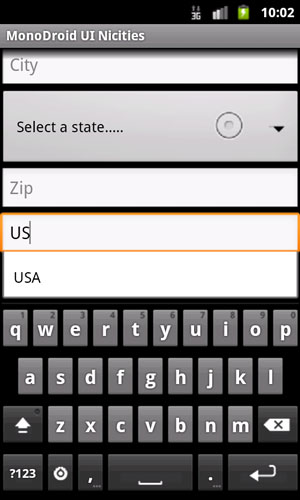
There are some places in an application where a user must be allowed to input anything he wants. At the same time, you want to provide the user with as much help as possible. In a situation like this, some auto-complete functionality would be helpful. Using the example application, for the country code, assuming that the user starts to type in the letters "u" and "s," the user is presented with the USA option, as shown in Figure 7.
 [Click on image for larger view.]
Figure 7. Entering a country code for the United States.
[Click on image for larger view.]
Figure 7. Entering a country code for the United States.
Here's the Android XML for the AutoCompleteTextView:
<AutoCompleteTextView android:id="@+id/Country"
      android:layout_width="fill_parent"
      android:layout_height="wrap_content"
      android:hint="@string/Country"
    />
Here's the code to make this work. It's in the Activity OnCreate method:
string[] countries = Resources.GetStringArray(Resource.Array.Countries);
var adapter = new ArrayAdapter<String>(this, Resource.Layout.ListItem, countries);
actvCountry.Adapter = adapter;
This code does the following things:
- The countries array, which is stored in the arrays.xml resource file, is loaded into a string array.
- The string array of countries is placed into an ArrayAdapter.
- Finally, the ArrayAdapter containing the countries is loaded into the auto-complete TextView. As the user types into the auto-complete TextView, the list of options is narrowed down considerably and the user can easily select the one he wants.
Scrolling
Scrolling through a UI is something that developers take for granted -- but it's not built-in to an Android UI. Thankfully, there's a simple but powerful control, the ScrollView. As its name implies, it's designed for allowing the controls within it to scroll. You need this because your application might be designed on a 4.6-inch device, but still has to run on a 3.7-inch device. The ScrollView will allow the user to work with content that might be just off the screen on a 3.7-inch device. The ScrollView will be used in something like the following code:
<ScrollView  xmlns:android="http://schemas.android.com/apk/res/android"
  android:id="@+id/sv"
  android:layout_width="fill_parent"
  android:layout_height="wrap_content"
>
<LinearLayout ………>
……………………
</LinearLayout>
</ScrollView>
Wrapping Up
In this article, I've looked at several different ways that the UI experience can be improved in Android:
- Using a virtual keyboard to display an optimized keyboard to the user.
- Using other device features to make data entry quick and easy.
- Using the AutoCompleteTextView to improve fields where EditText view data entry is a requirement.
The key takeaway from this article is that you need to think about how an application can help a user be more productive and actively help the user help himself.