Code Focused
How To Refactor for Dependency Injection, Part 2: Composition Root
Ondrej Balas continues his discussion on refactoring your code for dependency injection, this time focusing on the composition root pattern.
- By Ondrej Balas
- 06/18/2014
Building upon my article from last month, "How To Refactor for Dependency Injection," I'll continue the discussion by focusing on a common design pattern called composition root. The composition root pattern is just the concept of having a single spot in your application in which the application is composed and the object graph created. The actual mechanism for this is irrelevant, though commonly a dependency injection container is used.
The Composition Root
Using a composition root will differ based on the type of application, as it should be as close to the application's entry point as possible. The idea is that the composition root will contain all of the configuration necessary to compose all the application pieces. Take, for example, an application that models a fictional notification service. Figure 1 shows all the objects and interfaces I'll be using. The red lines show dependencies, and the blue lines show implementations of interfaces.
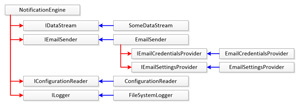 [Click on image for larger view.]
Figure 1. Object Model of a Fictional Notification Service
[Click on image for larger view.]
Figure 1. Object Model of a Fictional Notification Service
In many applications, an object graph like that in Figure 1 would be created by having each object instantiate its own dependencies, making maintenance more difficult than it needs to be. Using the composition root pattern, both the binding of implementations to abstractions and the dependency resolution should take place in one spot. A sample composition root is shown in Listing 1.
Listing 1: A Sample Composition Root
public class CompositionRoot
{
  public NotificationEngine CreateNotificationEngine()
  {
    IDataStream dataStream = new SomeDataStream();
    IEmailCredentialsProvider emailCredentialsProvider = new EmailCredentialsProvider();
    IEmailSettingsProvider emailSettingsProvider = new EmailSettingsProvider();
    IEmailSender emailSender = new EmailSender(emailCredentialsProvider, emailSettingsProvider);
    IConfigurationReader configurationReader = new ConfigurationReader();
    ILogger logger = new FileSystemLogger("somepath.txt");
    return new NotificationEngine(dataStream, emailSender, configurationReader, logger);
  }
}
And then it could be used like this:
static void Main(string[] args)
{
  CompositionRoot root = new CompositionRoot();
  NotificationEngine engine = root.CreateNotificationEngine();
  engine.SendNotification();
}
Refactoring to or writing a new application with a composition root like this is a great first step toward more maintainable code. It also allows the code to satisfy the dependency inversion principle, which specifies that higher-level objects (such as NotificationEngine in the example) should depend on abstractions instead of concrete implementations. This allows the composition root to perform dependency injection, giving the concrete implementations to the NotificationEngine.
While this is a perfectly valid way to implement a composition root, when most people think dependency injection, what they really want is a dependency injection container, also commonly referred to as an inversion of control (IOC) container.
Dependency Injection Containers
There are hundreds of dependency injection containers available, from large, general-purpose frameworks to tiny containers that meet a specific need related to dependency injection. With such a wide variety to choose from, it can be overwhelming to choose the right one. The good news is that when using the composition root pattern, most containers behave the same, with only minor differences in syntax, and can be easily replaced by a different one. There are some exceptions to this with dependency injection frameworks like the Managed Extensibility Framework (MEF), which will be discussed in more detail later in this series.
Generally when I start a new project, my dependency injection container of choice is an open source framework called Ninject. Ninject is a general-purpose framework with a few drawbacks, but I find it has an easy syntax and a lot of features that make it more pleasant to use than some similar frameworks.
Dependency injection containers make it even easier to create a composition root, because they allow you to bind interfaces to implementations, rather than actually create any objects. Instead, Ninject will remember the bindings and then intelligently create objects as they're requested, based on the bindings. The same composition root in Listing 1 changes to look like the composition root in Listing 2 instead.
Listing 2: Composition Root Using Ninject
public class CompositionRoot
{
  private IKernel kernel = new StandardKernel();

  public CompositionRoot()
  {
    kernel.Bind<IDataStream>().To<SomeDataStream>();
    kernel.Bind<IEmailCredentialsProvider>().To<EmailCredentialsProvider>();
    kernel.Bind<IEmailSettingsProvider>().To<EmailSettingsProvider>();
    kernel.Bind<IEmailSender>().To<EmailSender>();
    kernel.Bind<IConfigurationReader>().To<ConfigurationReader>();
    kernel.Bind<ILogger>().To<FileSystemLogger>().WithConstructorArgument(
      "filePath", "somepath.txt");            }

  public NotificationEngine CreateNotificationEngine()
  {
    return kernel.Get<NotificationEngine>();
  }
}
In this example, nothing is actually being created inside the constructor. You can think of the Bind statements as being instructions that say, "When this is requested, return one of these." It's only when the Get method is called from within CreateNotificationEngine that objects are actually created. When Get is called, the Bind instructions given to Ninject cause it to perform the following steps:
- Check bindings for NotificationEngine. No bindings exist, but NotificationEngine is a class, so Ninject will treat it as if it were bound to itself.
- Examine constructors of NotificationEngine object. The only existing constructor requires an IDataStream, IEmailSender, IConfigurationReader and ILogger.
- Check bindings for IDataStream. See that it's bound to an implementation of SomeDataStream.
- Examine constructors for SomeDataStream. The only constructor is the default constructor, so the object is created.
- Check bindings for IEmailSender. See that it's bound to an implementation of EmailSender.
- Examine constructors for EmailSender. The only constructor requires an IEmailCredentialsProvider and IEmailSettingsProvider.
- Check bindings for IEmailCredentialsProvider. See that it's bound to an implementation of EmailCredentialsProvider and that the only constructor is the default constructor, so a new instance of EmailCredentialsProvider is created.
- Check bindings for IEmailSettingsProvider. See that it's bound to an implementation of EmailSettingsProvider and that the only constructor is the default constructor, so a new instance of EmailSettingsProvider is created.
- Now that both dependencies of EmailSender are satisfied, create an EmailSender, passing in the newly created EmailCredentialsProvider and EmailSettingsProvider.
- As before, see that IConfigurationReader is bound to ConfigurationReader and ILogger is bound to FileSystemLogger, both with a single default constructor. Ninject will therefore create instances of these classes.
- Now that all four dependencies of NotificationEngine have been satisfied, it can be created by passing them all into its constructor.
- Return the newly created NotificationEngine.
Notice that in the first step, Ninject didn't have a Bind instruction for NotificationEngine. When this happens, Ninject automatically self-binds and treats the class as if it were bound to itself. Not all dependency injection frameworks do this by default, so if you're using a different framework you may need to explicitly bind NotificationEngine to itself.
Other Ways to Configure the Dependency Injection Container
In the example, I used code inside the constructor of the CompositionRoot to configure the Ninject bindings. While this method is a great way to get started with containers, many containers also offer alternative ways for setup. One common alternative is to use XML configuration, which has the added benefit of being modifiable without needing to recompile the application. Another method is to use automatic registration, in which the container uses naming conventions to perform bindings automatically, rather than needing them to be specified.
I consider these to be advanced scenarios and outside of the scope of this introduction to containers, but it's important to know they exist. Setting these up can vary wildly between containers, so for further information, I recommend looking at the documentation for your container of choice.
Lifecycle Management
One often-overlooked benefit of dependency injection containers is that they allow control of the lifecycle of the objects they manage. In my examples thus far, every time a NotificationEngine is requested, it and all of its dependencies are recreated. This happens because the default lifecycle of objects in Ninject is transient, but may not be the desired behavior. For example, if more than one NotificationEngine is used, it might make sense for them to all share a single logger. To do that, you simply need to tell Ninject which lifecycle to use at bind time, like this:
kernel.Bind<ILogger>().To<FileSystemLogger>().InSingletonScope().WithConstructorArgument(
  "filePath", "somepath.txt");
InSingletonScope added on to the binding will tell Ninject to only ever create a single instance of that object, no matter how many times it's requested from the container. Commonly available lifecycles include:
- InTransientScope: The default scope, a new object is created upon each request.
- InSingletonScope: Only one instance of the object is created, and subsequent requests return the same object.
- InThreadScope: Like singleton, but one instance is created per thread rather than one per application. The same thread will always get the same instance.
- InRequestScope: Like singleton, but each request in a Web application will have its own instance created for it. You need to be using Ninject.Web.Common to get access to this.
- InScope: Allows you to supply a function that determines whether to create a new instance.
For the full list, as well as usage examples, please refer to the Ninject documentation on Object Scopes.
Alternative Dependency Injection Containers
As I mentioned already, though Ninject is personally my container of choice, there are many other suitable alternatives. Some of the more popular ones include:
As this series continues, I'll explore some of the pros and cons of the various containers and how they compare to Ninject, as well as get into more dependency injection-related patterns and advanced usage scenarios.
About the Author
Ondrej Balas owns UseTech Design, a Michigan development company focused on .NET and Microsoft technologies. Ondrej is a Microsoft MVP in Visual Studio and Development Technologies and an active contributor to the Michigan software development community. He works across many industries -- finance, healthcare, manufacturing, and logistics -- and has expertise with large data sets, algorithm design, distributed architecture, and software development practices.