Cross Platform C#
Getting Device-Specific When Customizing a Xamarin Forms App
Your Xamarin Forms App needs one more little tweak, and that's to make it device-specific, so users don't freak out. Unlike the Apple tweak, the Android tweak takes a bit of work.
Last time, I looked at customizing Xamarin Forms applications so that the functionality is the same across platforms. I looked at the components and setting to make this possible, and added some custom, platform-specific programming to accomplish this. The result has been that my picture-taking application for my startup has rounded into form and is usable in low- and high-bandwidth areas. I've had a couple of users test it out with much success.
But that app is still missing something: On the iPhone, XF is well integrated with it. The programming model feels very much like programming against the native iPhone API. On Android, it provides a good representation of the Android UI. However, there are some basic settings in that UI that I feel it's missing.
What's the Problem?
XF provides a cross-platform API that translates into the native platform's UI APIs and other various APIs as necessary. That's great. It allows you to easily target these platforms. The problem is that the application may need to have a consistent and specific look and feel based on the target device. Users want to see applications that look, smell and taste like all of the other applications on the device they're using
What developers tend to do is target the iPhone first and Android second, often without thinking about making the application behave as an Android app. An application that looks and acts like an iPhone application while running on an Android phone definitely won't make Android users happy.
Thankfully, you now have some help, as the XF UI API calls get translated into the native platform API calls.
And the next issue is retaining the coloring and general themes for the target device. I'll cover that issue here, too.
Note: For this article, I'm assuming you're using XF version 2.0 or newer.
The Android Version
Material Design (MD) is a guide for visual, motion and interactive design from Google. It's available for Android 5.0 and newer. MD provides a new theme, new widgets for complex views, and some new APIs for custom shadows and animations. (Note: Greg Shackles covered Material Design in another article.)
To add MD support to your application, follow these steps:
1. Make sure that you're running Xamarin.Forms 2.0 or newer.
2. Change the "Target Android Version" in the project properties to the most recent version installed. On my system, this was Android 7.0 API 24.
3. Add the appropriate themes and colors to your application. Because an Android application is used to actually create an XF for Android application, these are going to be the standard themes that a user is already familiar with in Android. Those files are Listing 1, Listing 2 and Listing 3.
Listing 1: Android Colors (Resources/values/colors.xml)
<?xml version="1.0" encoding="utf-8"?>
<resources>
  <color name="primary">#3F51B5</color>
  <color name="primary_dark">#303F9F</color>
  <color name="primary_light">#C5CAE9</color>
  <color name="accent">#E040FB</color>
  <color name="primary_text">#212121</color>
  <color name="secondary_text">#757575</color>
  <color name="icons">#FFFFFF</color>
  <color name="divider">#BDBDBD</color>
  <color name="window_background">#F06292</color>
</resources>
Listing 2: Android Themes (Resources/values/styles.xml)
<?xml version="1.0" encoding="utf-8" ?>
<resources>
  <style name="MyTheme" parent="MyTheme.Base">
  </style>
  <style name="MyTheme.Base" parent="Theme.AppCompat.Light.NoActionBar">
    <item name="colorPrimary">@color/primary</item>
    <item name="colorPrimaryDark">@color/primary_dark</item>
    <item name="colorAccent">@color/accent</item>
    <item name="android:windowBackground">@color/window_background</item>
    <item name="windowActionModeOverlay">true</item>
    <item name="windowNoTitle">true</item>
    <item name="windowActionBar">false</item>
  </style>
</resources>
Listing 3: Android Themes (Resources/values-v21/styles.xml)
<?xml version="1.0" encoding="utf-8" ?>
<resources>
  <style name="MyTheme" parent="MyTheme.Base">
    <!--If you are using MasterDetailPage you will want to set these,
      else you can leave them out-->
    <!--<item name="android:windowDrawsSystemBarBackgrounds">true</item>
    <item name="android:statusBarColor">@android:color/transparent</item>-->
  </style>
</resources>
4. The next step is to add the theme to the application. This can be done in the AndroidManifest.xml:
<application android:label="AppName" android:icon="@drawable/icon" android:theme="@style/MyTheme">
Another way to add this is in an attribute on the MainActivity's class:
[Activity(Label = "GolfGameClubApp",
        Icon = "@drawable/icon",
        Theme = "@style/MyTheme",
        MainLauncher = true,
        ConfigurationChanges = ConfigChanges.ScreenSize | ConfigChanges.Orientation)]
Please note that the theme can be set in either the attribute of the class as a .NET attribute or in the Android Manifest file as an attribute. Either way should work just fine.
5. Add a file named tabs.axml, as shown in Listing 4.
Listing 4: Tabs File (Resources/layout/tabs.axml)
<android.support.design.widget.TabLayout
  xmlns:android="http://schemas.android.com/apk/res/android"
  xmlns:app="http://schemas.android.com/apk/res-auto"
  android:id="@+id/sliding_tabs"
  android:layout_width="match_parent"
  android:layout_height="wrap_content"
  android:background="?attr/colorPrimary"
  android:theme="@style/ThemeOverlay.AppCompat.Dark.ActionBar"
  app:tabIndicatorColor="@android:color/white"
  app:tabGravity="fill"
  app:tabMode="fixed" />
6. Add a file named toolbar.axml, shown in Listing 5.
Listing 5: Toolbar File (Resources/layout/toolbar.axml)
<?xml version="1.0" encoding="utf-8"?>
<android.support.v7.widget.Toolbar
  xmlns:android="http://schemas.android.com/apk/res/android"
  xmlns:app="http://schemas.android.com/apk/res-auto"
  android:id="@+id/toolbar"
  android:layout_width="match_parent"
  android:layout_height="?attr/actionBarSize"
  android:minHeight="?attr/actionBarSize"
  android:background="?attr/colorPrimary"
  android:theme="@style/ThemeOverlay.AppCompat.Dark.ActionBar"
  android:popupTheme="@style/ThemeOverlay.AppCompat.Light"
  app:layout_scrollFlags="scroll|enterAlways" />
7. The XF Activity MainActivity needs to inherit from the class FormsAppCompatActivity.
8. The OnCreate method of MainActivity needs to contain the following code:
       protected override void OnCreate(Bundle bundle)
        {
          TabLayoutResource = Resource.Layout.tabbar;
          ToolbarResource = Resource.Layout.toolbar;
          base.OnCreate(bundle);
          Forms.Init(this, bundle);
          LoadApplication(new App());
        }
The key items are that the TabLayoutResource and the ToolbarResource need to have values set.
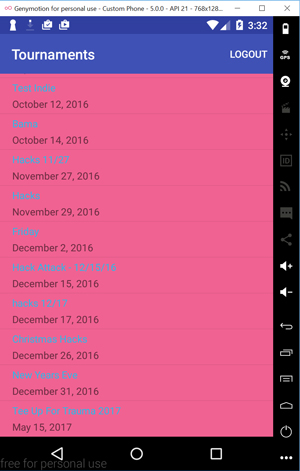
Now that the application has been updated to support MD, Figure 1 shows what these colors look like. Just as a word of warning: The colors for this example were chosen to be very ugly so that it could be easily verified that the colors were set up properly, so you might want to choose more pleasing colors.
 [Click on image for larger view.]
Figure 1. The Android-Specific UI Is Colorful, Yes?
[Click on image for larger view.]
Figure 1. The Android-Specific UI Is Colorful, Yes?
Targeting the iPhone
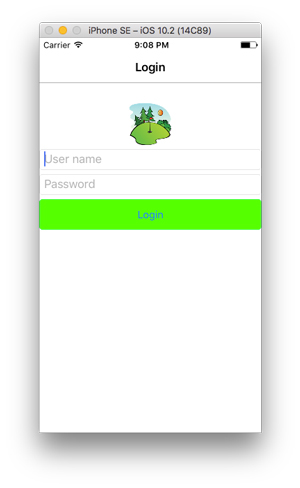
Customizing the UI general look and feel is fairly simple in the iPhone. Within an iPhone application, it's pretty easy to style. The easiest option in an iPhone application is to use the Appearance API. UIKit exposes a static class named Appearance on each view. For example, to style all of the UIButtons in an iPhone application, set the background color of the buttons to be:
UIButton.Appearance.BackgroundColor = UIColor.Green;
That's it! Figure 2 shows a button with the background color set to green.
 [Click on image for larger view.]
Figure 2. The Apple UI, Button Set to Green
[Click on image for larger view.]
Figure 2. The Apple UI, Button Set to Green
One More Thing: Device.OS
XF exposes a Device class. The Device class provides lots of functionality that's device-specific. One of the properties that it exposes is the .OS property, which allows for the testing of the running application to determine the platform. Once it determines the platform, platform-specific options can be applied to the code.
Xamarin Forms provides a great cross-platform API to create native applications for the iPhone and Android. Thankfully, there are features in XF that allow for applications to get a more platform-specific look and feel to them.
About the Author
Wallace (Wally) B. McClure has authored books on iPhone programming with Mono/Monotouch, Android programming with Mono for Android, application architecture, ADO.NET, SQL Server and AJAX. He's a Microsoft MVP, an ASPInsider and a partner at Scalable Development Inc. He maintains a blog, and can be followed on Twitter.