Cross Platform C#
Create Responsive Xamarin Apps with ReactiveUI
Learn how to leverage the open source MVVM ReactiveUI framework, the Observer Design Pattern, ReactiveX and more to make your Xamarin apps more responsive.
- By Daniel Krzyczkowski
- 10/24/2017
Many developers, especially those who have been coding enterprise applications for years, may think they can easily shift into mobile development. That might be true for some, but the mobile world is different; there are many additional obstacles to deal with. These include unreliable Internet connections, hardware limitations and -- most important -- the need for a responsive UX.
If an app isn’t immediately responsive, users will quickly abandon it, as many studies have proven.
That’s why I decided to present a Xamarin project using the composable, functional reactive Model-View-ViewModel (MVVM) framework called ReactiveUI. I’ll start with a short introduction to the Reactive Extensions on which ReactiveUI is built, and the Observer Design Pattern.
ReactiveX
ReactiveX (often used interchangeably with the term Reactive Extensions) is an API that enables asynchronous programming with the Observer Design Pattern. It’s available for many different platforms, including Java, JavaScript, Scala and, of course, the Microsoft .NET Framework. Microsoft championed the related Reactive Extensions in 2009, providing a set of libraries for creating asynchronous and event-based applications. Last year, the Reactive Extensions for .NET project joined the .NET Foundation, and this open source technology is crucial when creating responsive UIs.
ReactiveX enables composing many different asynchronous operations and dealing with their results. You can think about ReactiveX as providing data sources that can be observed to receive proper information.
Observer Design Pattern
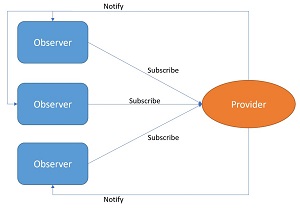
This pattern is based on push-based notifications between observer and provider as shown in Figure 1.
 [Click on image for larger view.]
Figure 1. The Observer Design Pattern
[Click on image for larger view.]
Figure 1. The Observer Design Pattern
The pattern defines a provider (also called subject or observable) and zero or more observers. Observers can register with the provider and receive notifications based on predefined conditions, events or state. Once one of these triggers occurs, the provider notifies all subscribers that one of their methods has been used.
It’s especially suitable for UI applications because it provides clean separation between business logic (data sources) and the UI layer. You can read more about the Observer Design Pattern in official Microsoft documentation.
ReactiveUI -- All in One
Now that I’ve introduced ReactiveX and the Observer Design Pattern, I’ll discuss how they’re applicable to mobile application development.
Imagine an application with a list of objects (for example, cars) retrieved from a Web service and displayed to the user. The list can be filtered by color of the car or brand, but these search operations affect UX. The list should be updated dynamically without any interruption.
Another case is a login. Typically a user has to provide a username and password and then log in with the click of a button. The ReactiveUI framework provides a clean implementation to handle these cases and more.
The ReactiveUI framework is available for all .NET platforms, including Xamarin. It’s based on Reactive Extensions and, as mentioned, supports the popular MVVM architectural pattern. Now I’ll show how to use it with a sample Xamarin.Forms application.
Adding ReactiveUI to a Xamarin.Forms Project
For this article I created a simple Xamarin.Forms demo application that shows ReactiveUI in action. It consists of two pages:
- Login page with button and fields for username and password
- List page with search functionality
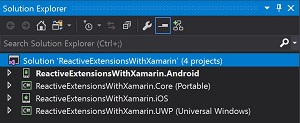
As shown in Figure 2, the solution consists of four projects:
- Portable Class Library (PCL) project for cross-platform business logic (the core of the solution)
- Android application project
- iOS application project
- UWP application project
 [Click on image for larger view.]
Figure 2. Solution Structure in Visual Studio
[Click on image for larger view.]
Figure 2. Solution Structure in Visual Studio
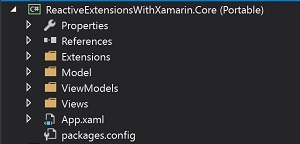
To get started, remove the default MainPage file from the PCL project. Then add Views, ViewModels and Model folders, along with an Extensions folder, as shown in Figure 3.
 [Click on image for larger view.]
Figure 3. The PCL Project Structure
[Click on image for larger view.]
Figure 3. The PCL Project Structure
Now it’s time to add ReactiveUI packages to the solution.
ReactiveUI is available through NuGet. Follow these steps to install it properly:
- In the PCL project:
Install-Package reactiveui-xamforms -Version 7.4.0
- In both platform projects (Android and iOS):
Install-Package reactiveui -Version 7.4.0
Install-Package reactiveui-events-xamforms -Version 7.4.0
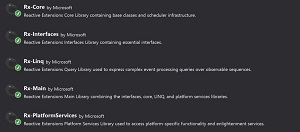
Note that after installing all of these packages, Reactive Extensions (Rx) packages are also included, as shown in Figure 4.
 [Click on image for larger view.]
Figure 4. Reactive Extensions Packages
[Click on image for larger view.]
Figure 4. Reactive Extensions Packages
Creating the Application UI
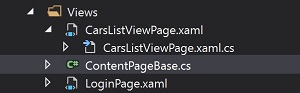
Each of the aforementioned pages, LoginPage and the subsequent CarsListViewPage, has to derive from the ContentPageBase class.
ContentPageBase is the base class for all pages that needs to be added so generic arguments can be used. Add a new ContentPageBase.cs file to the Views folder, as shown in Figure 5.
 [Click on image for larger view.]
Figure 5. The Base Class for All Pages
[Click on image for larger view.]
Figure 5. The Base Class for All Pages
Here’s the shell of the ContentPageBase.cs code:
 public class ContentPageBase<TViewModel> : ReactiveContentPage<TViewModel>
  where TViewModel : class
{
}
Now that the UI is ready, the next step is to modify codebehind classes for each page.
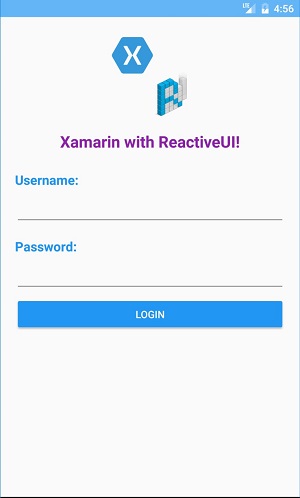
Modifying LoginPage Code
Add a new XAML page to the Views folder called LoginPage.xaml. Its code will result in the page shown in Figure 6.
 [Click on image for larger view.]
Figure 6. The LoginPage UI
[Click on image for larger view.]
Figure 6. The LoginPage UI
The LoginPage.xaml code is shown in Listing 1.
Note that we have to replace the default ContentPage with ContentPageBase to add generics.
Listing 1: LoginPage.xaml Code
<ui:ContentPageBase xmlns="http://xamarin.com/schemas/2014/forms"
  xmlns:x="http://schemas.microsoft.com/winfx/2009/xaml"
  xmlns:rxui="clr-namespace:ReactiveUI.XamForms;assembly=ReactiveUI.XamForms"
  xmlns:ui="clr-namespace: ReactiveExtensionsWithXamarin.Core.Views; assembly=ReactiveExtensionsWithXamarin.Core"
  xmlns:vms="clr-namespace:ReactiveExtensionsWithXamarin.Core.ViewModels; assembly=ReactiveExtensionsWithXamarin.Core"
x:TypeArguments="vms:LoginViewModel"
x:Class="ReactiveExtensionsWithXamarin.Core.Views.LoginPage">
  <ContentPage.Content>
    <StackLayout VerticalOptions="Fill" Padding="20">
      <Image HeightRequest="120" WidthRequest="120" Aspect="AspectFit" Source="main_logo.png"
        HorizontalOptions="Center" VerticalOptions="Start"/>
      <Label Text="Xamarin with ReactiveUI!" Margin="0, 10, 0, 0" HorizontalOptions="Center"
        TextColor="#8e24aa" FontAttributes="Bold" FontSize="Large"/>
      <StackLayout Margin="0, 20, 0, 0">
        <Label Text="Username:" FontAttributes="Bold" FontSize="Medium" TextColor="#2196f3" />
        <Entry x:Name="UsernameEntry" />
        <Label Text="Password:" FontAttributes="Bold" FontSize="Medium" Margin="0, 10, 0, 0"
          TextColor="#2196f3" />
        <Entry x:Name="PasswordEntry" IsPassword="true" />
        <Button Text="Login" BackgroundColor="#2196f3" TextColor="White" x:Name="LoginButton" />
        <Label x:Name="messageLabel" />
      </StackLayout>
      <ActivityIndicator x:Name="LoginActivityIndicator" HorizontalOptions="Center"
        Margin="0, 10, 0, 0"/>
    </StackLayout>
  </ContentPage.Content>
</ui:ContentPageBase>
Proper namespaces and arguments should be provided:
xmlns:rxui="clr-namespace:ReactiveUI.XamForms;assembly=ReactiveUI.XamForms"
xmlns:ui="clr-namespace:ReactiveExtensionsWithXamarin.Core.Views;assembly=ReactiveExtensionsWithXamarin.Core"
xmlns:vms="clr-namespace:ReactiveExtensionsWithXamarin.Core.ViewModels;assembly=ReactiveExtensionsWithXamarin.Core"
x:TypeArguments="vms:LoginViewModel"
Replace existing codebehind for LoginPage.xaml.cs with the code in Listing 2.
Remember, the LoginPage class must derive from the ContentPageBase class so you can add generic arguments in the ViewModel. In this case, LoginPage will be connected with LoginViewModel.
Listing 2: LoginPage.xaml.cs Codebehind
[XamlCompilation(XamlCompilationOptions.Compile)]
public partial class LoginPage : ContentPageBase<LoginViewModel>
{
  public LoginPage()
  {
    InitializeComponent();
    NavigationPage.SetHasNavigationBar(this, false);
  }


  protected override void OnAppearing()
  {
    base.OnAppearing();

    this.WhenActivated(disposables =>
    {
      this.Bind(ViewModel, vm => vm.Username, c => c.UsernameEntry.Text)
        .DisposeWith(disposables);

      this.Bind(ViewModel, vm => vm.Password, c => c.PasswordEntry.Text)
        .DisposeWith(disposables);

      this.OneWayBind(ViewModel, x => x.LoginCommand, x => x.LoginButton.Command)
        .DisposeWith(disposables);

      this.OneWayBind(ViewModel, x => x.IsLoading, x => x.LoginActivityIndicator.IsRunning)
        .DisposeWith(disposables);
    });
  }
}
Inside the OnAppearing method you have to add bindings. The WhenActivated method is responsible for collecting all bindings in a container called CompositeDisposable. In lambda expression, this object is presented as disposables. Once a page is no longer presented, these bindings are disposed so you aren’t wasting memory resources. As you can see in Listing 2, there are bindings for UsernameEntry, PasswordEntry, LoginButton and LoginActivityIndicator.
The binding context is set to LoginViewModel:
ContentPageBase<LoginViewModel>
Modifying CarsListViewPage Code
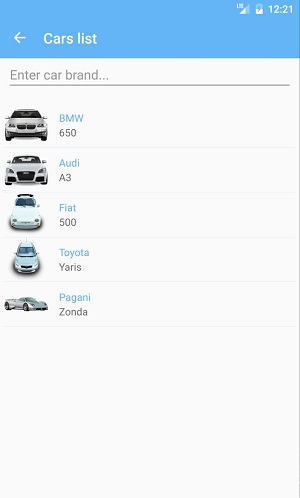
Add a new XAML page to the Views folder called CarsListViewPage.xaml. When it’s coded up, it should look like Figure 7.
 [Click on image for larger view.]
Figure 7. The CarsListViewPage UI
[Click on image for larger view.]
Figure 7. The CarsListViewPage UI
The CarsListViewPage.xaml code is presented in Listing 3.
Note that exactly like in the previous page, we have to replace the default ContentPage with ContentPageBase to add generics.
Listing 3: CarsListViewPage.xaml Code
<ui:ContentPageBase xmlns="http://xamarin.com/schemas/2014/forms"              xmlns:x="http:"//schemas.microsoft.com/winfx/2009/xaml
xmlns:rxui="clr-
namespace:ReactiveUI.XamForms;assembly=ReactiveUI.XamForms"
xmlns:ui="clr-
namespace:ReactiveExtensionsWithXamarin.Core.Views;assembly=ReactiveExtensionsWithXam arin.Core"
xmlns:vms="clr-
namespace:ReactiveExtensionsWithXamarin.Core.ViewModels;assembly=ReactiveExtensionsWi thXamarin.Core"
x:TypeArguments="vms:CarsListViewModel"
x:Class="ReactiveExtensionsWithXamarin.Core.Views.CarsListViewPage">
<ContentPage.Content>
  <StackLayout>
    <Entry HorizontalOptions="FillAndExpand" Placeholder="Enter car brand..."
      Margin="10, 0, 10, 10" x:Name="SearchViewEntry"/>
    <ListView x:Name="CarsListView" CachingStrategy="RecycleElement"
      Margin="6, 0, 6, 0">
      <ListView.ItemTemplate>
        <DataTemplate>
          <ImageCell Text="{Binding Brand}" Detail="{Binding Model}"
            ImageSource="{Binding ThumbnailUrl}"/>
        </DataTemplate>
      </ListView.ItemTemplate>
    </ListView>
  </StackLayout>
</ContentPage.Content>
</ui:ContentPageBase>
Again, proper namespaces should be provided:
xmlns:rxui="clr-namespace:ReactiveUI.XamForms;assembly=ReactiveUI.XamForms"  xmlns:ui="clrnamespace:ReactiveExtensionsWithXamarin.Core.Views;assembly=ReactiveExtensio nsWithXamarin.Core"
xmlns:vms="clr-
namespace:ReactiveExtensionsWithXamarin.Core.ViewModels;assembly=ReactiveExtensionsWithXa marin.Core"
x:TypeArguments="vms:CarsListViewModel"
Replace the existing codebehind for CarsListViewPage.xaml.cs with the code in Listing 4. You have to set up binding in the same way as was done for LoginPage.
Listing 4: CarsListViewPage.xaml.cs Code
[XamlCompilation(XamlCompilationOptions.Compile)]
public partial class CarsListViewPage : ContentPageBase<CarsListViewModel>
{
  public CarsListViewPage()
  {
    InitializeComponent();
  }
  protected override void OnAppearing()
  {
    base.OnAppearing();
    this.WhenActivated(disposables =>
    {
      this.OneWayBind(ViewModel, x => x.Cars, x =>
        x.CarsListView.ItemsSource).DisposeWith(disposables);
      this.Bind(ViewModel, x => x.SearchQuery, c => c.SearchViewEntry.Text)
        .DisposeWith(disposables);
    });
  }
}
The binding context is set to CarsListViewModel:
ContentPageBase<CarsListViewModel>
ViewModels Logic
Once those previous pages are ready, you can add ViewModels and connect each ViewModel with the appropriate page. Naturally, all ViewModels should be placed in the ViewModels folder.
The LoginViewModel code is shown in Listing 5.
Listing 5: LoginViewModel Code
public class LoginViewModel : ReactiveObject, IRoutableViewModel
{
  public string UrlPathSegment => "ReactiveUI with Xamarin!";
  public IScreen HostScreen { get; protected set; }

  string _userName;
  public string Username
  {
    get { return _userName; }
    set { this.RaiseAndSetIfChanged(ref _userName, value); }
  }

  string _password;
  public string Password
  {
    get { return _password; }
    set { this.RaiseAndSetIfChanged(ref _password, value); }
  }

  public ReactiveCommand LoginCommand { get; set; }


  ObservableAsPropertyHelper<bool> _isLoading;
  public bool IsLoading
  {
    get { return _isLoading?.Value ?? false; }
  }


  ObservableAsPropertyHelper<bool> _isValid;
  public bool IsValid
  {
    get { return _isValid?.Value ?? false; }
  }

  public LoginViewModel()
  {
    HostScreen = Locator.Current.GetService<IScreen>();
    PrepareObservables();
  }

  private void PrepareObservables()
  {

    this.WhenAnyValue(e => e.Username, p => p.Password,
      (emailAddress, password) => (!string.IsNullOrEmpty(emailAddress)) && !string.IsNullOrEmpty(password) && password.Length > 6)
  .ToProperty(this, v => v.IsValid, out _isValid);

    var canExecuteLogin =
    this.WhenAnyValue(x => x.IsLoading, x => x.IsValid,
      (isLoading, IsValid) => !isLoading && IsValid);


    LoginCommand = ReactiveCommand.CreateFromTask(
      async execute =>
      {
        var random = new Random();
        await Task.Delay(random.Next(400, 2000));
        HostScreen.Router.Navigate.Execute(new CarsListViewModel()).Subscribe();
      }, canExecuteLogin);


    this.WhenAnyObservable(x => x.LoginCommand.IsExecuting)
      .StartWith(false)
      .ToProperty(this, x => x.IsLoading, out _isLoading);
  }
}
Each ViewModel derives from ReactiveObject and implements the IRoutableViewModel interface. ReactiveObject is a base class that includes core functionality like the INotifyPropertyChanged interface implementation.
IRoutableViewModel interface has two properties:
- string UrlPathSegment { get; } -- This is just a string token that represents the current ViewModel. It can be considered as a URL for the ViewModel.
- IScreen HostScreen { get; } -- This property represents the IScreen object in which the ViewModel is currently displayed. I’ll explain more about this later in the "Application Startup Setup" section.
Now I’ll go through the PrepareObservables method:
When any value is provided in the Username or Password fields, check to ensure these values aren’t empty or null, and also check the length of the password:
this.WhenAnyValue(e => e.Username, p => p.Password, (emailAddress, password) => (!string.IsNullOrEmpty(emailAddress)) && !string.IsNullOrEmpty(password) && password.Length > 6)
.ToProperty(this, v => v.IsValid, out _isValid);
When any value is provided to the IsLoading and IsValid properties, check if IsLoading isn’t already started and if the IsValid property is true. If each condition is fulfilled, the canExecuteLogin observable is set to true:
var canExecuteLogin = this.WhenAnyValue(x => x.IsLoading, x => x.IsValid,
  (isLoading, IsValid) => !isLoading && IsValid);
Next, create LoginCommand to handle async operations -- in this case a fake Web service call.
When LoginCommand is invoked, create a new Random instance and delay the Task.
Once the Task is finished, use the HostScreen.Router property to navigate to the next ViewModel. LoginCommand can be executed only when the canExecuteLogin property is set to true:
LoginCommand = ReactiveCommand.CreateFromTask(  async execute =>
  {
    var random = new Random();
    await Task.Delay(random.Next(400, 2000));
    HostScreen.Router.Navigate
    .Execute(new CarsListViewModel()).Subscribe();
  }, canExecuteLogin);
When LoginCommand is being executed, change the IsLoading propety to true. This will make ActivityIndicator show on LoginPage. The ToProperty method converts Observable to ObservableAsPropertyHelper and automatically raises a property changed event:
this.WhenAnyObservable(x => x.LoginCommand.IsExecuting)
.StartWith(false)
.ToProperty(this, x => x.IsLoading, out _isLoading);
I need to explain that ObservableAsPropertyHelper is a helper class that enables a ViewModel to implement output properties backed by an Observable, so in this case by _isLoading. It enables notifying the UI when loading is finished:
ObservableAsPropertyHelper<bool> _isLoading;
public bool IsLoading
{
  get { return _isLoading?.Value ?? false; }
}
Listing 6 shows the code for CarsListViewModel.
Listing 6: CarsListViewModel Code
public class CarsListViewModel : ReactiveObject, IRoutableViewModel
{
  public string UrlPathSegment => "Cars list";
  public IScreen HostScreen { get; protected set; }

  private string _searchQuery;
  public string SearchQuery
  {
    get { return _searchQuery; }
    set { this.RaiseAndSetIfChanged(ref _searchQuery, value); }
  }

  private ObservableCollection<Car> _cars;
  public ObservableCollection<Car> Cars
  {
    get => _cars;
    private set
    {
      this.RaiseAndSetIfChanged(ref _cars, value);
    }
  }

  ObservableCollection<Car> _carsSourceList;
  private ObservableCollection<Car> CarsSourceList
  {
    get { return _carsSourceList; }
    set { this.RaiseAndSetIfChanged(ref _carsSourceList, value); }
  }


  public CarsListViewModel()
  {
    HostScreen = Locator.Current.GetService<IScreen>();
    CreateList();
    SetupReactiveObservables();
  }

  protected void SetupReactiveObservables()
  {

    this.WhenAnyValue(vm => vm.SearchQuery)
      .Throttle(TimeSpan.FromSeconds(2))
      .Where(x => !string.IsNullOrEmpty(x))
      .Subscribe(vm =>
      {
        var filteredList = CarsSourceList.Where(brand => brand.Brand
          .Contains(SearchQuery, StringComparison.OrdinalIgnoreCase)).ToList();
        Device.BeginInvokeOnMainThread(() => { Cars =
          new ObservableCollection<Car>(filteredList); });
      });

    this.WhenAnyValue(vm => vm.SearchQuery).Where(x => string.IsNullOrEmpty(x)).Subscribe(vm =>
    {
      Cars = CarsSourceList;
    });
  }

  #region Mock List Items

  private void CreateList()
  {
    CarsSourceList = new ObservableCollection<Car>
      {
        new Car
        {
          Brand = "BMW",
          Model = "650",
          ThumbnailUrl = "https://image.ibb.co/chZJbv/BMW.png"
        },

        new Car
        {
          Brand = "Audi",
          Model = "A3",
          ThumbnailUrl ="https://image.ibb.co/nvAMUF/AUDI.png"
        },

        new Car
        {
          Brand = "Fiat",
          Model = "500",
          ThumbnailUrl ="https://image.ibb.co/gjzbwv/FIAT.png"
        },

        new Car
        {
          Brand = "Toyota",
          Model = "Yaris",
          ThumbnailUrl ="https://image.ibb.co/mt1jia/TOYOTA.png"
        },

        new Car
        {
          Brand = "Pagani",
          Model = "Zonda",
          ThumbnailUrl ="https://image.ibb.co/nvS1UF/PAGANI.png"
        }
      };
    Cars = CarsSourceList;

    #endregion
  }
}
The CarsListViewModel class has a structure similar to LoginViewModel. It also derives from ReactiveObject and implements IRoutableViewModel.
I’ll now discuss the PrepareObservables method.
When any value is provided in the SearchViewEntry field and this value isn’t empty or null, a throttle method is responsible for delaying the display of search results. Once the user finishes typing, the search query will be executed after two seconds. The subscribe method is responsible for filtering CarsSourceList and returning the result to the Cars property.
The Cars property is bound to CarsListViewControl in CarsListViewPage:
this.WhenAnyValue(vm => vm.SearchQuery)
  .Throttle(TimeSpan.FromSeconds(2))
  .Where(x => !string.IsNullOrEmpty(x))
  .Subscribe(vm =>
    {
      var filteredList = CarsSourceList.Where(brand => brand.Brand
        .Contains(SearchQuery, StringComparison.OrdinalIgnoreCase)).ToList();
        Device.BeginInvokeOnMainThread(() => { Cars =
          new ObservableCollection<Car>(filteredList); });
    });
When an empty value is provided in the SearchViewEntry field (meaning the user cleared it), the original list is displayed without filters:
this.WhenAnyValue(vm => vm.SearchQuery)
.Where(x => string.IsNullOrEmpty(x)).Subscribe(vm =>
  {
    Cars = CarsSourceList;
  });
There are, of course, two lists: one for the initial data and one for the search results. Here’s the code for handling the search results once the user starts typing:
private ObservableCollection<Car> _cars;
public ObservableCollection<Car> Cars
{
  get => _cars;
  private set
  {
    this.RaiseAndSetIfChanged(ref _cars, value);
  }
}
The list with initial items retrieved from a Web service is mocked by the CreateList method:
ObservableCollection<Car> _carsSourceList;
private ObservableCollection<Car> CarsSourceList
{
  get { return _carsSourceList; }
  set { this.RaiseAndSetIfChanged(ref _carsSourceList, value); }
}
The Car Model Class
One model class is used in the application, called Car. Create a Car class inside the Model folder:
public class Car
{
  public string Brand { get; set; }
  public string Model { get; set; }
  public string ThumbnailUrl { get; set; }
}
Extensions
For the search functionality, also add a static class called StringExtensions inside the Extensions folder located in the PCL project:
static class StringExtensions
{
  public static bool Contains(this string source, string toCheck, StringComparison comp)
  {
    return source != null && toCheck != null && source.IndexOf(toCheck, comp) >= 0;
  }
}
Application Startup Setup
Before application launch, a couple more things need to be done. Refactor the App class and register dependencies in an IoC container, as shown in Listing 7
Listing 7: Refactoring the App Class
public partial class App : Application, IScreen
{
  public RoutingState Router { get; set; }

  public App()
  {
    InitializeComponent();

    Router = new RoutingState();
    Locator.CurrentMutable.RegisterConstant(this, typeof(IScreen));
    Locator.CurrentMutable.Register(() => new LoginPage(), typeof(IViewFor<LoginViewModel>));
    Locator.CurrentMutable.Register(() => new CarsListViewPage(),
      typeof(IViewFor<CarsListViewModel>));
    Router.NavigateAndReset.Execute(new LoginViewModel());

    MainPage = new RoutedViewHost();
  }

  protected override void OnStart()
  {
    // Handle when your app starts
  }

  protected override void OnSleep()
  {
    // Handle when your app sleeps
  }

  protected override void OnResume()
  {
    // Handle when your app resumes
  }
}
The App class has to implement the IScreen interface. This interface has one property: Router. This object is responsible for providing proper navigation between ViewModels. ReactiveUI enables this functionality so you can invoke navigation code from the ViewModel:
public RoutingState Router { get; set; }
Locator.CurrentMutable.RegisterConstant(this, typeof(IScreen));
You have to also register ViewModels and map them with proper pages:
Locator.CurrentMutable.Register(() => new LoginPage(), typeof(IViewFor<LoginViewModel>));
Locator.CurrentMutable.Register(() => new CarsListViewPage(),
  typeof(IViewFor<CarsListViewModel>));
Once ViewModels are registered you can navigate to LoginViewModel:
Router.NavigateAndReset.Execute(new LoginViewModel());
The last step is to register the App class as the main screen provider:
Locator.CurrentMutable.RegisterConstant(this, typeof(IScreen));
Launch the App and See the Result
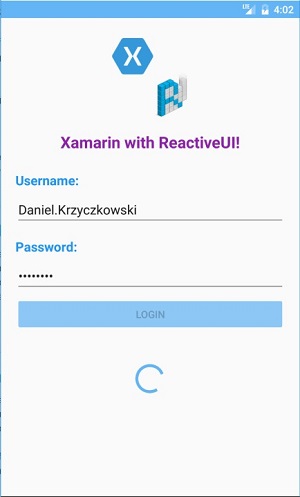
Once you finish the listed steps, build the project and launch the app to verify it works correctly. Type in a username and password. Click the Login button. On the CarsListViewPage, type the name of the brand and wait for the result. You should see the screen shown in Figure 8.
 [Click on image for larger view.]
Figure 8. A Login in Progress
[Click on image for larger view.]
Figure 8. A Login in Progress
Wrapping Up
The ReactiveUI framework provides easy and smooth functionality for reactive Xamarin.Forms apps, and you don’t have to be a senior developer to start using it. One big advantage of this open source framework -- still being improved by the community -- is cross-platform support for:
- Xamarin.Forms
- Xamarin Android
- Xamarin iOS
- Windows Presentation Foundation (WPF)
- Universal Windows Platform (UWP)
With a declarative way of coding, ReactiveUI makes your code easy to read and understandable for other developers. The example app described in this article is available on my GitHub site.
You can also get it in the accompanying code download.
If you want to learn more, definitely visit the ReactiveUI blog.