Inside TFS
A Look Inside Visual Studio Scrum Process Template
Mickey continues his exploration of the new Visual Studio Scrum 1.0 Process Template, with a look at the included features.
In my
previous column, we looked at how to download and install the Microsoft Visual Studio Scrum 1.0 Process Template for Team Foundation Server (TFS) 2010. In this column, we will look at how you can create your first Scrum Team Project, and delve into what the process template contains.
Creating a New Team Project with the Scrum template
Once you have installed the Microsoft Visual Studio Scrum 1.0 Process Template, you can create a new Team Project using that template as a base. In Team Explorer, right-click on the Team Project Collection where you want the Team Project to live, and select New Team Project using the context menu. This will start the Team Project creation wizard. Follow these steps:
- Enter a name and description for your Team Project and click the Next button.
- Select the Microsoft Visual Studio Scrum 1.0 process template, and click the Next button.
- Accept the default creation of a new SharePoint site. This will allow us to take advantage of the Scrum dashboard that was loaded previously. Click the Next button.
- Accept the default version control settings and click the Next button.
- Click the Finish button to create the Team Project.
- Click the Close button to close out the Team Project creation wizard.
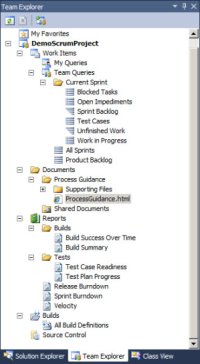
Figure 1 shows the project in Team Explorer after it has been created.

[Click on image for larger view.] |
| Figure 1. |
Figure 1 shows us several of the items that you get out of the box with the new Scrum template. Under work items, you have several team queries for dealing with work item information, including queries that are scoped to the current sprint level, as well as queries scoped to the team project level. The scoping of the queries to the current sprint level is done by including the Iteration Path in the query itself (see Figure 2).
This means that when you move to a new sprint (and therefore a new iteration in TFS) you will need to go into these queries and change the Iteration Path appropriately, so that the queries will run over the currently active sprint.
The work item tracking system contains all the work items you would expect a Scrum template to use, including:
- Bug
- Impediment
- Product Backlog Item
- Spring Tasks
It also contains two work item types not normally associated with the Scrum process.
While these work items are not Scrum specific, they are included so that the manual testing tools and test case management tools included with Visual Studio 2010 and Team Foundation Server 2010 can be utilized.
For those who would like more detail on how to use the Microsoft Visual Studio Scrum 1.0 Process Template, the Process Guidance is a great place to start. To access the process guidance, you can drill down to it in Team Explorer, under Documents -> Process Guidance, or you can right-click on your Team Project in Team Explorer and select Team Project Process Guidance. By default, you will be redirected to an MSDN site (Figure 3) that contains the latest guidance information on the template, with step by step information on how to use the process template to its full effectiveness.
From a reporting perspective, the process template comes with several out of the box reports to help you drive your Scrum process, including:
- Build Success Over Time
- Build Summary
- Test Case Readiness
- Test Plan Progress
- Release Burndown
- Sprint Burndown
- Velocity
The first four reports listed are used to track information related to builds and testing. The Release Burndown and Sprint Burndown reports are used to track how quickly the team has completed its work, and how much work remains in a product or sprint backlog.
The Velocity report is an important report that is used to track how much effort your team has completed for a spring. This report can then be used to predict how much backlog effort the team can exert in future sprints.
Finally, there is the project portal that was created for you during Team Project creation. To access the project portal, right-click on the Team Project in Team Explorer and select Show Project Portal. This will open the project portal in your web browser (see Figure 4).
There are two dashboards, the Release Dashboard (shown in Figure 4) and a customizable My Dashboard. The dashboards provide you detailed insight into the project. In Figure 4, you can view the Release Burndown report, product backlog information, as well as build information. Having all this information displayed in an easy to consume dashboard format makes it easy to consume and understand.
About the Author
Mickey Gousset spends his days as a principal consultant for Infront Consulting Group. Gousset is lead author of "Professional Application Lifecycle Management with Visual Studio 2012" (Wrox, 2012) and frequents the speaker circuit singing the praises of ALM and DevOps. He also blogs at ALM Rocks!. Gousset is one of the original Team System/ALM MVPs and has held the award since 2005.