Inside TFS
Creating a Test Case with Microsoft Test Manager 2010
Inside TFS columnist Mickey Gousset delves into how to create a test case using Microsoft Test Manager 2010.
With Team Foundation Server 2010, a test plan is composed of test cases. At its core, a test case is a series of steps performed against a piece of software, to validate the software is working correctly. TFS 2010 represents test cases as work items. As such, a test case can be created using either Team Explorer or Microsoft Test Manager. In keeping with the theme of my last column (
Test Plans with Microsoft Test Manager 2010), in this column we will look at how to create a test case using Microsoft Test Manager 2010.
Open Microsoft Test Manager 2010. Connect to the team project you want to work with, and select the appropriate test plan. This will open MTM 2010 into the Plan tab, with the test plan selected. To add a new test case to the test plan, click the New button on the tool bar. This will open a blank test case work item form, as shown in Figure 1.
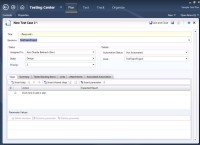
[Click on image for larger view.] |
| Figure 1. Blank Test Case Work Item form. |
The top section of the form should seem familiar to users of the TFS work item tracking system. You can set the title of the test case, and the iteration to which it applies. You can also assign to test case to a specific user, set its priority information, and other detail information.
The real power of the test case though, comes in the bottom portion of the screen, on the Steps tab. This is where you list out the manual steps the tester will use to test the application. Start typing where it says "Click here to add a step." In the Action column, you add the action that the tester should try and perform, such as "Open Internet Explorer." In the Expected Results column, you list what should happen when the action is performed, such as "Internet Explorer opens to its default home page." To continue adding new steps to the test case, hit Enter to go to a new line.
Not every action step requires an expected result. When an expected result is specified, it turns that step into a verification step. With a verification step, the tester will have to specify whether that particular step was successful or not.
You have the ability to provide parameters to your test steps. This allows you to run the test multiple times, each time using a different value. An example of this would be testing different login values on a Web site. Instead of creating a new test case for each login, you can create one test case, and pass multiple login values into it.
To create a parameter in a test step, simple type the "@" symbol and enter a parameter name. This will create two new parameters, username and password, and two new columns in the Parameter Values section. Now you enter, in the Parameter Values section, the user names and passwords to be used during the testing. When the tester runs the test, the test case will execute once for each row of parameters listed (Figure 2).
Shared Steps
Another nice feature for test cases is the ability to share test steps. You may have certain steps, such as logging into a Web site, that would normally be repeated multiple times across different tests. Every test may use the same login procedure, so you are recreating the same steps for each test case. Shared steps allow you to create a set of common steps that can be reused across multiple test cases.
Shared steps are just another work item type, so they are stored in Team Foundation Server. One nice feature about using shared steps is that, using our previous example, if the login procedure changes, instead of having to change every test case, you only have to change the shared step work item, and all the test cases will be automatically updated.
To create a shared test step from within an existing text case, select the steps in the test case that you want to include in the shared step. From the tool bar, click the Create Shared Steps button. This will open a window where you can give your shared steps a title. For this example, the title will be "Website Login Steps." The steps in your test case will be replaced with a single step named Website Login Steps. This step is bolded, and shows a different icon, to indicate it is a shared step. You can double-click it to open the work item and view the detailed information about the steps. (Figure 3).
At this point, we have learned about the new testing framework put in place by Team Foundation Server 2010, including test plans, test suites, and test cases. The next step will be to look at how test cases are executed, using the Manual Test Runner. Look for that column next week.
About the Author
Mickey Gousset spends his days as a principal consultant for Infront Consulting Group. Gousset is lead author of "Professional Application Lifecycle Management with Visual Studio 2012" (Wrox, 2012) and frequents the speaker circuit singing the praises of ALM and DevOps. He also blogs at ALM Rocks!. Gousset is one of the original Team System/ALM MVPs and has held the award since 2005.