Inside TFS
Modifying Work Item States and Transitions
Mickey Gousset dives into modifying the states and transitions of a work item.
In our previous column, we looked at how to add a new field to an existing work item type definition (WITD) in Team Foundation Server 2010. In this column, we're going to continue working at process template customization, with a look at how to create a new work item type, as well as how to modify the states and transitions of a work item type. We're going to create a new work item type called "Cost Center Task", and add a new state called "Approval".
Creating a New Work Item Type Definition
The best way to create a new WITD is by building off an existing WITD. In the previous column, we added a new field named "cost center" to the Task work item type. Now we want to take that work item type and turn it into a stand-alone work item type. To do this, open a command prompt and run the following command:
witadmin exportwitd /collection:http://localhost:8080/tfs /p:"Tailspin Toys" /n:Task /f:CostCenterTask.xml
This will export the WITD for the Task into a file named CostCenterTask.xml. To make this a stand-alone work item type, we need to modify the name of the work item type in the XML. Open the CostCenterTask.xml file in Notepad, and find the line:
<WORKITEMTYPE name="Task">
Change this line of the file to be:
<WORKITEMTYPE name="CostCenterTask">
You may also want to change the description of the work item by modifying the text within the DESCRIPTION tags:
<DESCRIPTION>Used to track tasks that also require a cost center</DESCRIPTION>
Save your changes to the file, then import it by running the following from the command prompt:
witadmin importwitd /collection:http://localhost:8080/tfs /p:"Tailspin Toys" /f:CostCenterTask.xml
Open Visual Studio 2010 and go into Team Explorer. Right-click on the Work Items folder and select "Create a new work item". There is now a new work item type listed named CostCenterTask. You now have the ability to create Cost Center Tasks.
States and Transitions via XML
Work items in TFS have different states, such as Active or Closed, and different transitions between those states, such as a brand new work item becomes Active, and then moves from Active to Closed. You can have rules that apply to certain states, and to transitions between states, in order to affect your business process.
The default Task work item type has two states: Active and Closed. It also has three transitions: open to Active, Active to Closed, and Closed to Active. For the new CostCenterTask, we want to add a third state, called Approval. We also want to change the transition hierarchy to be open to Approval, Approval to Active, Active to Closed, Closed to Active.
Open the CostCenterTask.xml in Notepad, and find the <WORKFLOW> tag. Below that tag is a <STATES> tag section, that lists the different states available for this work item type. Add the following XML directly below the <STATES> tag:
 <STATE value="Approval">

  <FIELDS>

  <FIELD  refname="Microsoft.VSTS.Common.ClosedDate">

  <EMPTY  />

  </FIELD>

  <FIELD  refname="Microsoft.VSTS.Common.ClosedBy">

  <EMPTY  />

  </FIELD>

  </FIELDS>

  </STATE>
The above XML creates a new state named Approval. I've defined two field requirements for this state. These field requirements must be true in order for the work item to enter this state. For this work item to be in the Approval state, both the Closed By field and the Closed Date field must be empty.
Once the states are defined, you need to define transitions into those states. For the CostCenterTask.xml work item type, you want it to be the first state the work item enters. Add the following XML directly below the <TRANSITIONS> tag:
 <TRANSITION from="" to="Approval">

  <REASONS>

  <DEFAULTREASON  value="New" />

  </REASONS>

  <FIELDS>

  <FIELD  refname="Microsoft.VSTS.Common.ActivatedBy">

  <ALLOWEXISTINGVALUE  />

  <COPY  from="currentuser" />

  <VALIDUSER  />

  <REQUIRED  />

  </FIELD>

  <FIELD  refname="Microsoft.VSTS.Common.ActivatedDate">

  <SERVERDEFAULT  from="clock" />

  </FIELD>

  </FIELDS>

  </TRANSITION>
This XML defines a new transition. The from="" indicates this work item has been new created, so the first state it goes to will be Approval. There is only one reason to go into the Approval state, which is specified as New. When you enter a state, you can define field rules to automatically fill out fields or set certain properties. For this state, we're automatically setting the Activated Date to the current date/time, and setting the Activated By field to the current user.
Next, we need to change the <TRANSITION from="" to="Active"> to the following:
<TRANSITION from="Approval" to="Active">

  <REASONS>

  <DEFAULTREASON  value="Approved" />

  <REASON  value="Approved with Questions" />

  </REASONS>

  </TRANSITION>
We want to be able to transition from the Approval state to the Active state. The default reason for this transition is that the task was approved; but the task could also be approved with questions, so we add that as a second potential reason.
If we save our changes, import the new work item type back into TFS, and create a new CostCenterTask work item, you'll notice it now starts off in the Approval state (Figure 1).
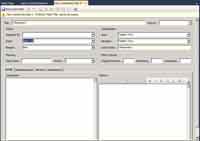
[Click on image for larger view.] |
| Figure 1. The CostCenterTask work item, opening in the Approval state. |
If you select the State field, change the state from Approval to Active, and then select the Reason field, you'll see the two reason options defined earlier.
States and Transitions via Process Editor
The Process Editor in the Team Foundation Power Tools provides a graphical design surface for managing states and transitions in a work item type. Let's look at how to add the same states and transitions using the Process Editor.
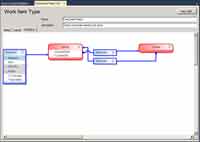
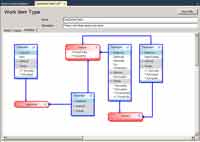
Using the Process Editor, export the Task work item type (see previous column), and save it to a file named CostCenterTask2.xml. Open this file in the editor, and change its name to be CostCenterTask2. Click on the Workflow tab to see the default states and transitions defined for this work item, as shown in Figure 2.
[Click on image for larger view.] |
| Figure 2. Workflow showing the default states and transitions defined for CostCenterTask 2. |
As you can see from Figure 2, the work item has two states (shown in red), and three transitions (shown in blue).
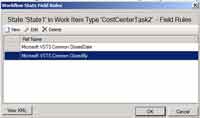
First, we need to add a new state to the design surface. From the Visual Studio Toolbox, drag a State object and drop it onto the design surface. In the Properties window in Visual Studio, change the state name to Approval. Double-click the state to open its Workflow State Field Rules window. For a work item to be in this state, the Closed Date and Closed By fields need to be empty. To do this, click the New button to open the Field Reference window. Select Microsoft.VSTS.Common.ClosedDate. Click the Rules Tab, then click the New button and select the Empty rule. Click OK to return to the properties of the State. Do the same thing again, but this time select the Microsoft.VSTS.Common.ClosedBy field. The Workflow State Field Rules window should look similar to Figure 3.
[Click on image for larger view.] |
| Figure 3. The newly-defined Workflow State Field Rules window. |
You also need to define transitions for this state. The first involves making this the initial state that a work item enters. To do this, select the transition that currently flows into the Active state, but doesn't have a source. In the Properties window, set the target of that transition to be Approval, and change the name to be ~Approval.
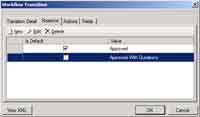
Next, you need to define a transition from the Approval state to the Active state. From the Visual Studio Toolbox, select the Transition Link, and draw a transition from the Approval state to the Active state. Double-click the transition to open its workflow window. Select the Reason's tab, and delete the default reason. Click the New button to add a new reason, enter Approved as the value, and check the Default checkbox, to make this the default reason. Click the New button to add a second reason, with a value of Approved With Questions (Figure 4).
[Click on image for larger view.] |
| Figure 4. Defining Transitions from the Approval state to the Active state. |
At this point the Workflow design surface should look similar to
Figure 5.
[Click on image for larger view.] |
| Figure 5. The updated workflow, with new Transitions added. |
You can now load this work item type back into TFS using the process editor and take advantage of the new states and transitions. You should really add a transition from Approval to Closed, in the event the task is not approved. I'll leave that as an exercise for you.
Editing the states and transitions of a work item type can be done faster directly in the XML, but it requires a deeper understanding of the XML, and all the rules built into TFS around the work item tracking system. While editing in the Process Editor might be slower, the Workflow visual design surface can make it easier to understand how the different states interact.
About the Author
Mickey Gousset spends his days as a principal consultant for Infront Consulting Group. Gousset is lead author of "Professional Application Lifecycle Management with Visual Studio 2012" (Wrox, 2012) and frequents the speaker circuit singing the praises of ALM and DevOps. He also blogs at ALM Rocks!. Gousset is one of the original Team System/ALM MVPs and has held the award since 2005.