Papa's Perspective
Running Windows 8 in a Virtual Machine
The advantages of using virtualization, and specifically VirtualBox, to develop on the Windows 8 platform.
Windows 8 has a lot to offer to developers, whether your skills lie in HTML5, XAML or even C++. The bits for the Windows Developer Preview are out and you likely want to give them a test drive, but you also want to be careful to get up and running quickly without affecting your existing system. So if wiping your PC and installing Windows 8 Developer Preview on it isn't an option, here are two alternatives.
Virtual Hard Drive Options
If you want great performance and an isolated OS that doesn't affect what's already on your PC, installing a Virtual Hard Drive (VHD) on metal is a great option. There are two ways to do this, and it really depends on whether you're willing to wipe your partitions first or not (thus obliterating what's on the drive).
If you're willing to clean the partition first, the advantage is that you can create multiple VHD files for multiple OSes and boot from any of them. You are then running right off the metal, so the performance is great. Plus, your OSes are all contained within a single VHD file, limiting the risk of one OS going down and affecting the others.
However, if you already have an OS on your PC and want to try booting from a new VHD, you can still do that. Your existing OS won't be as isolated from the VHD, but it's still a workable option. My recommendation is to wipe the partition clean first if you can. You can refer to this blog post that explains in detail how to get an OS up and running on metal.
But perhaps you want another option which is easy to get going and to get rid of when you're done. That's when running the OS as a virtual machine (VM) in a program like VirtualBox can be great. I like VirtualBox because it's free, supports multiple OSes (including Windows 8), is easy to set up, and flexible.
VirtualBox
VirtualBox follows the "keep it simple" guideline. I haven't been able to get a VM as responsive as running off the metal, but there are ways to squeeze out extra performance to make it very usable. Plus, since Windows 8 works best on widescreen resolutions, VirtualBox is great since it allows configurable screen resolutions. In fact, Dan Wahlin and I have been using this technique for some Windows 8 videos we've been recording.
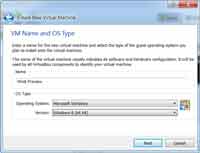
Start by downloading and installing VirtualBox, then downloading the Windows 8 Developer Preview iso file. You'll also want to download and install the VirtualBox Extension Pack if you want to use any USB 2.0 devices. Run VirtualBox and click the New button to create a new virtual machine. Enter a name for your virtual machine such as "Win8 Preview" and select Windows 8 (64 bit) as your Windows version, as shown in Figure 1.
[Click on image for larger view.] |
| Figure 1. Naming the VM and listing Windows 8 as the version. |
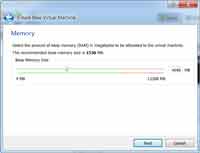
Click Next and set the memory (Figure 2) to at least 2GB of RAM, but if you can afford it you should give it 4GB.
[Click on image for larger view.] |
| Figure 2. Configure at least 2 MB RAM for your VM; 4 MB is even better for performance. |
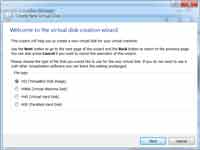
Click Next, indicate that you want to use a start-up disk and create a new hard disk. Click Next again, and select a VDI for a VirtualBox Disk image, as shown in Figure 3. You can select one of the other options, like VHD, but I've found the most success with VDI. Click Next and select either dynamically allocated or fixed. I recommend dynamically allocated so you don't get stuck with a limit, but fixed offers better performance, if that's a priority. Click Next and choose the location of the virtual machine and its size. Click Next and then click Create.
[Click on image for larger view.] |
| Figure 3. Choosing VDI in this step yields good results. |
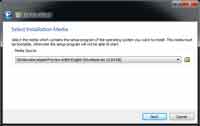
Now that your VM's created, select it in VirtualBox and click the Start button in the toolbar. When the First Run Wizard appears, click the Next button and select the iso file (Figure 4) for the Windows 8 Developer Preview you downloaded earlier. Then click the Next and Start buttons. Once the setup process for Windows 8 begins, follow the prompts as you normally would.
[Click on image for larger view.] |
| Figure 4. Your installation media in this case is the Windows 8 Developer Preview .iso file. |
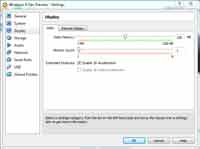
Once the VM's running, there are some key settings you should consider tweaking. First, to boost performance, set the RAM to 4GB if you can spare it. You should also go to the Settings window, select the Display option and check the options to enable both 3D and 2D acceleration, if applicable. Then crank up your video memory to at least 128MB of RAM, as shown in Figure 5. For some reason all of my VMs start out at 1MB, which just won't cut it on Windows 8 (or much else with animations, for that matter).
[Click on image for larger view.] |
| Figure 5. Adjust video memory to at least 128 MB, if you can spare it, for best performance out of your VM. |
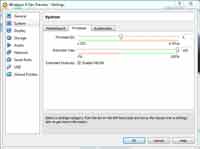
You might also want to go into the Settings window and choose the System option, then the Processor tab. Use at least two CPUs, if you can spare them, as shown in Figure 6.
[Click on image for larger view.] |
| Figure 6. If you're on a multi-core machine and can spare CPUs, utilizing more than one can have a dramatic impact on performance. |
After changing these settings, I received dramatically better performance from my VMs running Windows 8.
Using VirtualBox is a nice option because it's easy to get going and is completely isolated. You'll get lesser performance than installing on metal (using the first option I mentioned), but it's great option to use with a VM, which has advantages like snapshots and rollback to specific machine states.
About the Author
John Papa is a Microsoft Regional Director and former Microsoft technical evangelist. Author of 100-plus articles and 10 books, he specializes in professional application development with Windows, HTML5, JavaScript, CSS, Silverlight, Windows Presentation Foundation, C#, .NET and SQL Server. Check out his online training with Pluralsight; find him at johnpapa.net and on Twitter at twitter.com/john_papa.