C# Corner
Windows 8: Advanced Live Tiles, Part 2
How to schedule live tile and badge updates in a Windows 8 application.
In part 1 of this series, I covered how to add secondary live tiles to your application. Today I'll cover how to schedule periodical updates of live tiles.
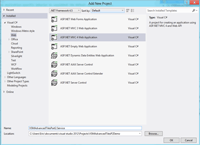
The first thing needed is a Web service from which to pull tiles and badges. Start by creating a new ASP.NET MVC 4 project, as depicted in Figure 1.

[Click on image for larger view.] |
| Figure 1. Creating a new ASP.NET MVC 4 Web application. |
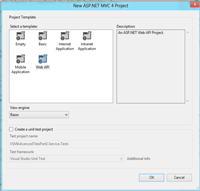
When prompted, select Web API as your web application project type, as shown in
Figure 2.

[Click on image for larger view.] |
| Figure 2. Selecting Web API ASP.NET project type. |
Next add a new ApiController class named TileController. The TileController will serve as a dynamic tile that can be retrieved through an HTTP GET request. You can easily add a new ApiController by right-clicking on the Controllers folder, clicking on add and then clicking on the Controller... button (see
Figure 3).

[Click on image for larger view.] |
| Figure 3. Adding a new ApiController class. |
In the TileController I only kept the Get method and changed the return type to XElement to force proper XML output. The method returns a new live tile with wide and square representations. The message in the tile includes a randomly-generated number to increase the chance of getting a unique tile when it's polled. See Listing 1 for the full TileController class source.
Badge notifications may also be polled, so I add a new ApiController named BadgeController. I've chosen to keep the BadgeController minimal, as well. I've modified the Get method to return an XElement. The method takes a single id parameter and generates a random number, just like the TileController's Get method. The XML for a badge is much simpler, though: its format is
<badge value=x" />
where x is a whole number. See Listing 2 for the full BadgeController source code.
To allow for easy testing of the Web API service, I added a mediaFormat query string mapping to the service. To force an XML format you can append
?mediaFormat=XML
to the polled Uri. To enforce this rule, open up Global.asax.cs and add the QueryStringMapping in Listing 3 to the Application_Start method.
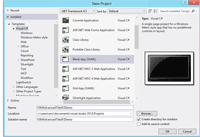
Now it's time to test out the Web API REST service. Create a C# new Metro-style application, as shown in Figure 4.

[Click on image for larger view.] |
| Figure 4. Creating a new Metro-style application. |
Open up MainPage.xaml and add the XAML markup in the root Grid element from
Listing 4.
The next step is to poll the Web API service and send the retrieved tile or badge notification to Windows 8. Open up MainPage.xaml.cs and add the NotificationType enum defined below.
public enum NotificationType
    {
        Badge,
        Tile
    };
Next, I've added the AddItemsFromEnum<T> method used to populate the notification type and recurrence combo boxes.
 private void AddItemsFromEnum<T>(ComboBox comboBox)
        {
            foreach (var value in Enum.GetValues(typeof(T)))
                comboBox.Items.Add(new { Text = value.ToString(), Value = value });

            comboBox.DisplayMemberPath = "Text";
            comboBox.SelectedValuePath = "Value";
        }
The LoadRecurrences and LoadNotificationType methods call the AddItemsFromEnum<T> method, to populate the Recurrences and NotifcationTypes combo boxes respectively.
private void LoadRecurrences()
{
    AddItemsFromEnum<PeriodicUpdateRecurrence>(Recurrences);
}
private void LoadNotificationTypes()
{
    AddItemsFromEnum<NotificationType>(NotifiactionTypes);
}
In the PollButton_Click event, I use WinRT to actually poll the completed Uri and update the tile or badge. The full polling Uri is assembled by taking the base Uri entered by the user and appending either Badge\id or Tile\id, depending on the selected notification type.
Uri pollUri = new Uri(PollingUri.Text);
            PeriodicUpdateRecurrence updateDuration = (PeriodicUpdateRecurrence)Recurrences.SelectedValue;
            NotificationType notificationType = (NotificationType)NotifiactionTypes.SelectedValue;
            Uri fullPollUri = new Uri(String.Format("{0}/{1}/{2}?mediaFormat=XML",
                pollUri.AbsoluteUri, notificationType, Number.Text));
Now I check the notificationType and use either the BadgeUpdateManager or TileUpdateManager helper classes to schedule the periodic badge or tile updates. See
Listing 5 for the code to schedule the Tile or Badge updates. See
Listing 6 for the entire MainPage code-behind source.

[Click on image for larger view.] |
| Figure 5. The completed automatic polling sample application. |
You should now be able to run the application and schedule either Tile or Badge periodic polling.
As you can see, scheduled live tile and badge updates can prove to be quite useful for applications that require periodically updated content. Stay tuned for the third and final installment, where I'll cover lock screen badge notifications.
About the Author
Eric Vogel is a Senior Software Developer for Red Cedar Solutions Group in Okemos, Michigan. He is the president of the Greater Lansing User Group for .NET. Eric enjoys learning about software architecture and craftsmanship, and is always looking for ways to create more robust and testable applications. Contact him at [email protected].