Mono for Android
Background Services in Mono for Android
Learn how to create background services by building a simple music player.
- By Greg Shackles
- 07/10/2012
When you start out building Android applications, one of the first things you'll generally familiarize yourself with is the activity lifecycle. Often this familiarity is triggered by wondering why your activity seems to get restarted every time you rotate the device, or some similar unexpected scenario.
Since there is generally only one active activity at a time on a device, and since that activity is still susceptible to being restarted, you might find yourself wondering how to perform a long-running background operation within your application without worrying about it being interrupted. Taking that even further, how would you be able to keep something running even after your application has exited?
Thankfully, the Android SDK provides an easy mechanism for doing just that: services. A service is an Android component that has no user interface, and can continue running in the background indefinitely, even after the application that started it is gone. Like all Android components, a service defined in your application can actually be used by other applications as well. It is also possible to create bindings to a service, which allow for applications to have a deeper interaction with that service, even across processes.
One thing to keep in mind when creating services is that although they’re running in the background, they’re not necessarily running on a separate thread. By default a service runs on the main thread of its host process. Because of this, just as you would in an activity to keep the UI thread responsive, you should take care to run any CPU-intensive operations on a background thread.
Since services can potentially run indefinitely, you should make sure you free up any resources used by the service once they are no longer needed. It also becomes your responsibility to stop the service once it’s no longer needed, to fully free up any resources it had tied up.
Let's take a look at what's involved in setting up a service. Just like every other Android component, services need to be registered in the application's AndroidManifest.xml file in order to work properly. Mono for Android makes this simple by providing the Service attribute. Decorating a class with this attribute will cause the proper XML to be generated during the build process, saving you the hassle of having to write and maintain it yourself.
Your service class should also inherit from Android.App.Service, an abstract class provided by the Android SDK that acts as a base class for all services. For the purposes of this article we’re going to focus on three methods in Service you can override:
- OnCreate. This method is called when your service is first created, and is your first opportunity to start preparing things needed by the service later on. This only gets called once for the lifetime of the service, so it should mainly be used for initialization and preparation.
- OnDestroy. This is called when your service is about to be destroyed. This is your last hook into the service's lifetime, and is a good place to make sure you’ve freed up any resources allocated by the service.
- OnStartCommand. The OnStartCommand method is invoked every time something requests to start the service. Even if the service is already running this method will be called, so this is where you can actually start doing the work in your process.
One of the easiest ways to understand a service is to imagine a music application. Loading the application would allow the user to browse their music library, choose a song or an album, and start listening to it. If the music was played from within an activity, that would mean the music would stop once the user switched away from the application, or even navigated to another screen within it. Obviously this isn't ideal. However, if you use a service to handle the actual playback, it could continue playing in the background even after the user moves on to something else.
To demonstrate how to implement a service, I’ll build a basic music application. To keep things simple, it will just be able to start and stop a single song, which ships inside the application. You can feel free to substitute any supported music file you like, but for the sake of having a working example, this article will make use of a song released by the band Nine Inch Nails under the Creative Commons license.
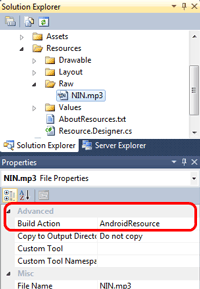
To get started, open up Visual Studio and create a new Mono for Android application, naming it AndroidServicesDemo. By default this will add a bunch of files to the new project. You can go ahead and delete Activity1.cs, but everything else can be left alone. This example will assume that a file named NIN.mp3 has been added to the Resources/Raw folder in the project. The Raw folder is not there by default, so you’ll need to create it. You can substitute in your own music file, or simply grab the file from the sample project. Make sure to set the Build Action on this file to AndroidResource (see Figure 1).

[Click on image for larger view.] |
| Figure 1. Setting the Build Action to AndroidResource. |
The first piece to create is the actual music player service, so add a class to the project named Music Service. Start by declaring the class, as shown in Listing 1.
There are a few things of importance in Listing 1. The Service attribute, as discussed earlier, will tell Mono for Android to generate the appropriate entry in AndroidManifest.xml for this service. Also, notice that the class inherits from the Service class, an abstract base class provided by the Android SDK that all services must inherit from. There are also a few constants defined that will be used later on to help eliminate any magic values from the application. The OnBind() method is required to be defined, but since this service isn't going to be using binding it will never be called, and can simply return null and ignored. Finally, there's a reference to the MediaPlayer class, which is also a part of the Android SDK, and can be used for playing music in an application.
With the shell of the class in place, it's time to start adding in some functionality. First, override the OnStartCommand() method, which will be called whenever something requests that the service is started. See Listing 2 for the code.
The Intent object sent into this method will include any extra information the caller provided with the command. In this case, the actual command is included inside the intent. Once parsed out, the service can determine whether to start or stop playing the music. The startPlaying() and stopPlaying() methods haven’t been defined yet, so we can implement them now, as shown in Listing 3.
In startPlaying() it quickly returns if music is already playing, but otherwise it initializes the MediaPlayer object with the music file and starts playing. When the file finishes playing it will automatically stop the service, which is a good way to make sure the service gives up its resources when it no longer needs them. In stopPlaying(), if the music is playing it will stop, release its resources and null out the object reference, allowing the garbage collector to clean everything up as soon as possible.
The other important thing to notice in these methods is the use of notifications. When you have some kind of persistent service that continues on in the background, such as a music service, it's a good idea to make this known to the user.
Notifications allow you to keep an icon in the status bar at the top of the device, as well as place messages in the notification tray to let the user know what's going on. In this case, the service will display a message letting the user know the name of the song that's currently playing, and clear that notification once the music is stopped. The notification also declares that if the user taps on it, it will start MusicActivity, so they’re able to see the player interface and stop the music if they want.
Finally, there's one last thing the service should do: make sure it cleans up its resources when destroyed. This can be done by overriding the OnDestroy() method:
public override void OnDestroy()
    {
        base.OnDestroy();

        stopPlaying();
    }
Now you have a working music service! Of course, the service isn't all that useful unless you actually use it, so the next step is implementing an activity that calls it.
Before starting the activity, you'll want to update the layout to have Play and Stop buttons. In the Resources/Layout folder is a file named Main.axml, which is a part of the default project template. Double-click on this file to open it up in the Mono for Android layout designer.
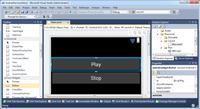
By default the layout will have a single button. From the Toolbox, click and drag a Button element into the layout under the existing button. In the properties panel for each button you can assign a new ID for them, so give them the IDs of Play and Stop (see Figure 2 for an example). You can double-click on a button to quickly change its text.

[Click on image for larger view.] |
| Figure 2. Creating Play and Stop buttons. |
With the layout done, you can now create an activity that uses it. Add a new class, which you can see in Listing 4, to the project named MusicActivity.
The code that makes up this activity is pretty straightforward. First, it pulls in the layout defined earlier in Main.axml. Once loaded, it locates the two buttons inside that layout and assigns click handlers to them, which are exposed through the Click event.
Inside the handlers an Intent is created, which you can think of as a message that tells Android what you would like to do next. Calling StartService() with this intent will trigger the OnStartCommand() method defined earlier in MusicService, telling the service what to do next.

[Click on image for larger view.] |
| Figure 3. The application UI. |
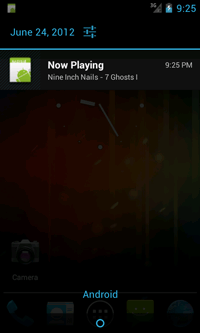
That's all you need to use your shiny new music service, so fire it up! If everything went smoothly you should see something that looks like Figure 3. After you hit play, try backing out of the application and note that the music will continue to play even though the application is no longer in the foreground. You can check the notification tray on the device (see Figure 4) and bring back the application by tapping on the notification.

[Click on image for larger view.] |
| Figure 4. The notification tray. |
This only scratches the surface of what you can do with background services in Android, but hopefully helps you start to understand the power they offer for certain scenarios. As always, with power comes responsibility, and you need to avoid using up too many resources or secretly draining the user's battery in the background. These kinds of things can lead to a poor user experience, but when used appropriately, services can be a powerful part of your Android developer toolbelt.