Mobile Corner
Working with Design and Runtime Data for Windows Phone
In part one of this series, Nick Randolph discusses the use of Expression Blend design-time data in Windows Phone applications.
- By Nick Randolph
- 07/12/2012
Microsoft often talks about how designers and developers can work hand in hand with its latest tools. Designers work in Expression Blend and developers work in Visual Studio. In my experience, this rarely happens on real world projects, however.
In the few cases in which you’re lucky enough to have a designer that's familiar with Expression Blend, the fairy tale of developers and designers being able to work independently seldom happens. Projects often start out well. Designers are able to create design-time data in Expression Blend, which they can use to do the initial design of the application. However, as the project evolves and developers are brought in to start wiring up the logic of the application, the design experience typically deteriorates until the designers are left pretty much guessing where or how to position elements on the screen.
In this column, I'm going to recap how to use design-time data, and how it's wired up within your Windows Phone application. My next column will expand on this topic and cover disabling design-time data at runtime, whilst preserving the design-time experience.
Design-Time Data in Expression Blend
We’re going to start by creating a new project in Expression Blend, which we’ll call DesignTimeDataSample.(Select File,then New Project, then Windows Phone, and then Windows Phone Application.) From the Data window, click the Create Sample Data icon and select New Sample Data, as highlighted in Figure 1.
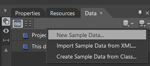
[Click on image for larger view.] |
| Figure 1. Creating Design-Time Data |
When prompted give the sample data set a name, in this case MockDataSource, and make sure the "Enable sample data when application is running" option is checked. In most cases, it's the designers that will do the initial layout of pages within the application, so they'll want to run the application using design-time data. I’ll come back to this option later to walk through replacing it with dynamically loaded data at runtime.
Next, let’s customize the design-time data by changing the name and types of properties. Rename the Collection node to Images; change Property1 to Title; change Property2 to ImageUrl; and change the type of data to Image. You should have a Data window that looks similar to Figure 2.
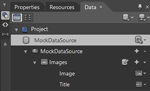
[Click on image for larger view.] |
| Figure 2. Customizing Design-Time Data |
I’ll close off the role of the designer by dragging the Images node into the middle of the design surface. This should create a ListBox in the middle of the page and databind it to the design-time data. Tidy this up a little by right-clicking anywhere on the ListBox and selecting Auto Size, then Fill to stretch the ListBox to fill the available space.
Structure of Design-Time Data
Before I look at how to replace the design-time data with runtime data, let’s first look at how the design-time data is wired up. If you look at the Projects window (Figure 3), you’ll see that a number of additional files have been added to the project.
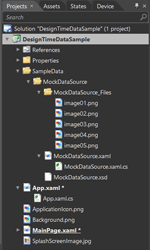
[Click on image for larger view.] |
| Figure 3. Adding Design-Time Data Files |
The structure of your design-time data, as illustrated in Figure 2 in the data window, is defined by the MockDataSource.xsd and the generated MockDataSource.xaml.cs file. The MockDataSource.xaml file contains the actual sample data. The XAML in Listing 1 includes the Images collection, which in this case has two items, each with Title and ImageUrl properties.
What you should also note is that the ImageUrl property values correspond to the images that have also been added to your project. When you added the design-time data to your application, you may have noticed that the App.xaml file was modified. The changes have been emphasized in the following XAML. This code is creating an instance of the design-time data within your application so that it can be referenced as a resource within your application using the key, MockDataSource and, of course, by Expression Blend.
<Application
    xmlns:SampleData="clr-namespace:Expression.Blend.SampleData.MockDataSource"
    x:Class="DesignTimeDataSample.App" ... >
    <Application.Resources>
        <SampleData:MockDataSource x:Key="MockDataSource" d:IsDataSource="True"/>
    </Application.Resources>
    ...
</Application>
The last step is looking at how the design-time data is wired up on the page; again this was done automatically when you dragged the Images node onto the design surface. The following XAML, taken from MainPage.xaml, highlights the attributes that wire up the design-time data to the ListBox.
<phone:PhoneApplicationPage
    x:Class="DesignTimeDataSample.MainPage" ... >
    ...
    <Grid x:Name="LayoutRoot" Background="Transparent"
          DataContext="{Binding Source={StaticResource MockDataSource}}">
        ...
        <Grid x:Name="ContentPanel" Grid.Row="1" Margin="12,0,12,0">
	    <ListBox ItemTemplate="{StaticResource ImagesItemTemplate}"
                ItemsSource="{Binding Images}" />
        </Grid>
    </Grid>
</phone:PhoneApplicationPage>
First, the DataContext of the LayoutRoot (the first element within the page) is set equal to the design-time data using the key, MockDataSource. The key value used to reference the design-time data is irrelevant, so long as it’s the sample in the App.xaml, where the design-time data is loaded into the application, and wherever the data needs to be referenced. It’s important to note that the DataContext flows down to each of the nested elements (unless the DataContext is specified for a nested element). Since neither the ListBox, nor the ContentPanel Grid, have a DataContext explicitly defined, their DataContext will be the same as the LayoutRoot. The contents of the ListBox are wired up to the Images property on the design-time data in the data binding expression for the ItemsSource property.
This column serves as a recap for getting started with design-time data in your Windows Phone application, and how it’s wired up within your application. In my next column, I’ll expand on what I've presented here to disable the design-time data when the application is run, whilst ensuring it's still available at design-time.
About the Author
Nick Randolph runs Built to Roam, a consulting company that specializes in training, mentoring and assisting other companies build mobile applications. With a heritage in rich client applications for both the desktop and a variety of mobile platforms, Nick currently presents, writes and educates on the Windows Phone platform.