Code Focused
A Live Tiles Tutorial
Live Tiles are images that update a pinned tile (icon) on the start screen of Windows Phone. They're used to offer updates to a user browsing the start screen, without having to open the application completely.
Live Tiles can be categorized as either primary tiles or secondary tiles. Primary tiles are created when the user pins the application to the Start window. Secondary tiles are created programmatically through interaction with the user. For example, in a stock monitoring application, a secondary tile can be created for each stock symbol the user selects (e.g., MSFT).
In addition, starting with Windows Phone OS 7.1, tiles are available with two sides, allowing the application to flip the same tile and present different information to the user. This article will focus solely on primary tiles.
System Requirements
To participate in building a Phone app the following is required:
1. Windows PC (Windows 7 OS)
2. Visual Studio 2010
3. Windows Phone tools and SDK installed prior to the event. Go here and click "download the SDK" to install the required software.
The Demo
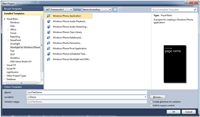
Since the best way of explaining a concept is by example, I'll create a simple Windows Phone App, keeping most of the default parameters and changing minimal items. Assuming the system requirements (mentioned above) are met, I'll start by selecting a Windows Phone Application template, as seen in Figure 1.
[Click on image for larger view.] |
| Figure 1. Selecting the Windows Phone Application template. |
Second, when prompted to select a Windows Phone OS version, I selected 7.1, the latest version. This can be seen in as seen in Figure 2.

[Click on image for larger view.] |
| Figure 2. Select Windows Phone OS 7.1. |
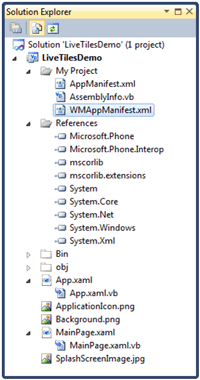
Figure 3 shows all the files and references created by default.
[Click on image for larger view.] |
| Figure 3. Default files and references. |
Default Files and References
One of the files created by default is the WMAppManifest.xml. This file contains all information that will identify the application once it's published to the Windows Phone Marketplace, including its title. The title attribute shown here is the name that will appear to the user in the app list. For this example I'll leave it as the default, set to the project name "LiveTilesDemo":
<App xmlns="" ProductID="{42eb42e9-d021-473f-9d17-16ca590332f9}" Title="LiveTilesDemo"
RuntimeType="Silverlight" Version="1.0.0.0" Genre="apps.normal"  Author="LiveTilesDemo author"
Description="Sample description" Publisher="LiveTilesDemo">
The code here shows the <Tokens> node with the <BackgroundImageURI>, <Count>, and <Title> elements. These elements exist in every primary tile and will be used heavily for this demo. The default setting for <BackgroundImageURI> is "Background.png", and can be seen in Figure 4. I'll leave this setting unchanged for this demo. However, publishing the app to the Marketplace will require this image to be changed. More information on application submission to the Marketplace can be found here.
<Tokens>
<PrimaryToken TokenID="LiveTilesDemoToken" TaskName="_default">
<TemplateType5>
<BackgroundImageURI IsRelative="true" IsResource="false">Background.png</BackgroundImageURI>
<Count>0</Count>
<Title>LiveTilesDemo</Title>
</TemplateType5>
</PrimaryToken>
</Tokens>
The complete file listing for WMAppManifest.xml can be seen in Listing 1. For more information on the WMAppManifest.xml, please go here.
[Click on image for larger view.] |
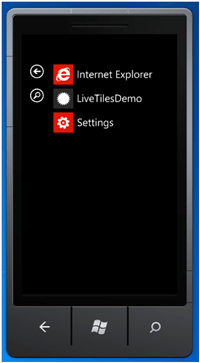
| Figure 4. Default appearance while browsing apps. |
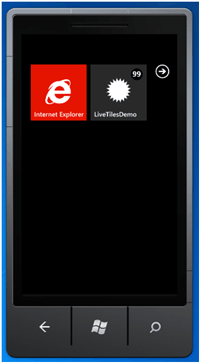
To see the Live Tiles in action, the app must be pinned to the start screen. I modified the value of <Count> to 201. The value will appear in the upper right hand corner of the pinned tile.
However, as you can see in Figure 5, the value displayed is "99". This is because the count value only allows 2 digits, with a maximum limit of 99, regardless of the value entered. This is something that needs to be accounted for when building a production app. Please note the count value only appears when the tile is pinned to the start screen, not when browsing the apps as in Figure 4.
The value of the <Title> element appears at the bottom of the tile. In this case, it's set to the name of the project by default. The value of <Title> will appear as white text, and the value of <Count> will appear as white text in a black circle. The color, size and layout cannot be changed, even if the user changes the theme. The tile will utilize the icon used to the full size of the tile (173px X 173px), regardless of the original icon size. Therefore, having an icon the same size as the tile is preferred.
[Click on image for larger view.] |
| Figure 5. The live tile, pinned to the start screen. |
The next step is to import the icons for updating my Live Tile. I could either use pre-existing icons or create custom icons using MS Paint, or preferably, MS Expression Design. For more information on creating icons, please visit
this page.
In this case, I created three new icons that are alterations of Background.png. I called them "AltPrimaryTile1.png", "AltPrimaryTile2.png", "AltPrimaryTile3.png". The icons can be seen in Figure 6. I'll create a folder called "CustomTiles" and use it for storing all the icons I'll use for updating the Live Tile.
After adding the folder to the project and the three newly made icons to that folder, I'll change the "Build Action" for all icons to "Content".
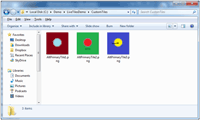
[Click on image for larger view.] |
| Figure 6. Three newly-created icons to be used for tile updates. |
Now that all my icons are in place, I'll modify the code to do the tile updates. The complete listing of MainPage.xaml.vb can be found in Listing 2. I created a method called UpdatePrimaryTile() that updates the tiles in an infinite loop (this is only for demo purposes to show how the tiles can be continuously updated).
UpdatePrimaryTile() is called once from the class constructor method, New(). After it's called, it cycles through an infinite loop starting on line 15. Within the infinite loop is a for loop iterating from 1 to 3 (for each of the alternate primary tiles).
Inside the For loop, first I declare a ShellTile object, called PrimaryTile, and instantiate it to the First() of ActiveTiles. The ActiveTiles class represents both primary and secondary tiles.
Afterwards, I check to see the PrimaryTile is not null so I can update the object with a new tile object, called NewTile. I change the URI to reflect the path and name of the next image I want to display. Since I want to update count to any number less than 99, I decided to update it to the number of seconds at the time of update. In addition, I update the title of the tile to reflect the current system date/time.
Once all the properties are updated, I then call PrimaryTile.Update() and pass it the NewTile object containing all the new values. Since I have a tile already pinned on my start screen, I'll see the updates as they occur. Notice at the end of the For loop of Listing 2, the process sleeps for 5,000 milliseconds, then continues. This effectively causes a brief pause between each update so I can see the changes.
After all my code's in place, I run the application in Visual Studio, which spawns the emulator. If the emulator seems like it's hung on the splash screen (with the clock image), it's not. Simply press the Windows key on the emulator and you're running.
If the app isn't pinned to the start screen, simply browse the apps by clicking the right arrow on the emulator and you'll see the icon for the LiveTiles Demo, as seen in Figure 4. To pin it to the start screen, simply press and hold the icon until the context menu appears with the "pin to start" option.
Once the icon is pinned, simply go back to the start screen and watch the continuous updates. Figure 7 shows three consecutive tile updates. Notice the seconds appear in the count circle in the right hand corner.
Also notice the system date/time can't be accommodated by the tile title. Unfortunately, nothing can be done to change the size, font, or color. This is something to note when building a production application.
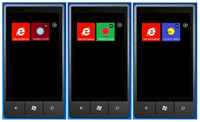
[Click on image for larger view.] |
| Figure 7. Three consecutive tile updates. |
Caution: TMI
As you've seen, Live Tiles can be used to constantly alert the user of updated events. Although the Windows Phone 7.5 platform offers a great deal of flexibility in using tiles, caution should be exercised not to overwhelm the user with useless information or too many updates. Used properly, Live Tiles can make an ordinary application extraordinary by delivering the needed information to the user.
About the Author
Sam Nasr has been a software developer since 1995, focusing mostly on Microsoft technologies. Having achieved multiple certifications from Microsoft (MCAD, MCTS(MOSS), and MCT), Sam develops, teaches, and tours the country to present various topics in .Net Framework. He is also actively involved with the Cleveland C#/VB.Net User Group, where he has been the group leader since 2003. In addition, he also started the Cleveland WPF Users Group in June 2009, and the Cleveland .Net Study Group in August 2009, and is the INETA mentor for Ohio. When not coding, Sam loves spending time with his family and friends or volunteering at his local church. He can be reached by email at [email protected].