Mono for Android
Android 4 and Fragments
Learn how to use the Fragments API in Mono for Android to create an application UI for multiple screens, such as a handset and tablet.
With the release of Android 3.0, Google added support for larger displays and attention-grabbing UI designs and layouts. On a tablet screen, UI components can be used to present better information. How does Android do this? It has a technology called Fragments, and I'll look at its implementation in the currently shipping operating system, Android 4. (Let's get past all the jokes about Android and fragmentation on its device platform.)
What's a Fragment? Most people are familiar with an Activity, which is a piece of an application that provides a screen full of information to a user. A Fragment represents a portion of an Activity’s screen. Multiple fragments can be combined into a single activity. In addition, a Fragment is modular and may be reused across multiple Activities.
[Click on image for larger view.] |
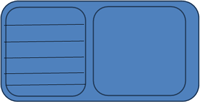
| Figure 1. When the user selects an item from the ListView (left), the detail view (right) is filled with information. |
Figure 1 shows an Activity that contains the entire screen of information, and two Fragments. The Fragment on the left is a master view of data. When the user selects an item from the ListView, the detail view on the right is filled with information.
Fragment Types
Developers can opt to use several types of fragments within their applications. A Fragment class is a base class for other fragment types. It's from this class that an application’s user interface or behavior can be within an Activity.
A DialogFragment is used to display a floating dialog. This class is an alternative to the dialog helper methods in the Activity class.
A ListFragment displays a list of items much like a ListView, and the items are managed by an adapter. Conceptually, this is similar to a ListActivity.
A PreferenceFragment displays a hierarchy of preference objects. This is similar to a PreferenceActivity.
A WebViewFragment is one that contains a webview and displays content within the webview.
Fragments can bet set so that they are usable from both a handset and a tablet. In this example, when a user touches a Star Trek character in the ListView, the detail Fragment gets filled with an image of the character along with a quote from that character. Both the master and the detail Fragments are shown to the user at the same time on a tablet. On a handset, the ListView is shown within one screen of information. When the user selects a Star Trek character, the detail view is shown with the image and the quote.
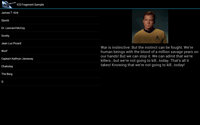
Let’s look at the application. Figure 2 shows the application in a tablet emulator. The Star Trek character list is on the left-hand side, and the character image and quotes are on the right-hand side.
[Click on image for larger view.] |
| Figure 2. The master/detail view of an Android 4.03 application running in a tablet emulator. |
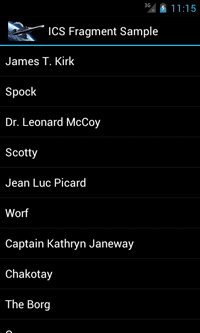
When run on an Android 4.03 (codenamed Ice Cream Sandwich) based handset, the result looks like Figure 3 and Figure 4. Figure 3 shows the master view of Star Trek characters.
[Click on image for larger view.] |
| Figure 3. The master view of Star Trek characters. |
When a user is selected in the ListView, a picture and a quote from that user are shown in the detail view, seen in Figure 4.

[Click on image for larger view.] |
| Figure 4. The detail view of a Star Trek character. |
The Code
Let’s look at the code to make this happen. The first code that's run is the Activity that performs the initial load.
[Activity(Label = "ICS Fragment Sample", MainLauncher = true, Icon = "@drawable/Enterprise")]
public class Activity1 : Activity
{
    protected override void OnCreate(Bundle bundle)
    {
        base.OnCreate(bundle);
        SetContentView(Resource.Layout.Main);
    }
}
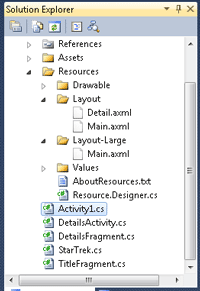
In this code, the Resource.Layout.Main is loaded via the call to SetContentView. The next step is to look at the Fragments that are loaded. In the project, there are two folders. One is the layout folder, and the other is the layout-large folder as shown in Figure 5.
[Click on image for larger view.] |
| Figure 5. The layouts setup in the project. |
The layouts for a normal layout screen are in the Layout directory, and the Layout-Large directory loads the Main.axml file. The file that's loaded depends on the screen size of the device.
Let’s look at the layout file for a tablet display. In this code, shown in Listing 1, a Fragment within the application is loaded. This Fragment is named the TitlesFragment. Notice that the namespace of the application is included, and it's a fully qualified DNS name. My personal experience has been that the fully qualified DNS entry is needed, or it won’t work; you may have better luck another way.
The next step is to look at the content of the TitlesFragment class in Listing 2. Several things are worth noting about the TitlesFragment class:
- The class inherits from a Fragment. In this specific case, it inherits from a ListFragment. Some of the other Fragment types that can be used include a Fragment, DialogFragment, ListFragment, PreferenceFragment and a WebViewFragment.
- The ListFragment has a built in ListView; there's no need to create one.
-
Content of the Fragment is not loaded in the OnCreate method, but in the OnActivityCreated method.
- When the ArrayAdapter is created, one of the built-in Android layouts is used. In this case, I'm using the SimpleListItem1 layout. Thankfully, Visual Studio’s intelliSense support provides access to the various built-in binding layouts.
- Once an item in the ListView is selected, the OnListItemClicked event is called with calls into ShowDetails. The ShowDetails method loads an Activity, when the application is running on a handset, or loads up another Fragment, when running on a larger screen device.
Now, let’s take a look at the Content of the DetailsFragment class, shown in Listing 3. A few things are worth noting in the code:
- The NewInstance method is merely a way to get an instance of the Fragment. There are a number of ways to create an instance of the DetailsFragment. This is merely one.
- The OnCreateView method is where the layout of the Fragment is loaded. In this case, the Fragment’s layout is created programmatically, but the layout could be loaded from a resource.
Fragment APIs
The previous section explained how to use a Fragment as part of the xml content contained within an .axml file in the Resource Layout directories. Fragments can also be loaded programmatically. This is done through the FragmentManager, which is found in Android 3.0 and later. It's available via an Activity’s .FragmentManager property.
In the case of the sample code, the application will add and remove Fragments in an Activity as follows:
- Reference the FragmentManager.
- Call the .BeginTransaction() method of the FragmentManager. This method will return a FragmentTransaction object that can be used.
- Call the appropriate method from on a FragmentTransaction such as .Add(….) to add a Fragment to an Activity, .Replace(….) to replace a Fragment that is in an Activity, and .Remove(…) to remove a Fragment from an Activity.
- The .SetTransition(…) method is called to set the type of transition effect when performing the Add/Replace/Remove operation.
- The final method to call is the .Commit() method on the transaction. This method causes the operation to occur on the Fragment.
This operation isn’t all that can be done with a Fragment. Finding Fragments can be performed by calling FindFragmentById() or FindFragmentByTag() methods of the FragmentManager.
Android is very stack-based regarding Activities. Fragments can be a part of this as well. The Fragment Transaction object has the method .AddToBackStack() to add the existing transaction state to the stack. The Fragment Manager’s .PopBackManager() allows an application to programmatically simulate the user clicking the back button, so that the previous state can be obtained.
A Fragment can access the Activity that it's within by calling the .Activity property of the Fragment. This is convenient when performing background operations that must then be synchronized with the main UI thread via the RunOnUIThread(…) method.
Fragments can handle their own lifecycle. This includes events to handle Resume, Pause, Start, Stop and several points in the destruction of the Fragment. Most of these events flow down from the parent Activity.
This is only an introduction to the Fragments API in Mono for Android. As I've shown, you can use Fragments to create an application UI for both a handset and a tablet. There's more to come on this subject very soon in this column.
About the Author
Wallace (Wally) B. McClure has authored books on iPhone programming with Mono/Monotouch, Android programming with Mono for Android, application architecture, ADO.NET, SQL Server and AJAX. He's a Microsoft MVP, an ASPInsider and a partner at Scalable Development Inc. He maintains a blog, and can be followed on Twitter.