C# Corner
Using MEF in a Windows Store App
Eric Vogel covers how to use the Managed Extensibility Framework (MEF) to extend a Windows Store application.
The Managed Extensibility Framework (MEF), introduced in .NET Framework 4, is a library that allows an application to be extended through the use of MEF components. In a sense, it's a composition layer for an application. An MEF component defines what it's capable of doing (exports) and its dependencies (imports). MEF may be used by .NET Framework 4.5 Web and client applications as well as Windows Store apps. In this article, I'll cover how to use the MEF NuGet package for Windows Store apps.
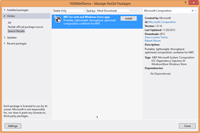
To get started, install the Microsoft.Composition NuGet package, shown in Figure 1.

[Click on image for larger view.] |
| Figure 1. NuGet installation of MEF for Windows Store apps. |
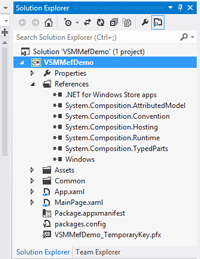
The MEF System.Composition references should now be added to your project, as shown in Figure 2.

[Click on image for larger view.] |
| Figure 2. MEF Project References added. |
Now it’s time to put MEF to good use. The sample application will allow the user to validate an input field using a custom validator. Each validator will be loaded as an MEF part from a BusinessRules assembly.
Next, let's add the supporting classes and interfaces that will be loaded via MEF. First, create a C# Windows Store apps Class Library named BusinessRules, and add it to the solution, as shown in Figure 3.

[Click on image for larger view.] |
| Figure 3. Adding the BusinessRules Class Library Project. |
Next, add a NuGet project reference to MEF to the BusinessRules project. Now add an IValidate interface to the BusinessRules project. The IValidate interface will serve as the MEF contract for the custom validators. The IValidate interface defines a single Validate method that validates a given input string and returns a success or failure message.
namespace BusinessRules
{
    public interface IValidate
    {
        string Validate(string input);
    }
}
Now let's add the ValidateMetaData class, which is used to tag a specific concrete validator class for use by MEF. The ValidateMetaData class contains a single property named Name and overrides the ToString method for easy display in a client application.
namespace BusinessRules
{
    public class ValidateMetaData
    {
        public string Name { get; set; }

        public override string ToString()
        {
            return Name;
        }
    }
}
Now let’s add the email validator that will implement the IValidate interface. First, add using statements for the System.Composition and System.Text.RegularExpressions namespaces.
using System.Composition;
using System.Text.RegularExpressions;
Next, add an Export attribute passing in the IValidate Type to tell MEF that the class exports the IValidate interface.
[Export(typeof(IValidate))]
Then add an ExportMetadata attribute passing in "Name", "Email" to tell MEF the ValidateMetaData metadata property settings.
[ExportMetadata("Name", "Email")]
Now let's implement the IValidate interface’s Validate method to see if the input string matches an email pattern regular expression, and returns an appropriate success or failure message. The ValidateEmail class is shown in Listing 1.
Next, let's implement the ValidateUSPhone validator that checks if the input is a valid U.S. phone number. The class is very similar to the ValidateEmail class except that the metadata Name attribute is set to "U.S. Phone", and a phone regular expression is used to validate the input. The resulting code is shown in Listing 2.
Now it’s time to implement the client application that will load the input validators. The user will be able to enter a text input, select a validator, and then perform the validation through a button click. First, add a project reference to the BusinessRules project to the Windows Store project. Next, add the UI for the application. Open the MainPage.xaml and use the Grid element markup shown in Listing 3.
Now it’s time to put everything together and use MEF to load the business rule validators. Open up the MainPage.xaml.cs file. Then add using statements for the System.Composition, System.Composition.Hosting, and System.Reflection namespaces to the MainPage class as follows:
using System.Composition;
using System.Composition.Hosting;
using System.Reflection;
Then add a property named Validators to store a collection of validators that will be loaded through MEF using the ImportMany attribute.
[ImportMany]
public IEnumerable<Lazy<BusinessRules.IValidate, BusinessRules.ValidateMetaData>>
Validators { get; private set; }
Then add a member IValidate type variable to store the currently selected validator.
private BusinessRules.IValidate _selectedValidator;
Now it’s time to update the MainPage class constructor to initialize MEF. The first step is to setup the MEF configuration to load the BusinessRules assembly.
var configuration = new ContainerConfiguration()
                        .WithAssembly(typeof(BusinessRules.IValidate).GetTypeInfo().Assembly);
Then create the MEF CompositionHost through the ContainerConfiguration instance.
var compositionHost = configuration.CreateContainer();
Next, call the SatisfyImports method on the created CompositionHost object to have MEF set the Validators property from the BusinessRules assembly.
compositionHost.SatisfyImports(this);
The completed MainPage constructor should now look like the following code:
public MainPage()
 {
     this.InitializeComponent();

     var configuration = new ContainerConfiguration()
                 .WithAssembly(typeof(BusinessRules.IValidate).GetTypeInfo().Assembly);

     var compositionHost = configuration.CreateContainer();
     compositionHost.SatisfyImports(this);
 }
Now databind the ValidationTypes combobox from the Validators property in the OnNavigatedTo event handler as follows:
protected override void OnNavigatedTo(NavigationEventArgs e)
 {
     ValidationTypes.DataContext = Validators;
 }
Next, let's implement the Click event handler for the Validate button to call the selected validator and update the Result TextBlock. If there isn't a current selector, then "No validator was found," is displayed in the Result TextBlock.
private void Validate_Click(object sender, RoutedEventArgs e)
 {
     if (_selectedValidator == null)
         Result.Text = "No validator was found.";
     else
         Result.Text = _selectedValidator.Validate(Input.Text);
 }
The final step is to implement the SelectionChanged event handler for the ValidationTypes combobox. When the selected item changes, the _selectedValidator member field is set to the selected value.
private void ValidationTypes_SelectionChanged(object sender, SelectionChangedEventArgs e)
{
    if (e.AddedItems.Count > 0)
        _selectedValidator = ValidationTypes.SelectedValue as BusinessRules.IValidate;
}
The complete MainPage class implementation is shown in Listing 4.
You should now be able to run the completed application, select either an Email or U.S. Phone validator and run the validator on the entered text, as shown in Figure 4.

[Click on image for larger view.] |
| Figure 4. Completed MEF demo. |
MEF is a great library to have in your toolset when constructing a Windows Store app. You can use MEF to decouple your business needs from the UI layer, and increase the extensibility of your application. This is only one of the many use cases for MEF. Feel free to share how you’re using MEF to manage your application complexity in the comments section below.
About the Author
Eric Vogel is a Senior Software Developer for Red Cedar Solutions Group in Okemos, Michigan. He is the president of the Greater Lansing User Group for .NET. Eric enjoys learning about software architecture and craftsmanship, and is always looking for ways to create more robust and testable applications. Contact him at [email protected].