C# Corner
Building a Chat Web App With Signal R, Part 2
Eric Vogel covers how to create a real-time Web data entry form with ASP.NET MVC, KnockOutJS and SignalR.
More on this topic:
In Part 1, I covered how to use the SignalR persistent connection API to create a simple real-time chat Web application. This installment will cover how to use the Signal R Hub API in concert with KnockoutJS to create real-time data entry Web application. Multiple users will be able to update the same person record simultaneously, and will be automatically updated when another user makes a change to that record.
To get started, create a new C# ASP.NET MVC 4 project in Visual Studio 2012. Then, select the Internet Application template option.
Next, you need to obtain the SignalR NuGet Package through the NuGet Package Manager. After installing SignalR, add the necessary ASP.NET MVC routing rules for the Hub API. Open up the App_Start\RouteConfig.cs file and add a using statement for the Microsoft.AspNet.SignalR namespace. Then add the following Signal R Hub route before the default routing rule.
RouteTable.Routes.MapHubs();
Your completed RegisterRoutes method should now look like this:
public static void RegisterRoutes(RouteCollection routes)
 {
     routes.IgnoreRoute("{resource}.axd/{*pathInfo}");

     RouteTable.Routes.MapHubs();

     routes.MapRoute(
         name: "Default",
         url: "{controller}/{action}/{id}",
         defaults: new { controller = "Person", action = "Index", id = UrlParameter.Optional }
     );
 }
Now it's time to set up the Entity Framework model for the person data model. The first step is to create a new Person class file within the Models folder. I'll be making use of Entity Framework Code-First, so the Person class will be a plain old CLR object (POCO). Then I add Id, FirstName, LastName, and Email properties to the class, and make the Id field required. The class should look like this:
using System.ComponentModel.DataAnnotations;

namespace VSMSignalRPart2Demo.Models
{
    public class Person
    {
        [Required]
        public int Id { get; set; }
        public string FirstName { get; set; }
        public string LastName { get; set; }
        public string Email { get; set; }
    }
}
Now a DbContext class is needed to support updating a Person Entity. Create a new class named PersonContext that inherites from System.Data.Entity.DbContext, and that contains a single property of type DbSet<Person> named People:
using System.Data.Entity;
using System.Data.Entity;

namespace VSMSignalRPart2Demo.Models
{
    public class PersonContext : DbContext
    {
        public DbSet<Person> People { get; set; }
    }
}
Now it's time to implement the PersonHub class that will use Entity Framework (EF) to create, read, update and delete Person records in real-time using Signal R. First create a Hubs folder, then create an empty PersonHub class file in it.
Next, add using statements for the Microsoft.AspNet.SigalR.Hubs and the Models namespace for your project to the PersonHub class file. Then, make the PersonHub class inherit from the Hub class.
Now it's time to implement the GetAll method, which will retrieve all the existing Person records from the database via EF. Once the records are retrieved, the Hub API is used to push the collection of Person records to the client via the call to Clients.Caller.allPeopleRetrieved (people). The peopleAll method is a JavaScript method that will be implemented later to handle displaying the received Person records.
public void GetAll()
 {
     using (var context = new PersonContext())
     {
         var people = context.People.ToArray();
         Clients.Caller.allPeopleRetrieved (people);
     }
 }
Next let's implement the Add method
Listing 1 that will create a new Person record and notify all connected clients that a new Person record was created. First, a new Person record is created. Then its properties are set from the passed in newPerson instance. Next, the new Person record is persisted to the database. Finally, all connected clients are updated via the Clients.All.personCreated Hub API call.
The personCreated method is a JavaScript method that will be created later. In addition, I catch any exceptions raised from the server by calling the client-side method Clients.Caller.raiseError. The raiseError method is a JavaScript method that will be created later; it will display the an error stating “Unable to create a new Person” to the user.
Now let's implement the Update method, as shown in Listing 2. First, the existing person is retrieved from a newly-created PersonContext. If the person exists, its properties are then updated from the passed-in updatedPerson Person object. Once the Person record is committed to the database, the connected clients are notified via the Clients.All.personUpdated call.
The personUpdated method is a JavaScript method added later to handle displaying the updated user to an individual client. In addition, any errors are caught and an error message stating “Unable to update the Person” is raised to the calling client.
The last remaining PersonHub method is the Delete method Listing 3. First, the Person record is retrieved from its given Id value. If the existing person is found, the delete is committed to the database. Once the delete transaction has been completed, all connected clients are notified via the Clients.All.personRemoved call.
The personRemoved method is a JavaScript method implemented later to handle removing a person record from an individual client. In addition, any exceptions are caught; if one occurs, it's raised to the client via the Clients.All.raiseError call.
Now it's time to implement the client-side JavaScript view model that utilizes KnockOutJS and SignalR to update a bound HTML view. Create a new JavaScript file in the Scripts folder named PersonManager.js. Next, add a JavaScript reference statement for the SignalR JQuery Plug-In JavaScript file as follows, to enable intellisense for the SignalR JavaScript API:
/// <reference path="jquery.signalR-1.0.0-rc1.js" />
To ensure that the client side code is only invoked when the document is ready, add an empty JQuery parent function:
$(function () {
});
First, let's implement the personViewModel that will be used to bind an individual rendered Person record to the view. A personViewModel is constructed from a given, id, firstName, lastName, email and owner peopleListViewModel instance.
The id, firstName, lastName, and email properties are setup as KnockOut observable instances. This allows the view model to be bound to an HTML form via a data-bind attribute, as will be covered later. The view model also has a removePerson function that invokes the deletePerson method on the given owner peopleListViewModel. Lastly the firstName, lastName and email properties are setup to notify the owner object of any changes via the owner's updatePerson method. See Listing 4 for the completed personViewModel implementation.
Now it's time to implement the peopleViewModel that will be bound to a table in the view. The peopleViewModel is a collection of personViewModel models that interacts with the PersonHub server to create, read, update and delete Person records. The first step is to retrieve the personHub connection through the SignalR API:
function peopleViewModel() {
    this.hub = $.connection.personHub;
Next, I initialize the peopleViewModel properties to be KnockOut observable objects:
this.people = ko.observableArray([]);
this.newPersonFirstName = ko.observable();
this.newPersonLastName = ko.observable();
this.newPersonEmail = ko.observable();
Then the people, self, and notify fields are initialized:
var people = this.people
var self = this;
var notify = true;
Next, the init method is defined and set up to call the getAll method on the PersonHub server.
this.init = function () {
this.hub.server.getAll();
}
After that, the allPeopleRetrieved method is invoked from the PersonHub's GetAll method. The allPeopleRetrieved method maps the given Person array to a new array of personViewModel objects:
this.hub.client.allPeopleRetrieved = function (allPeople) {
    var mappedPeople = $.map(allPeople, function (person) {
        return new personViewModel(person.Id, person.FirstName,
            person.LastName, person.Email, self)
    });
  people(mappedPeople);
}
The personUpdated method updates the bound personViewModel to the received updatedPerson Person record from the PersonHub server:
this.hub.client.personUpdated = function (updatedPerson) {
     var person = ko.utils.arrayFilter(people(),
         function(value) {
             return value.id == updatedPerson.Id;
         })[0];
     notify = false;
     person.firstName(updatedPerson.FirstName);
     person.lastName(updatedPerson.LastName);
     person.email(updatedPerson.Email);
     notify = true;
 };
The raiseError method binds the given error string from the PersonHub to the error div DOM element in the view:
this.hub.client.raiseError = function (error) {
     $("#error").text(error);
 }
The personCreated method updates the people collection with the received Person model record from the PersonHub:
this.hub.client.personCreated = function (newPerson) {
     people.push(new personViewModel(newPerson.Id, newPerson.FirstName, newPerson.LastName,
         newPerson.Email, self));
 };
The personRemoved method removes the Person model record from the PersonHub with the given Id from the people collection:
this.hub.client.personRemoved = function (id) {
    var person = ko.utils.arrayFilter(people(), function(value) {
        return value.id == id;
    })[0];
    people.remove(person);
}
The createPerson function creates a new personViewModel from the newPersonFirstName, newPersonLastName, and newPersonEmail properties. Then it calls the Add method on the PersonHub to save the Person record to the database. Finally, it clears the new person field properties.
this.createPerson = function () {
        var person = { firstName: this.newPersonFirstName(), lastname: this.newPersonLastName(), email: this.newPersonEmail() };
        this.hub.server.add(person).done(function () {
            console.log('Person saved!');
        }).fail(function (error) {
            console.warn(error);
        });
        this.newPersonEmail('');
        this.newPersonFirstName('');
        this.newPersonLastName('');
}
The deletePerson method calls the Delete method on the PersonHub to delete the given Person record by Id from the database:
this.deletePerson = function (id) {
     this.hub.server.delete(id);
}
The updatePerson method calls the Update method on the PersonHub, passing in the given Person record:
this.updatePerson = function (person) {
    if (notify) {
        this.hub.server.update(person);
    }
}
See Listing 5 for the completed peopleViewModel implemenatation.
Now that the view models are created, a new peopleViewModel can be bound through KnockOutJS as follows:
var viewModel = new peopleViewModel();
ko.applyBindings(viewModel);
Finally, the PersonHub connection is started, with a continuation to initialize the viewModel:
$.connection.hub.start(function () {
        viewModel.init();
    });
Listing 6 contains the completed PersonManager.js implementation.
The next step is to create a PersonController that will be used to render a Person record view. Add an empty MVC Controller class file named PersonController.cs. The completed PersonController should look like this:
using System.Web.Mvc;

namespace VSMSignalRPart2Demo.Controllers
{
    public class PersonController : Controller
    {
        //
        // GET: /Person/

        public ActionResult Index()
        {
            return View();
        }
    }
}
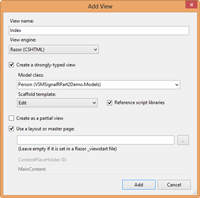
Next, add a new View for the PersonController's Index action, as seen in Figure 1.

[Click on image for larger view.] |
| Figure 1. Adding a Person View. |
The final step is to finish the view. Open up the Index.cshtml for the newly-created Razor view. You should now have a basic view implementation for the Person model. Now copy the markup from Listing 7 from below the @model declaration.
The major changes I've made from the default view implementation is to add the data-bind attribute to the FirstName, LastName and Email view bindings. In order to add a data-bind attribute, I replaced the generated Html.EditorFor calls with Html.TextBoxFor calls, and set the appropriate @data_bind HTML attribute. For example, to bind the FirstName Person model property to the newPersonFirstName property to the client peopleViewModel.newPersonFirstName field, I add the following Html.TextBoxFor call to the view:
@Html.TextBoxFor(model => model.FirstName, new { @data_bind = "value: newPersonFirstName" })
I've also added an additional error div element to display any errors that may occur during a SignarlR call. In addition, I changed the standard BeginForm call with a standard <form> element that binds a POST action to the createPerson method on the KnockOut peopleViewModel.
The last major change to the generated view is the inclusion of the editable persons table. The table is created by using a KnockOut HTML template that loops over the records in the peopleViewModel.people collection. The template is created as a script tag, as shown in Listing 8.
As you can see, the template includes a new table row with cells for the firstName, lastName and email properties for a personViewModel instance, in addition to a delete button that invokes the removePerson method on the view model. You'll also notice that I'm using a slightly different binding for the table values. The “valueUpdate: ‘afterkeydown'” binding option will force the binding to update the view model as soon as a key is pressed.
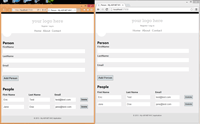
Congratulations -- you've just created your first real-time data entry form (Figure 2) using ASP.NET MVC 4, SignalR and KnockOutJS!

[Click on image for larger view.] |
| Figure 2. The completed sample application. |
SignalR is a very powerful API to have at your disposal when creating Web applications. Combined with KnockOutJS and ASP.NET MVC 4, you have a potent trifecta to tackle the world of real-time Web development.