C# Corner
Build a Windows Store App Using SQLite
No database for your Windows Store app? No problem -- SQLite to the rescue!
The Windows Runtime stack is currently lacking a local relational database from Microsoft. Never fear, because SQLite is freely available and up to the task. Today I'll be covering how to use SQLite within a Windows Store App to persist a collection of contacts.
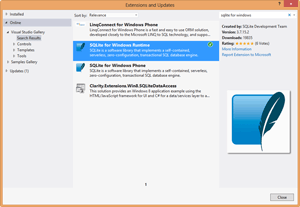
The first step is to create a new C# Windows Store App. Then you need to obtain the SQLite for Windows Runtime Visual Studio 2012 Extension, as seen in Figure 1.
 [Click on image for larger view.]
Figure 1. Installing the SQLite for Windows Runtime VS 2012 Extension.
[Click on image for larger view.]
Figure 1. Installing the SQLite for Windows Runtime VS 2012 Extension.
Next, add a new C# class library to the project named DataAccess with the same namespace as your source project. Then install the sqlite-net NuGet package.The sqlite-net NuGet package is a thin C# wrapper around the SQLite library that has synchronous and asynchronous APIs. After installing the package, you should see SQLite.cs and SQLiteAsync.cs files added to your DataAccess Visual Studio project.
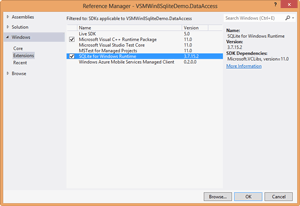
After that you need to add references to the Microsoft Visual C++ Runtime Package and the SQLite for Windows Runtime assemblies to your DataAccess project, as seen in Figure 2.
 [Click on image for larger view.]
Figure 2. SQLite for Windows Runtime DataAccess project references.
[Click on image for larger view.]
Figure 2. SQLite for Windows Runtime DataAccess project references.
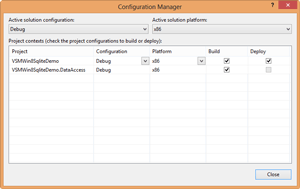
After that, set the build configuration to the x86 architecture, as seen in Figure 3.
 [Click on image for larger view.]
Figure 3. Setting the solution to x86 CPU architecture.
[Click on image for larger view.]
Figure 3. Setting the solution to x86 CPU architecture.
The SQLite for Windows Runtime can run in either x86, x64, or ARM configurations. I've chosen to use x86 for this sample as it's the most compatible CPU setting.
The DataAccess project is now fully configured to utilize SQLite within the Windows Runtime. Now, to resume implementation of the DataAccess layer. Add a new folder named Entities to the DataAccess project, then add a new class file to the Entities folder named Contact. The Contact class will be used to model a Contact record within the application and the SQLite database. Start out by adding an Id integer property as well as FirstName, LastName and Email properties to the Contact class. Then override the ToString implementation to return "LastName, FirstName".
Now it's time to add the SQLite mappings to the Contact class. Add a using statement for the SQLite namespace to the Contact class file:
using SQLite;
Now add a Table attribute to the Contact class, passing in "Contacts" as the first and only argument:
[Table("Contacts")]
  public class Contact
The Id field needs to be designated as a unique primary key that is auto-incremented within SQLite. To accomplish this, a set of matching attributes are applied to the Id property:
PrimaryKey, Unique, AutoIncrement]
  public int Id  { get; set; }
Your contact class should now resemble Listing 1.
using SQLite;

namespace VSMWin8SqliteDemo.DataAccess.Entities
{
    [Table("Contacts")]
    public class Contact
    {
        [PrimaryKey, Unique, AutoIncrement]
        public int Id { get; set; }
        public string FirstName { get; set; }
        public string LastName { get; set; }
        public string Email { get; set; }

        public override string ToString()
        {
            return string.Format("{0}, {1}", LastName, FirstName);
        }
    }
}
Listing 1: The Contact.cs entity class file.
To further isolate the main application from SQLite, I've chosen to create a Database class wrapper. The Database class implements an IDatabase interface that lays out an asynchronous API for connecting to a SQLite database. Create a new interface named IDatabase in the DataAccess project. Add a using statement for the SQLite namespace to the IDatabase interface file, then add an Initialize method that returns a Task. Finally, add a GetAsynConnection method that returns a SQLiteAsyncConnection to the IDatabase interface:
using System.Threading.Tasks;
  using SQLite;

namespace VSMWin8SqliteDemo.DataAccess
  {
  public interface IDatabase
  {
  Task Initialize();
  SQLiteAsyncConnection  GetAsyncConnection();
  }
  }
Now it's time to implement the IDatabase interface. Create a new DataAccess class named Database that implements the IDatabase interface. Next, add using statements for the System.Threading.Tasks, SQLite and your Entities namespaces. Then add a private readonly SQLiteAsyncConnection class member named _dbConnection:
private readonly SQLiteAsyncConnection _dbConnection;
Next, add the Database constructor that creates a new SQLiteAsyncConnection instance from a given database path:
public Database(string databasePath)

{
  _dbConnection = new SQLiteAsyncConnection(databasePath);
  }
Now, implement the Initialize method that creates the Contacts table in the database using the SQLite asynchronous API generic CreateTableAsync method:
public async Task Initialize()
  {
  await _dbConnection.CreateTableAsync<Contact>();
  }
The SQLiteAsync API utilizes the attributes that were added to the Contact class to create a new Contacts table in a database if one doesn't already exist. Finally, implement the GetAsyncConnection IDatabase method that simply returns the set _dbConnection field:
public SQLiteAsyncConnection GetAsyncConnection()
  {
  return  _dbConnection;
  }
Your finished Database class should now resemble Listing 2.
using System.Threading.Tasks;
using SQLite;
using VSMWin8SqliteDemo.DataAccess.Entities;

namespace VSMWin8SqliteDemo.DataAccess
{
    public class Database : IDatabase
    {
        private readonly SQLiteAsyncConnection _dbConnection;

        public Database(string databasePath)
        {
            _dbConnection = new SQLiteAsyncConnection(databasePath);
        }

        public async Task Initialize()
        {
           await _dbConnection.CreateTableAsync<Contact>();
        }

        public SQLiteAsyncConnection GetAsyncConnection()
        {
            return _dbConnection;
        }
    }
}
Listing 2: Database.cs Class Implementation
The last parts of the DataAccess layer to implement are the IContactRepository and ContactRepository interface and class. The IContactRepository interface defines a contract for asynchronous Contact record retrieval, creation, modification, and deletion.
Create a new directory named Repository to the DataAccess project. Then, create a new interface file named IContactRepository. Add using statements for System.Threading.Tasks and your Entities namespaces to the interface file. Next, add a SaveAsync method that returns a Task and takes a Contact record, then a DeleteAsync method that returns a Task and takes a Contact record. Last, add a GetAllAsync method that returns a Task:
using System.Collections.Generic;
  using System.Threading.Tasks;
  using VSMWin8SqliteDemo.DataAccess.Entities;


namespace VSMWin8SqliteDemo.DataAccess.Repository
  {
  public interface IContactRepository
  {
  Task SaveAsync(Contact contact);
  Task DeleteAsync(Contact contact);
  Task<List<Contact>>  GetAllAsync();
  }
  }
Now it's time to implement the ContactRepository. Create a new class file for the ContactRepository class within the Repository directory in the DataAccess project. Next, add using statements for the System.Threading.Tasks and your Entities namespaces. Then add a private readonly SQLiteAsyncConnection variable named _database to the class:
private readonly SQLiteAsyncConnection _database;
Now add the ContentRepository constructor that takes a given IDatabase and sets the _database member variable:
public ContactRepository(IDatabase database)
  {
  _database =  database.GetAsyncConnection();
  }
The next step is to implement the IContactRepository SaveAsync method, that either creates or updates a given Contact record asynchronously using SQLite. If a contact has a 0 value for its Id, it will be inserted; otherwise, it will be updated as follows:
public async Task SaveAsync(Contact contact)
  {
  if (contact.Id == 0)
    await  _database.InsertAsync(contact);
  else
    await  _database.UpdateAsync(contact);
  }
Now it's time to implement the DeleteAsync method that takes a given Contact record and removes the record asynchronously through SQLite:
public async Task DeleteAsync(Contact contact)
  {
  await _database.DeleteAsync(contact);
  }
The last step in this section is to implement the GetAllAsync method that asynchronously retrieves all the Contact records using SQLite:
public async Task<List<Contact>> GetAllAsync()
  {
  var contacts = await _database.Table<Contact>().ToListAsync();
  return contacts;
  }
Your finished ContactRepository class should look like Listing 3.
using System.Collections.Generic;
using SQLite;
using System.Threading.Tasks;
using VSMWin8SqliteDemo.DataAccess.Entities;

namespace VSMWin8SqliteDemo.DataAccess.Repository
{
    public class ContactRepository : IContactRepository
    {
        private readonly SQLiteAsyncConnection _database;

        public ContactRepository(IDatabase database)
        {
            _database = database.GetAsyncConnection();
        }

        public async Task SaveAsync(Contact contact)
        {
            if (contact.Id == 0)
                await _database.InsertAsync(contact);
            else
                await _database.UpdateAsync(contact);
        }

        public async Task DeleteAsync(Contact contact)
        {
            await _database.DeleteAsync(contact);
        }

        public async Task<List<Contact>> GetAllAsync()
        {
            var contacts = await _database.Table<Contact>().ToListAsync();
            return contacts;
        }
    }
}
Listing 3: ContactRepository.cs Class Implementation
The DataAccess project is now completed; it's time to implement the application UI. The application will allow the user to create, read, update and delete a Contact database record. A record is either created or updated through a Save button click, and removed through a Delete button click.
Open up MainPage.xaml in your solution and copy the root StackPanel from Listing 4 into the root Grid element. As you can see, two-way binding is used for binding a Contact record to the UI. In addition, a list of Contact records is displayed below the entry fields via a ListView control. Also, a status TextBlock is included that will be updated when a record is saved or deleted.
<StackPanel Name="CurrentContact" Margin="10">
     <TextBlock>First Name</TextBlock>
     <TextBox Name="FirstName" Text="{Binding FirstName, Mode=TwoWay}"></TextBox>
     <TextBlock>Last Name</TextBlock>
     <TextBox Name="LastName" Text="{Binding LastName, Mode=TwoWay}"></TextBox>
     <TextBlock>Email</TextBlock>
     <TextBox Name="Email" Text="{Binding Email, Mode=TwoWay}"></TextBox>
     <Button Name="Save" Click="Save_Click">Save</Button>
     <Button Name="Delete" Click="Delete_Click">Delete</Button>
     <ListView Name="Contacts" ItemsSource="{Binding}" SelectionChanged="Contacts_OnSele
         <ListView.ItemTemplate>
             <DataTemplate>
                 <StackPanel Orientation="Horizontal" Margin="4">
                     <TextBlock Text="{Binding LastName}"></TextBlock>
                     <TextBlock>,</TextBlock>
                     <TextBlock Text="{Binding FirstName}" Margin="3,0"></TextBlock>
                     <TextBlock Text="{Binding Email}"></TextBlock>
                 </StackPanel>
             </DataTemplate>
         </ListView.ItemTemplate>
     </ListView>
     <TextBlock Name="Status" FontSize="16" Foreground="GreenYellow"></TextBlock>
 </StackPanel>
Listing 4: MainPage.xaml XAML markup
Now it's to time to implement the MainPage class that brings the application all together. Open the MainPage.xaml.cs file and add using statements for your DataAccess, DataAccess.Repository, and DataAccess.Entities namepsaces:
using VSMWin8SqliteDemo.DataAccess;
  using VSMWin8SqliteDemo.DataAccess.Repository;
  using  VSMWin8SqliteDemo.DataAccess.Entities;
Next, add private class member fields for a Contact and an IContactRepository:
private Contact _contact;
private  IContactRepository _contactRepository;
In the OnNavigatedTo event, initialize a new Contact record and bind it to the form. Then the SQLite database is initialized and the existing Contact records are loaded and bound to the form.
protected async override void OnNavigatedTo(NavigationEventArgs e)
  {
  InitializeContact();
  await InitializeDatabase();
  await UpdateContacts();
  }
The InitializeContact method sets the _contact class field and binds the CurrentContact StackPanel to the _contact object:
private void InitializeContact()
  {
  _contact = new Contact();
  CurrentContact.DataContext =  _contact;
  }
The InitializeDatabase method sets up the database for the application asynchronously. First, a Database class is created from a generated absolute database path:
string datbasePath = Windows.Storage.ApplicationData.Current.LocalFolder.Path  + "\\contacts.db";
  Database  database = new Database(datbasePath);
Next, the database is initialized and the _contactRepository class member is instantiated from the initialized database:
await database.Initialize();
  _contactRepository = new ContactRepository(database);
The completed InitializeDatbase is as follows:
private async Task InitializeDatabase()
  {
  string datbasePath = Windows.Storage.ApplicationData.Current.LocalFolder.Path  + "\\contacts.db";
  Database database = new Database(datbasePath);
  await database.Initialize();
  _contactRepository = new ContactRepository(database);
  }
The UpdateContacts method sets the ItemSource property of the Contacts ListView from the_contactRepository class field's GetAllAsync method:
private async Task UpdateContacts()
  {
  Contacts.ItemsSource = await _contactRepository.GetAllAsync();
  }
Now it's time to implement the Save button click event that saves the bound Contact record to the database through the ContactRepository:
await _contactRepository.SaveAsync(_contact);
Then it updates the list of existing contacts to include the newly-saved Contact record:
await UpdateContacts();
Finally, the Status TextBlock is updated to notify the user that their Contact record was saved to the database:
Status.Text = string.Format("{0} has been saved to your contacts.", _contact);
Here's the completed Save button click event handler code:
private async void Save_Click(object sender, RoutedEventArgs e)
  {
  await _contactRepository.SaveAsync(_contact);
  await UpdateContacts();
  Status.Text = string.Format("{0} has been saved to your contacts.", _contact);
  }
Next up, implement the Delete button click event handler named Delete_Click. When the Delete button is clicked, the full name of the selected contact is stored to be used later for the updated status:
string fullName = _contact.ToString();
Then the selected Contact record is deleted through the ContactRepository.
await _contactRepository.DeleteAsync(_contact);
Next, the ListView of contacts is updated by calling the UpdateContacts method:
await UpdateContacts();
Then the currently bound Contact record is reset through the InitializeContact method:
InitializeContact();
Finally, the Status TextBlock is updated to notify the user that the Contact record that was removed.
Status.Text = string.Format("{0} has been removed from your contacts.", fullName);
The last method to implement is the OnSelectionChanged event of the Contacts ListView. The event is fired when a new Contact record is selected from the collection of contacts. In the event, the currently selected Contact record is retrieved and bound to the CurrentContact StackPanel:
private void Contacts_OnSelectionChanged(object sender, SelectionChangedEventArgs e)
  {
  if (e.AddedItems.Count <= 0) return;
  _contact = e.AddedItems[0] as Contact;
  CurrentContact.DataContext =  _contact;
  }
The completed MainPage class implementation is shown in Listing 5.
using System.Threading.Tasks;
using Windows.UI.Xaml;
using Windows.UI.Xaml.Controls;
using Windows.UI.Xaml.Navigation;
using VSMWin8SqliteDemo.DataAccess;
using VSMWin8SqliteDemo.DataAccess.Repository;
using VSMWin8SqliteDemo.DataAccess.Entities;

// The Blank Page item template is documented at http://go.microsoft.com/fwlink/?LinkId=234238

namespace VSMWin8SqliteDemo
{
    /// <summary>
    /// An empty page that can be used on its own or navigated to within a Frame.
    /// </summary>
    public sealed partial class MainPage : Page
    {
        private Contact _contact;
        private IContactRepository _contactRepository;

        public MainPage()
        {
            this.InitializeComponent();
        }

        /// <summary>
        /// Invoked when this page is about to be displayed in a Frame.
        /// </summary>
        /// <param name="e">Event data that describes how this page was reached.  The Parameter
        /// property is typically used to configure the page.</param>
        protected async override void OnNavigatedTo(NavigationEventArgs e)
        {
            InitializeContact();
            await InitializeDatabase();
            await UpdateContacts();
        }

        private void InitializeContact()
        {
            _contact = new Contact();
            CurrentContact.DataContext = _contact;
        }

        private async Task InitializeDatabase()
        {
            string datbasePath = Windows.Storage.ApplicationData.Current.LocalFolder.Path + "\\contacts.db";
            Database database = new Database(datbasePath);
            await database.Initialize();
            _contactRepository = new ContactRepository(database);
        }

        private async Task UpdateContacts()
        {
            Contacts.ItemsSource = await _contactRepository.GetAllAsync();
        }

        private async void Save_Click(object sender, RoutedEventArgs e)
        {
            await _contactRepository.SaveAsync(_contact);
            await UpdateContacts();
            Status.Text = string.Format("{0} has been saved to your contacts.", _contact);
        }

        private async void Delete_Click(object sender, RoutedEventArgs e)
        {
            string fullName = _contact.ToString();
            await _contactRepository.DeleteAsync(_contact);
            await UpdateContacts();
            InitializeContact();
            Status.Text = string.Format("{0} has been removed from your contacts.", fullName);
        }

        private void Contacts_OnSelectionChanged(object sender, SelectionChangedEventArgs e)
        {
            if (e.AddedItems.Count <= 0) return;
            _contact = e.AddedItems[0] as Contact;
            CurrentContact.DataContext = _contact;
        }
    }
}
Listing 4: MainPage.xaml XAML markup
You've just implemented your first SQLite-backed Windows Store App!
 [Click on image for larger view.]
Figure 4. Saving a new contact record.
[Click on image for larger view.]
Figure 4. Saving a new contact record.
You should now be able to create or update a contact record, as seen in Figure 4.
You should also be able to delete an existing Contact record (Figure 5.)
 [Click on image for larger view.]
Figure 5. Removing an existing contact record.
[Click on image for larger view.]
Figure 5. Removing an existing contact record.
Using SQLite within in a Windows Store App takes a little work to get set up. But once things are set up, you have a fast and lightweight relational database to leverage within your application. If your Windows Store application needs a full relational database with support for transactions, SQLite is currently your best bet.