In-Depth
Create a MapView in Google Maps for iOS
You're not stuck with using Apple's Maps app in your iOS development. Learn how to leverage the Google Maps SDK for iOS.
With the introduction of iOS 6 in September 2012, Apple Inc. removed the map system based on Google Maps and introduced its own map system for iPhone and iPad users. The introduction of Apple Maps, like any new technology, came with its own problems.
In December 2012, Google released its Google Maps SDK for iOS. (Check the Google Maps SDK for iOS page for additional documentation as new features are deployed to the product.) Google Maps for iOS has a long, solid track record, given the use of its data in Android and many years of usage. The introduction of Google Maps for iOS has resulted in a measurable increase in the number of users who have updated their existing iPhones from iOS version 5 to iOS version 6. This article will look at using Google Maps for iOS using Xamarin.iOS.
Getting Started
Getting started with the Google Maps SDK for iOS is fairly easy, because Xamarin Inc. has made the process of getting up to speed simple. First off, Xamarin has already written a set of bindings for using the Google Maps SDK for iOS with Xamarin.iOS. With the release of the Xamarin Component Store, you can now easily download and install the Xamarin.iOS bindings for Google Maps. To get to the Xamarin Component Store, open or create a project in Xamarin Studio, and go to Project | Get More Components. You'll then be able to add in components, as shown in Figure 1.
 [Click on image for larger view.]
Figure 1. Add components from the Xamarin Component Store.
[Click on image for larger view.]
Figure 1. Add components from the Xamarin Component Store.
Note: If you aren't familiar with Xamarin's recent product announcements and its Component Store, check out the Xamarin Web site as well as the company's blog. At a high level, the Component Store is a cross between NuGet and a component app store, where free components are available along with components that you can purchase.
Once the component is available in a project, you'll need to configure the project to use Google Maps:
- Add the Google.Maps namespace to any class that will use the maps.
- In the FinishedLaunching method within the AppDelegate of a Xamarin.iOS project, add the following code:
public override bool FinishedLaunching (UIApplication app,   NSDictionary options){  MapServices.ProvideAPIKey (MapsApiKey);
  // Add additional code to hook up the necessary view
  // controllers and start the application
}
The Google Maps API key is available from Google here.
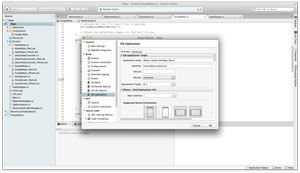
- Set up the application's Identifier, as shown in Figure 2.
 [Click on image for larger view.]
Figure 2. Setting up the application's Identifier.
[Click on image for larger view.]
Figure 2. Setting up the application's Identifier.
Programming the Google Maps SDK for iOS
Now that the project is set up, you need to add in a MapView. A MapView is the control that will display the map to the user. In this example, there will be a header, a UI search bar and the MapView. These controls will be added programmatically in the ViewDidLoad method. The code is shown in Listing 1.
Listing 1. Adding a MapView to your project.
public override void ViewDidLoad (){  base.ViewDidLoad ();  var dims = this.View.Frame;  var searchFrame = new RectangleF(0, 0, dims.Width, 30);  var mapFrame = new RectangleF(0, searchFrame.Height,
    dims.Width, dims.Height - searchFrame.Height);  uisb = new UISearchBar(searchFrame);  uisb.SearchButtonClicked += HandleSearchButtonClicked;  uisb.Text = "golf";  this.View.AddSubview(uisb);  // Perform any additional setup after loading the view,
  // typically from a nib  var camera = CameraPosition.FromCamera (latitude: lat,                                           longitude: lon,                                           zoom: 10);  mapView = MapView.FromCamera (RectangleF.Empty, camera);  mapView.MyLocationEnabled = true;  mapView.Frame = mapFrame;  mapView.MapType = MapViewType.Normal;  mapView.TappedMarker = (map, Marker) => {    Console.WriteLine ("Marker tapped");    return false;  };  mapView.ChangedCameraPosition += HandleChangedCameraPosition;  this.View.AddSubview(mapView);}
void HandleChangedCameraPosition (object sender, GMSCameraEventArgs e){  Console.WriteLine("Postion: {0}", e.Position.Target);}
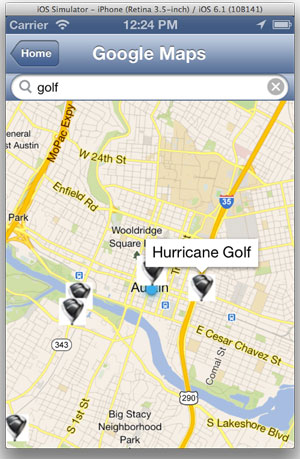
The result of this code displays something similar to Figure 3. In this image, you can see the map is centered in Austin, Texas (the location of the Xamarin Evolve Conference), along with a set of points.
 [Click on image for larger view.]
Figure 3. Displaying the map to the user.
[Click on image for larger view.]
Figure 3. Displaying the map to the user.
Adding Points to a MapView
Adding points to a MapView is done via the .AddMarker method.
- This example uses the Begin/End asynchronous pattern in .NET. (Note: At the time of this writing, the async/await support is in alpha. Xamarin.iOS and Xamarin.Android products should have the async/await support added soon.)
- Because this is being done on a background thread, any calls to the UI must be from within the UI thread. Therefore, the InvokeOnMainThread method must be used to wrap the call to the MapView.
- To clear the contents of the MapView, call the .Clear method.
- Within the loop:
- The distance from the center of the map is calculated via a call to the iOS CoreLocation point's .DistanceFrom method.
- A Marker option is created. The .Title, .Position and .Icon properties are set. Because this is a golf example, the code uses an image of the driver that I currently play with.
- Finally, the point is added via the .AddMarker method, as shown in Listing 2.
Listing 2. Adding a point via the .AddMarker method.
void YahooSearchProcessResult(IAsyncResult iar){  InvokeOnMainThread(delegate{    mapView.Clear();  });  srl = ys.ProcessRestXmlLINQHttpResponse(iar);  var center = new CLLocation(lat, lon);  foreach(var sr in srl)  {    sr.DistanceFromCenter = center.DistanceFrom(
      new CLLocation(sr.Latitude, sr.Longitude));    var m = new Google.Maps.MarkerOptions();    m.Title = sr.Description;    m.Position = new CLLocationCoordinate2D(sr.Latitude, sr.Longitude);    m.Icon = UIImage.FromFile("driver.jpg");    InvokeOnMainThread(delegate{      mapView.AddMarker(m);    });  }}
I'm sure your next question is what to do when a user touches a map marker. This is handled by setting the .TappedMarker property to a delegate. One thing that's different is that there's now the "+=" operation to add the delegate. There's only one delegate associated with the TappedMarker. This is slightly different from standard .NET/C# events, where add events via the "+=" operation and multiple methods can be attached to handle an event.
Other Features
There are numerous other features available in Google Maps. These include:
- Polylines: Polylines allow a program to draw lines on a map. This is done via a MutablePath, which contains a series of points representing a series of line segments.
- Polygons: Polygons are similar to polylines. A polygon consists of a series of points. The biggest difference is that a polygon is a closed region.
- Circles: Circles are all the points on the surface that are a given distance from a center.
- URL Scheme:The Google Maps SDK for iOS exposes a URL scheme. This can be used to open the Google Maps application for iOS. The URL scheme begins with "comgooglemaps://" and can be used to display a map.
- Geocoding: The Google Maps SDK for iOS provides forward and reverse geocoding. Forward geocoding turns an address into a latitude/longitude pair. Reverse geocoding turns a latitude/longitude pair into an address.
Wrapping Up
Though it has only been around since December 2012, the Google Maps SDK for iOS has already been updated twice as of this writing. Updates from Xamarin have come quickly. Additionally, Google announced that further enhancements will be delivered this summer to the Google Maps SDK for iOS. The maps product has the advantage of years of data behind it in the form of Google Maps in iOS 5 and earlier, as well as Google Maps in Android, so it's more mature than a 1.0 product. This is definitely a product you can feel comfortable using in your applications.
Many thanks to Kevin Darty, Stephen Long and Alex Desoto for their help with this article.
About the Author
Wallace (Wally) B. McClure has authored books on iPhone programming with Mono/Monotouch, Android programming with Mono for Android, application architecture, ADO.NET, SQL Server and AJAX. He's a Microsoft MVP, an ASPInsider and a partner at Scalable Development Inc. He maintains a blog, and can be followed on Twitter.