Inside TFS
Test-driven Development with Visual Studio 2012: Part 2
In Part 2 of his column, Mickey Gousset dives deeper into the Test Explorer window.
(This article applies to all editions of Visual Studio 2012, except Test Professional 2012)
Click here for Part 1
In Part 1 of this column, I defined test-driven development (TDD), why it's important, why it's a successful development methodology, and the basics of how to implement TDD using the unit testing framework in Visual Studio 2012. In this column, I'm going to continue to build off the example code in Part 1, and continue to dive into the unit testing framework in Visual Studio 2012, specifically the different features provided by Test Explorer to help with the testing process.
When I left off last time, I'd created the stub code for the Add method and run the unit test for the method. The test failed because the code hadn't been implemented yet. This implies that I need to implement the actual method. I can add the following line of code to the method to implement the logic:
return (p1 + p2);
Open the Test Explorer window, and click the Run All link to run all the unit tests. The solution will compile and the tests will run. This time the test will pass, as expected.
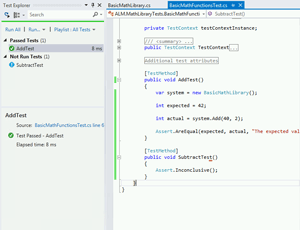
Let's dive into the Test Explorer window in more detail. The Test Explorer window is my interface into the unit tests in my solution. The Test Explorer window, by default, groups my tests into multiple categories, such as Failed Tests, Not Run Tests and Passed Tests. This lets me easily see new tests that have been created but not yet executed, so I can run just those tests in a test run. To see this, add a new test method, SubtractTest, to the BasicMathFunctionsTest class, as shown in Figure 1.
 [Click on image for larger view.]
Figure 1. The SubtractTest test method.
As can be seen in Figure 1, a new method was added to the BasicMathFunctionsTest.cs class, called SubtractTest. If I compile the solution, the unit test framework will pick up on the new test method and add it to the Test Explorer window under the Not Run Tests category, as shown. This provides a quick and easy way to see what new tests are available.
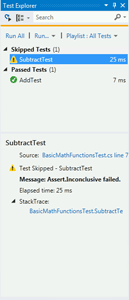
Notice how the method currently contains one line of code, Assert.Inconclusive(). If I just create the test method without any code and run it, it would pass. While this is perfectly valid, it doesn't help me identify any test stub methods I might have created, i.e. test methods where I just created the shell of the method, with the intention of adding the actual test code later. Adding an Assert.Inconclusive() call to any unfinished test method will cause that test method to show up as skipped in the Test Explorer window (Figure 2). Any methods showing up as skipped would indicate test methods that need to be modified/created.
 [Click on image for larger view.]
Figure 2. Tests that need to be implemented will show up as skipped in Test Explorer.
The Test Explorer window can be used to organize tests into Test Playlists. Right-click on a test, and select Add to Playlist | New Playlist to create a new playlist file. This creates an XML file with a .PLAYLIST extension, containing the names of all the tests in that playlist. I can now select the Playlist drop down box in the Test Explorer window and select the created playlist. This will display in Test Explorer only the tests contained in the playlist. To see all the tests available in a solution, click the Playlist drop down box again and select All Tests.
By default, the tests in Test Explorer are arranged by test outcome, such as passed, failed or skipped. You can also arrange them by test class, test duration or test project.
Another methodology starting to appear is the idea of continuous testing. The idea is that I should be continuously testing my code as I build it. Visual Studio 2012 supports this by allowing me to automatically run my unit tests as part of my personal build process. Instead of building my solution and then opening Test Explorer and running my tests, I can have the tests run automatically as soon as I build the solution. This saves time, as well as providing immediate feedback on the build process. To do this, click the Run Tests After Build button in the top left of the Test Explorer.
The past two columns have delved into how to perform TDD using Visual Studio 2012, and a more in-depth look into the Test Explorer window. Visual Studio 2012 provides many more testing opportunities for TDD, from the use of other testing frameworks to the use of shims and fakes to help mock out code to test. All of these tools can be used to help create better-tested code.
About the Author
Mickey Gousset spends his days as a principal consultant for Infront Consulting Group. Gousset is lead author of "Professional Application Lifecycle Management with Visual Studio 2012" (Wrox, 2012) and frequents the speaker circuit singing the praises of ALM and DevOps. He also blogs at ALM Rocks!. Gousset is one of the original Team System/ALM MVPs and has held the award since 2005.