Cross Platform C#
Creating a UI in Xamarin.iOS
Wally McClure guides you through using the XCode design surface integration with Xamarin Studio, and programmatically creating controls.
No matter your feelings toward Apple, there's no denying the marketplace likes the iPhone and iPad family of products. You can't ignore them, and because you're reading this column, I thought it would be interesting to look at the options you have for creating a UI with Xamarin.iOS. There are two options I'll look at in-depth:
- Using the XCode design surface integration with Xamarin Studio.
- Programmatically creating controls.
There are, or course, other options for creating a UI, which I'll cover briefly at the end of this article.
Creating UI
The first step in learning any platform is understanding how to create a UI. I think this is not only the most important step, but also the most daunting. Beginners have to learn how to create the UI as well as how the platform vendor expects a UI to be created. The platform vendor expectation is laid out in a document typically called a "human interface guideline." This document provides expectations regarding application layout, so that users can move between applications on a platform with as little learning required as possible. Each of the platform vendors has its own set of guidelines that provides a look into its soul. These include:
These are important documents. You should take the time to read them before jumping into any platform. I wish I'd read the Apple Human Interface Guidelines before I wrote my first e-book on Xamarin.iOS back in 2009. If I had, the e-book would be less embarrassing to go back and read now. The lesson learned is that developers need to read a platform vendor's UI recommendations.
The Controls
There are a number of controls you can use in an iOS application. Any discussion of the UI in iOS deserves at the very least a short list of the controls that are available and what these controls do. Here are some of the more common controls built into iOS:
- UIButton: A fairly standard, round or rectangular button. You'll use this as a control when a user wants to perform an action. If you're new to iOS, you'll be familiar with a click type of event that will need to be processed. In iOS, there are various touch events you can handle.
- UILabel: A label is a space or area used for static text. Typically, this control is used to provide information to the user.
- UITextField: A text field is for user input. With this control, a user will be presented with a soft keyboard on the screen.
- UISlider: Used to display and input a single value between a minimum and a maximum.
- UISwitch: Displays and inputs a Boolean value.
- UITableView: A grid of data in a plain, section or grouped view.
- UIImageView: An image view is the control used to display a single image as well as an animation of a series of images.
- UITextView: A text view is a control used to display and edit multiple lines of text. Conceptually, the text view is similar to the text field. However, there are different properties and events with which you'll need to familiarize yourself.
- UIMapView: Used to display maps and geographic information.
- UIScrollView: Most controls are defined in a location on the screen. Unfortunately, this means that only one screen of information can be displayed. A scroll view allows a user to scroll through more than a single screen of controls and information. The scrolling can be vertical as well as horizontal.
- UIDatePicker: Used to display and set date information.
- UIPicker Displays and sets information; it's conceptually similar to a dropdown list box.
- UISearchBar: A search bar is an editable search bar and is typically displayed at the top of a view.
These are just some of the controls available in iOS. Most other controls are geared toward navigation in an application; I'll discuss those in a future column.
Using the Xcode Design Surface
Having a graphical design surface for applications is an important feature. You need a mechanism to place elements visually on a screen. These elements can be moved around the screen with a mouse. Controls can have their properties set within the Xcode editor. How does this work? When a user selects a .xib file within Xamarin Studio, a temporary Xcode project is created, and Xcode is opened with the .xib file in the editor.
I'll take a look at a basic iPhone project in Xamarin Studio:
- Each view in Xamarin Studio has a .cs file, a .xib file and a designer.cs file. The .cs file is a partial class file you can use to process events, set properties on controls and place business logic into. The .xib file is an XML-based file that holds the UI of the iPhone application. A designer.cs file is a programmatic listing of outlets. You shouldn't edit the designer.cs file because it's overwritten when the .xib file is updated.
- There's a .xib file for the iPhone and a separate .xib file for the iPad. A side condition of this is that the iPhone and iPad can't have the same name used for an outlet when both devices are used in a universal project.
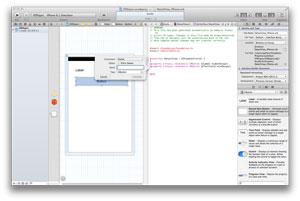
What about the integration between Xamarin Studio and Xcode? An iPhone .xib file is shown in the Xcode design surface in Figure 1. There are several items to note in this UI:
- There are three UI controls -- a UILabel, a UITextField and a UIButton. The controls are placed on the design surface by dragging them from the right-hand frame to the design surface.
- The location of the controls, as well as the height and width, can be set easily and quickly. Thankfully, Xcode provides visual cues for layout assistance.
- Properties can be set on the control in the frame in the upper-right fragment. In Xcode, this is within the Identity Inspector. Note that properties can also be set programmatically in code.
- The outlets for the controls are shown in the right-hand window. This brings up the question of what an outlet is. As Miguel de Icaza says, "Since the beginning of time, man has asked what exactly is an outlet and why do I need one?" The short answer is that an outlet is a private, class-level pointer that's used to access a control.
- When the file is saved in Xcode, typically upon closing the file, the controls are available via the outlets created in Step 4. Now you can program against the controls.
 [Click on image for larger view.]
Figure 1. An iPhone .xib file.
[Click on image for larger view.]
Figure 1. An iPhone .xib file.
I've found this scenario works great for beginners and helps developers learn about iOS. The negatives:
- Xcode integration is fairly brittle. When I'm working in iOS, it tends to cause a few lockups.
- Editing a layout in Xcode has sometimes created a problem in the .xib file. I'm not sure what causes this. Hand-editing the .xib file seems to solve this problem.
Neither of these issues is major, but they should be noted.
Programmatically Creating a UI
The Xcode design surface is a great tool for creating a UI, but there are situations where placing controls on the Xcode design surface won't work well visually:
- You may choose to create your UIs programmatically, perhaps because you feel you have more control over layout.
- If you're using the Xamarin.iOS plug-in for Visual Studio, there's no design surface on Windows at this point in time.
- By not depending on the Xcode design surface, there's a limited dependency on Xcode. As Apple changes its development tools and SDK, there might be some problems with the integration. This issue occurred when Apple introduced Xcode 4, and there was some time between Xcode 4 shipping and Xcode 4 support.
- Moving back and forth between the iPhone and iPad UIs feels much simpler when you have more control over the UI controls. This is a definite improvement over having two separate .xib files when using the Xcode designer and building two separate UI files.
Example source code for placing a few controls in a view in iOS is shown in Listing 1.
Listing 1. Source code for placing controls in a view in iOS.
public partial class ProgrammaticUIViewController : UIViewController {   UILabel lbl;   UITextView txt;   UIButton btn;   static bool UserInterfaceIdiomIsPhone {     get { return UIDevice.CurrentDevice.UserInterfaceIdiom == UIUserInterfaceIdiom.Phone; }   }    public ProgrammaticUIViewController ()     : base (UserInterfaceIdiomIsPhone ? "ProgrammaticUIViewController_iPhone" :
      "ProgrammaticUIViewController_iPad", null)   {   }    public override void DidReceiveMemoryWarning ()   {     // Releases the view if it doesn't have a superview.     base.DidReceiveMemoryWarning ();
    // Release any cached data, images, etc. that aren't in use.   }    public override void ViewDidLoad ()   {     base.ViewDidLoad ();     lbl = new UILabel ();     this.View.BackgroundColor = UIColor.White;      var viewFrame = this.View.Frame;     lbl.Frame = new RectangleF (10f, 10f, viewFrame.Width - 20f, 30f);     lbl.Text = "this is an example label";     this.View.AddSubview (lbl);      txt = new UITextView ();     txt.Frame = new RectangleF (
      lbl.Frame.Left, lbl.Frame.Bottom + 10f, viewFrame.Width - 20f, 60f);     txt.Layer.BorderWidth = 5f;     txt.Layer.BorderWidth = 1f;     this.View.AddSubview (txt);      btn = UIButton.FromType (UIButtonType.RoundedRect);     btn.SetTitle ("Click me", UIControlState.Normal);     btn.Frame = new RectangleF (
       txt.Frame.X, txt.Frame.Bottom + 10f, viewFrame.Width - 20f, 30f);     btn.TouchUpInside += (object sender, EventArgs e) => {       var uia = new UIAlertView("ui controls",
        "You have clicked on the UI Button example", null, "Ok", null);       uia.Show();     };     this.View.AddSubview (btn);     // Perform any additional setup after loading the view, typically from a nib.   } }
Here's what this code sample does:
- It defines a set of controls at the class level. These are the label, text field and button that will be used in the example.
- In the ViewDidLoad method, the controls are created. Each of the controls is instantiated. A size for the control is assigned via the .Frame property and a RectangleF object. Various properties are set, then the control is added to the View to be shown.
- The frame that's assigned is just a RectangleF object. In this specific usage, the starting point's X and Y coordinates are the first two parameters. The next two parameters handed in are the width and height.
- The button is instantiated via a UIButton.FromType method. The value that's handed in is a value from the UIButtonType enum. This isn't the only way to instantiate the UIButton, just a common way.
- If you're a .NET developer, you're familiar with the getting and setting of various properties. With iOS, there are some comparable getters/setters. However, this is not true in all circumstances. Setting the text of a button is done via the SetTitle method. I think the fact that Xamarin has chosen to keep the API calls is a positive; it makes learning the Xamarin.iOS API as simple as learning the Apple iOS APIs.
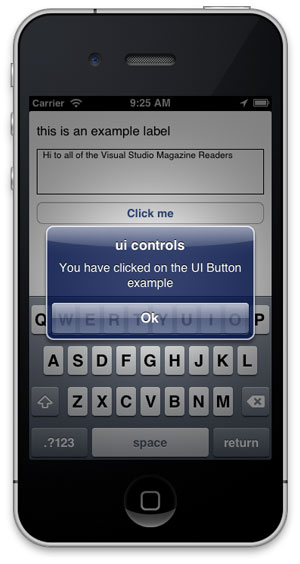
The output of running this code in the simulator is shown in Figure 2.
This is the way I've started to create all of my UIs. The negatives of this approach include:
- The code is repetitive. With the exception of the Frame, the code for each control is nearly the same, yet continually takes up space.
- The code is brittle. The insertion of new controls into the sequence requires changes into other parts of the code. The same is true of removing controls, as well as moving controls around.
- There's no support for orientation changes.
 [Click on image for larger view.]
Figure 2. The output of running the code in the simulator.
[Click on image for larger view.]
Figure 2. The output of running the code in the simulator.
Based on these issues, Apple introduced a feature called Auto Layout and Constraints in iOS 6. Unfortunately, this feature only works in iOS 6 (and later). iOS 6 is on a clear majority of iOS devices, and sometime around the publication of this article, iOS 7 will ship. Unfortunately, my current client requires their apps to run under iOS 5 and later, so I haven't had a chance to dig into this feature yet. Expect to see more coverage of this feature in the future.
Other UI Options
There are other options for creating an iOS API.
- MonoTouch.Dialog (MT.D): This is an API originally conceived back during the MonoTouch 1.0 days. It was designed based on the fact that many mobile use cases are list- and grid-based. MT.D is now a part of Xamarin.iOS. One of the positives of creating a UI with MT.D is that it's optimized for creating a list-based UI quickly and easily. A negative of using MT.D is that it isn't the native UI. While applications built with MT.D look just like all other iOS applications, the APIs used to create a UI are MT.D-specific. This makes learning MT.D more difficult than learning the iOS API because there's less documentation for the iOS APIs.
- Xamarin Designer for iOS: Xamarin is currently working on adding another option: the Xamarin Designer for iOS. This was first demonstrated by Miguel de Icaza at the Xamarin Evolve conference in April 2013. It's a design surface that will be a part of Xamarin.iOS running on the Mac. I'll cover Xamarin Designer for iOS in a future column. Of all of the options discussed in this article, this is the one that excites me the most.
About the Author
Wallace (Wally) B. McClure has authored books on iPhone programming with Mono/Monotouch, Android programming with Mono for Android, application architecture, ADO.NET, SQL Server and AJAX. He's a Microsoft MVP, an ASPInsider and a partner at Scalable Development Inc. He maintains a blog, and can be followed on Twitter.