C# Corner
Web API 2 Routing Attributes, Part 1
Eric Vogel covers how to use the new Web API 2 routing attributes to create a Web service in Part 1 of this series.
Click here for Part 2
Microsoft has recently released the Visual Studio 2013 Preview 1, which includes ASP .NET Web API 2. One of the most notable new additions to Web API is attribute-based routing. Prior to version 2, all routing in Web API was convention-based, as it is in ASP.NET MVC. Convention-based routing is great for most cases, but can be cumbersome if you need to specify many custom route templates.
You may want to use attributed routing if you need many custom routes in a controller, or just want to have a more SEO-friendly routes. Web API 2 includes a few different types of routing attributes. To start with, the base HttpGet, HttpPut, HttpPost, and HttpDelete now have an override that allows you to specify a custom route template. For example, if your Web service is for a blog, you could have a route for a particular entry in multiple formats, such as blog/2013-8-28/ or blog/8-28-2013/ to retrieve all entries for Aug. 28, 2013. You can also create more complex routes too; if you wanted to get all blog posts from a particular author for a given date, you could define a route like blog/evogel/2013-8-28/.
In addition to just overriding routes for a particular controller action, you can also set a custom route template for an entire controller by using the RoutePrefix attribute. The RoutePrefix attribute is best to use when you want all of your controller actions to have a particular custom path. For example, if you wanted all blog posts to be available at api/blogs, you'd use the following RoutePrefix attribute:
[RoutePrefix("api/blogs")]
You can also apply constraints and default values in a controller action route attribute. The built-in route template constraints include some value-type checks as well as range checks. For example, to specify that a route template parameter named orderId is an integer type, you'd use the following attribute:
[HttpGet("orderId:int")]
There's also an included regex parameter constraint for high flexibility. In addition, you can create custom route template constraints by implementing the IInlineContraintResolver interface; but I'll leave that for a future article.
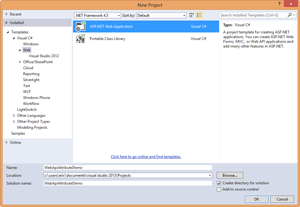
Now let's build an app that includes some of the aforementioned custom routing attributes in Web API 2. The sample application allows the consumer to create, update and retrieve blog posts by date or author in an SEO-friendly manner. First, create a new ASP.NET project in Visual Studio 2013, as seen in Figure 1.
 [Click on image for larger view.]
Figure 1. Creating the new ASP.NET project.
Then select the Web API ASP.NET project type, as seen in Figure 2.
 [Click on image for larger view.]
Figure 2. Selecting the Web API ASP.NET project type.
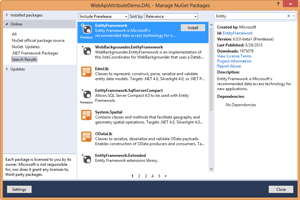
The first step is to set up the data access library for the Web service. The data access layer (DAL) will use Entity Framework to create, update, delete and retrieve blog posts. Create a new Class Library project and name it DAL, with the same namespace as your Web API project. Next, install Entity Framework 6 via NuGet, as seen in Figure 3.
 [Click on image for larger view.]
Figure 3. Installing Entity Framework via the NuGet manager.
Now it's time to add the BlogPost model class. Create a new directory named Entities within your DAL project. Then add a new class file for the BlogPost class:
using System;
using Microsoft.Build.Framework;

namespace WebApiAttributeDemo.DAL.Entities
{
    public class BlogPost
    {
        [Required]
        public long Id { get; set; }
        public string Title { get; set; }
        public string Author { get; set; }
        public string Content { get; set; }
        public DateTime CreatedOn { get; set; }
        public DateTime ModifiedOn { get; set; }
    }
}
Next, add the BlogContext class, which is the Entity Framework model-first context for the BlogPost table:
using System.Data.Entity;

namespace WebApiAttributeDemo.DAL.Entities
{
    public class BlogContext : DbContext
    {
        public DbSet<BlogPost> BlogPosts { get; set; }
    }
}
The next step is to create the IBlogRepository, which is the interface for the modification and retrieval of BlogPost records from the BlogContext:
using System;
using System.Collections.Generic;
using WebApiAttributeDemo.DAL.Entities;

namespace WebApiAttributeDemo.DAL.Repository
{
    public interface IBlogRepository
    {
        IEnumerable<BlogPost> GetAll();
        BlogPost GetById(long id);
        IEnumerable<BlogPost> GetByDate(DateTime date);

        IEnumerable<BlogPost> GetByAuthor(string author);
        void Delete(long id);
        void Add(BlogPost post);
        void Update(BlogPost post);
    }
}
As you can see, there are defined methods for retrieving all blog posts, and blog posts by a creation date or author. I've also added methods for retrieving a single blog post by its ID, and to update and add a blog post to the database. The next step is implement the IBlogRepository via the BlogRepository class. Create a new class file named BlogRepository in the Repository folder in your DAL project:
using System;
using System.Collections.Generic;
using System.Data.Entity.SqlServer;
using System.Linq;
using System.Net.Mime;
using WebApiAttributeDemo.DAL.Entities;

namespace WebApiAttributeDemo.DAL.Repository
{
    public class BlogRepository : IBlogRepository
    {
        private readonly BlogContext _context;

        public BlogRepository()
        {
            _context = new BlogContext();
        }

        public IEnumerable<BlogPost> GetAll()
        {
            return _context.BlogPosts;
        }

        public BlogPost GetById(long id)
        {

            return _context.BlogPosts.SingleOrDefault(x => x.Id == id);
        }

        public IEnumerable<BlogPost> GetByDate(DateTime date)
        {
            return _context.BlogPosts.Where(x => SqlFunctions.DateDiff("dd", date, x.ModifiedOn) == 0);
        }

        public IEnumerable<BlogPost> GetByAuthor(string author)
        {
            return _context.BlogPosts.Where(x => x.Author == author);
        }

        public void Delete(long id)
        {
            var post = GetById(id);
            _context.BlogPosts.Remove(post);
            _context.SaveChanges();
        }

        public void Add(BlogPost post)
        {
            post.CreatedOn = DateTime.Now;
            post.ModifiedOn = DateTime.Now;
            _context.BlogPosts.Add(post);
            _context.SaveChanges();
        }

        public void Update(BlogPost post)
        {
            post.ModifiedOn = DateTime.Now;
            var existing = GetById(post.Id);
            if (existing != null)
            {
                _context.Entry(existing).CurrentValues.SetValues(post);
                _context.SaveChanges();
            }
            _context.SaveChanges();
        }
    }
}
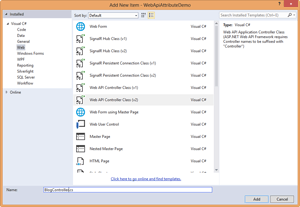
Now that the data access layer's complete, it's time to create the blog API controller. Add a new Web API v2 controller to the Controllers folder, as seen in Figure 4.
 [Click on image for larger view.]
Figure 4. Adding the blog Web API Controller.
Now, add using statements for your Entities and Repository DAL namespaces:
using WebApiAttributeDemo.DAL.Entities;
using WebApiAttributeDemo.DAL.Repository;
Next, add the RoutePrefix attributes to the BlogController class to have a routing prefix of "api/blog" and "api/blogs":
[RoutePrefix("api/blog")]
[RoutePrefix("api/blogs")]
public class BlogController : ApiController
The next step is to add the IBlogRepository member variable and initialize it in the class's constructor:
private readonly IBlogRepository _blogRepository;

public BlogController(IBlogRepository blogRepository = null)
{
    _blogRepository = blogRepository ?? new BlogRepository();
}
Now, add the retrieve all blog posts method that uses the blog repository to retrieve all blog posts:
// GET api/<controller>
public IEnumerable<BlogPost> Get()
{
    return _blogRepository.GetAll();
}
Then add the get by ID controller action method. The method is annotated with an HttpGet attribute with a "posts" path. In addition, I've set an integer type constraint on the route with a minimum value constraint of 1, and a route order of 3. This means that if any other controller action of the same name exists with a lower value, its route will have higher priority than this method. The actual Get method simply calls the GetById method on the blog repository:
// GET api/<controller>/5
[HttpGet("posts/{id:int:min(1)}", RouteOrder = 3)]
public BlogPost Get(int id)
{
    return _blogRepository.GetById(id);
}
It's time to add the get by author controller action method, which has an HttpGet attribute with an author regex type constraint; it allows words and white space with a route order of 2. The method simply calls the GetByAuthor method to retrieve all blog posts created by the given author:
[HttpGet(@"{author:regex([\w+\s+])}", RouteOrder = 2)]
public IEnumerable<BlogPost> Get(string author)
{
    return _blogRepository.GetByAuthor(author);
}
Next, add the get by created date method that's annotated with an HttpGet attribute with date parameter. The date parameter is constrained to be of type date time and the route is given an order of 1. The GetByDate blog repository method is used to actually retrieve the needed blog posts:
[HttpGet("{date:datetime}", RouteOrder = 1)]
public IEnumerable<BlogPost> Get(DateTime date)
{
    return _blogRepository.GetByDate(date);
}
Now add the Post method that allows a new blog post to be created from a form post. The actual blog post record is created via the blog repository's Add method:
// POST api/<controller>
public void Post([FromBody]BlogPost post)
{
    _blogRepository.Add(post);
}
Next, implement the Put method that allows an existing blog post to be updated via an HTTP PUT action. The blog repository's Update method is used to actually update the record:
// PUT api/<controller>/5
public void Put(int id, [FromBody]BlogPost post)
{
    _blogRepository.Update(post);
}
Finally, I implement the Delete method that takes a blog post ID and deletes the found record via the blog repository's Delete method:
// DELETE api/<controller>/5
public void Delete(int id)
{
    _blogRepository.Delete(id);
}
Your finished BlogController class:
using System;
using System.Collections.Generic;
using System.Linq;
using System.Web.Http;
using WebApiAttributeDemo.DAL.Entities;
using WebApiAttributeDemo.DAL.Repository;

namespace WebApiAttributeDemo.Controllers
{
    [RoutePrefix("api/blog")]
    [RoutePrefix("api/blogs")]
    public class BlogController : ApiController
    {
        private readonly IBlogRepository _blogRepository;

        public BlogController()
        {
            _blogRepository = new BlogRepository();
        }

        public BlogController(IBlogRepository blogRepository = null)
        {
            _blogRepository = blogRepository ?? new BlogRepository();
        }

        // GET api/<controller>
        public IEnumerable<BlogPost> Get()
        {
            return _blogRepository.GetAll();
        }

        // GET api/<controller>/5
        [HttpGet("posts/{id:int:min(1)}", RouteOrder = 3)]
        public BlogPost Get(int id)
        {
            return _blogRepository.GetById(id);
        }

        [HttpGet(@"{author:regex([\w+\s+])}", RouteOrder = 2)]
        public IEnumerable<BlogPost> Get(string author)
        {
            return _blogRepository.GetByAuthor(author);
        }

        [HttpGet("{date:datetime}", RouteOrder = 1)]
        public IEnumerable<BlogPost> Get(DateTime date)
        {
            return _blogRepository.GetByDate(date);
        }

        // POST api/<controller>
        public void Post([FromBody]BlogPost post)
        {
            _blogRepository.Add(post);
        }

        // PUT api/<controller>/5
        public void Put(int id, [FromBody]BlogPost post)
        {
            _blogRepository.Update(post);
        }

        // DELETE api/<controller>/5
        public void Delete(int id)
        {
            _blogRepository.Delete(id);
        }
    }
}
As you can see, the new routing attributes are very easy to put to good use, and flexible. In addition, the attributes are extensible through custom routing parameter constraints. Stay tuned for the next article in the series, where I cover how to consume the Web API service from a Windows Store app.
About the Author
Eric Vogel is a Senior Software Developer for Red Cedar Solutions Group in Okemos, Michigan. He is the president of the Greater Lansing User Group for .NET. Eric enjoys learning about software architecture and craftsmanship, and is always looking for ways to create more robust and testable applications. Contact him at [email protected].