Code Focused
Create Windows Services Easily with Topshelf
Creating a Windows Service is trivial using Topshelf, a freely-available library that converts a console application to a Windows Service. In this article, you'll create a simple notification app and integrate Topshelf.
- By Ondrej Balas
- 10/03/2013
Windows Services are special types of applications that run in the background, and typically always run when the machine is on. One benefit of this is that the service itself doesn't rely on a user being logged into the machine. There are a few ways to create Windows Service applications using the .NET Framework, but the easiest by far is to use a library named Topshelf.
Topshelf is an open source library freely available on GitHub. The project's Web site has documentation and examples to help. The Topshelf project allows you to take an existing console application and turn it into a Windows Service, while still handling the various events such as Start and Stop. Doing it this way makes debugging a breeze.
Creating the Application
Typically you would add Topshelf to an existing application that already does something. In this case, I'll start off by creating a simple application that pops up a message box every 20 seconds.
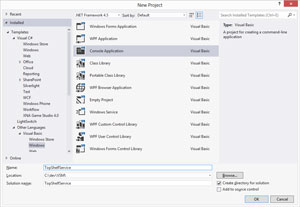
To create the application, begin by launching Visual Studio and making a new "Console Application" project, as shown in Figure 1.
 [Click on image for larger view.]
Figure 1. Create a new console application.
[Click on image for larger view.]
Figure 1. Create a new console application.
The application's functionality is represented by the TimedNotifier class, shown in Listing 1.
Listing 1: The TimedNotifier Class
Class TimedNotifier
  Private _timer As System.Timers.Timer

  Public Sub New()
    _timer = New Timer(20000) With {.AutoReset = True}
    AddHandler _timer.Elapsed, AddressOf TimerOnElapsed
  End Sub

  Private Sub TimerOnElapsed()
    'Note: I added a reference to System.Windows.Forms so that I could use MessageBox
    System.Windows.Forms.MessageBox.Show("The time is now " & DateTime.Now)
  End Sub

  Public Sub Start()
    _timer.Start()
  End Sub

  Public Sub [Stop]()
    _timer.Stop()
  End Sub
End Class
If you're following along, don't forget to add a reference to System.Windows.Forms. At this point, I can add a few lines to the Main method to get the application to function:
Sub Main()
  Dim notifier As New TimedNotifier
  notifier.Start()

  Console.WriteLine("Notifications should start appearing soon")
  Console.WriteLine("Press enter to exit")
  Console.ReadLine()
End Sub
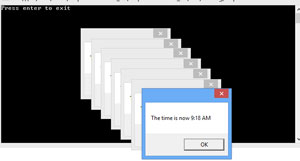
If you run the application and let it run for a couple of minutes, you should start seeing message boxes pop up showing you what time it is, as shown in Figure 2.
 [Click on image for larger view.]
Figure 2. After running for a few minutes, a few message boxes have popped up.
[Click on image for larger view.]
Figure 2. After running for a few minutes, a few message boxes have popped up.
Integrating Topshelf
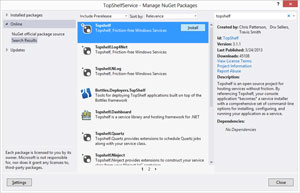
Now that the application is going, the next step is to integrate Topshelf and convert it to a Windows Service. First, you'll need to reference the Topshelf library. I recommend doing this by acquiring it through NuGet, as shown in Figure 3.
 [Click on image for larger view.]
Figure 3. Installing the Topshelf library using the NuGet Package Manager.
[Click on image for larger view.]
Figure 3. Installing the Topshelf library using the NuGet Package Manager.
Once the library is added, replace the code in the Main method with the code in Listing 2.
Listing 2: The Updated Sub Main with Topshelf Configuration Code
Sub Main()
  HostFactory.Run(Sub(configurator)
    configurator.Service(Of TimedNotifier)(Sub(service)
      service.ConstructUsing(Function(factory)
        Return New TimedNotifier
      End Function)

      service.WhenStarted(Function(notifier, hostControl) As Boolean
        Return notifier.Start(hostControl)
      End Function)

      service.WhenStopped(Function(notifier, hostControl) As Boolean
        Return notifier.Stop(hostControl)
      End Function)
    End Sub)

    configurator.RunAsLocalSystem()

    configurator.SetDisplayName("Sample Service: Timed Notifier")
    configurator.SetDescription("This sample service will notify you of the " & _
      "current time every 20 seconds.")
    configurator.SetServiceName("TimedNotifier")
  End Sub)

End Sub
For the code to run, the TimedNotifier class needs to be set to implement ServiceControl, with the Start() and Stop() methods inside the TimedNotifier class changed to implement the interface. The updated TimedNotifier class is shown in Listing 3.
Listing 3: The Updated TimedNotifier Class
Class TimedNotifier
  Implements ServiceControl
  Private _timer As System.Timers.Timer

  Public Sub New()
    _timer = New Timer(20000) With {.AutoReset = True}
    AddHandler _timer.Elapsed, AddressOf TimerOnElapsed
  End Sub

  Private Sub TimerOnElapsed()
    'Note: I added a reference to System.Windows.Forms so that I could use MessageBox
    System.Windows.Forms.MessageBox.Show(text)
    'The line below writes the text to a file so that you can see the application working,      ' as you will not see the message boxes while the application is running as a service.
    File.AppendAllLines(Path.Combine(Environment.GetFolderPath(Environment.SpecialFolder. _
      CommonDocuments), "TimedNotifierLog.txt"), New String() {text})
  End Sub

  Public Function Start(ByVal hostControl As HostControl) As Boolean Implements _
    ServiceControl.Start
    _timer.Start()
    Return True
  End Function

  Public Function [Stop](ByVal hostControl As HostControl) As Boolean Implements _
    ServiceControl.[Stop]
    _timer.Stop()
    Return True
  End Function
End Class
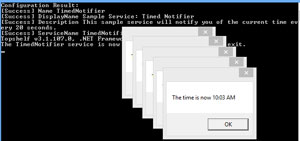
Now, when I run the application, it behaves just as before, but with a bit more text in the console window, as shown in Figure 4. Take note of the changes to the TimerOnElapsed() method. In addition to showing a MessageBox, it now also writes to a log file. The reason for this is simply because when the application is later installed as a service, it will noon't be able to interact with the logged in user, and you will not see the message boxes pop up.
 [Click on image for larger view.]
Figure 4. The service is still working, but now with Topshelf.
[Click on image for larger view.]
Figure 4. The service is still working, but now with Topshelf.
Topshelf has the concept of a HostFactory, on which I a'm calling the Run() method on. I then pass the Run() method an Action that takes a HostConfigurator (that I named configurator in this case). I use that to configure the service, telling it how to construct the TimedNotifier object, which methods to call when the service is started and stopped, and even the user account to use when running the service. I also set the service name and description, which will be shown in the system services list when installed. For a full list of configuration opens, see the Topshelf documentation.
Installing the Service
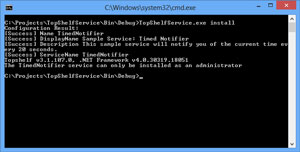
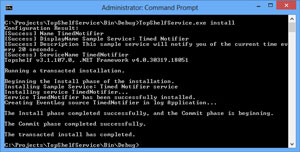
When Topshelf is integrated in your console application, the application itself will become the service installer. To use the installer features, you'll need to open up a command prompt with elevated permissions. To do this, right-click on the Command Prompt icon and select "Run as Administrator" when starting it. Once started, you can install it by going to the folder that the executable is in and typing in:
TopshelfService.exe install
If the command prompt isn't running "as Administrator", you'll get an error as shown in Figure 5. Otherwise, you should see the service get installed as shown in Figure 6.
When installing, you can also override many of the configuration options set in the code by adding additional arguments. A complete list of those arguments is available as part of the Topshelf documentation here.
 [Click on image for larger view.]
Figure 5. An error occurs if you are not running "As Administrator".
[Click on image for larger view.]
Figure 5. An error occurs if you are not running "As Administrator".
 [Click on image for larger view.]
Figure 6. The service installs successfully.
[Click on image for larger view.]
Figure 6. The service installs successfully.
In addition to installing, you can also start, stop or uninstall the service by using the appropriate verb. For example, to uninstall just type in:
TopshelfService.exe uninstall
Advanced Usage
In this contrived example, the application was only popping up a message box in accordance with a timer. In a real application you could do all sorts of things, like watching directories for file changes, connecting to databases or e-mail accounts, or anything else. One pattern I commonly find myself using is integrating Topshelf with applications that have a self-hosted Web API component. This allows my service to easily communicate with outside applications.
For more information on self-hosting Web API, take a look at my recent article. While combining the two is outside the scope of this article, the sample code includes a project that uses both Topshelf and Web API for you to check out.
About the Author
Ondrej Balas owns UseTech Design, a Michigan development company focused on .NET and Microsoft technologies. Ondrej is a Microsoft MVP in Visual Studio and Development Technologies and an active contributor to the Michigan software development community. He works across many industries -- finance, healthcare, manufacturing, and logistics -- and has expertise with large data sets, algorithm design, distributed architecture, and software development practices.