C# Corner
Virtual Reality in .NET, Part 3: 3D With Distortion and Head Tracking
Go deeper into the Oculus Rift SDK.
More on this topic:
Welcome to Part 3 of this series on Virtual Reality programming with Oculus Rift in the .NET Framework. In Part 1, I did an overview of the Oculus SDK, and in Part 2 of the series I showed how to render a stereoscopic 3D scene.
Since those articles were published, a lot's changed with the SDK. For example, it's changed from using a pixel shader for distortion to using a vertex mesh-based shader. In addition, it now supports both a new SDK renderer and client-side rendering. The renderer handles the details of setting up both the pixel and vertex shaders, as well as the final flush and sync draw calls. It's now the recommended path of game integration.
Luckily for us, there's a new .NET Framework wrapper around the new Oculus SDK 0.3.2 -- SharpOVR. This article will demonstrate the use of SharpOVR in conjunction with the SharpDX Toolkit to quickly create a 3D scene with distortion and head tracking.
To get started, open up Visual Studio (either 2012 or 2013) and install the SharpDX Visual Studio Extension, as seen in Figure 1.
 [Click on image for larger view.]
Figure 1. Installing SharpDX Toolkit for Visual Studio.
Next you'll need to create a new ShaprDX project using the newly installed Toolkit Game template (Figure 2).
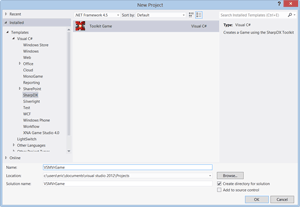 [Click on image for larger view.]
Figure 2. Creating a toolkit game.
Next you'll be prompted to select the options for the Toolkit Game: check the 3D Model checkbox, as seen in Figure 3.
 [Click on image for larger view.]
Figure 3. Selecting toolkit sample options.
Once the game project's been created, install the SharpOVR NuGet package, as shown in Figure 4.
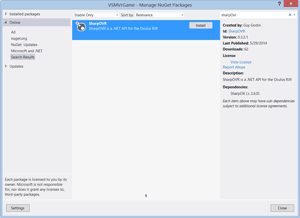 [Click on image for larger view.]
Figure 4. Installing the SharpOVR NuGet package.
Now it's time to update the game sample to support the Oculus Rift. First open up your game class file, then add an HMD member variable:
private readonly HMD _hmd;
Then add an eye render viewport of type Rect[]:
private Rect[] _eyeRenderViewport;
Next add an eye texture array:
private D3D11TextureData[] _eyeTexture;
Then add a 2D render target:
private RenderTarget2D _renderTarget;
Now, add a shader resource view and a depth stencil buffer:
private ShaderResourceView _renderTargetSrView;
private DepthStencilBuffer _depthStencilBuffer;
Then add an eye render description array:
private EyeRenderDesc[] _eyeRenderDesc;
Next add the eye position vector:
private readonly Vector3 _eyePos = new Vector3(0, 0, 7);
Then comes the eye yaw value:
private const float EyeYaw = (float)Math.PI;
Now add a keyboard manager that will be used to get the current state of the keyboard later:
private readonly KeyboardManager _kbKeyboardManager;
It's time to initialize the OVR SDK in the game constructor and create an HMD object for the Rift. If you don't have an Oculus Rift, a debug rift object is created:
OVR.Initialize();
_hmd = OVR.HmdCreate(0) ?? OVR.HmdCreateDebug(HMDType.DK1);
After that, set the preferred back buffer width and height to the resolution of the created HMD:
graphicsDeviceManager.PreferredBackBufferWidth = _hmd.Resolution.Width;
graphicsDeviceManager.PreferredBackBufferHeight = _hmd.Resolution.Height;
Finally, create the KeyboardManager for the game:
_kbKeyboardManager = new KeyboardManager(this);
The completed game constructor should look like Listing 1.
Listing 1: The Constructor
public VSMVrGame()
{
    var graphicsDeviceManager = new GraphicsDeviceManager(this);
    Content.RootDirectory = "Content";
    OVR.Initialize();
    _hmd = OVR.HmdCreate(0) ?? OVR.HmdCreateDebug(HMDType.DK1);
    graphicsDeviceManager.PreferredBackBufferWidth = _hmd.Resolution.Width;
    graphicsDeviceManager.PreferredBackBufferHeight = _hmd.Resolution.Height;
    _kbKeyboardManager = new KeyboardManager(this);
}
Next update the Initialize method to initialize the HMD via the InitHmd method that will be defined later:
InitHmd();
Then set the window position to the suggested position from the SDK:
var window = this.Window.NativeWindow as Form;
if (window != null)
{
    window.SetDesktopLocation(_hmd.WindowPos.X, _hmd.WindowPos.Y);
}
The completed Initialize method should now be like Listing 2.
Listing 2: The Initialize Method
protected override void Initialize()
{
    // Modify the title of the window
    Window.Title = "VSMVrGame";

    InitHmd();

    var window = this.Window.NativeWindow as Form;
    if (window != null)
    {
        window.SetDesktopLocation(_hmd.WindowPos.X, _hmd.WindowPos.Y);
    }

    base.Initialize();
}
Now to implement the InitHmd method, which prepares the Rift for rendering and initializes its sensor.
First, set the render target size to the default render target size reported from the HMD:
var renderTargetSize = _hmd.GetDefaultRenderTargetSize();
Then create the render target with the render target size:
_renderTarget = RenderTarget2D.New(GraphicsDevice, renderTargetSize.Width, renderTargetSize.Height,
    new MipMapCount(1), PixelFormat.R8G8B8A8.UNorm);
Next, assign the shader resource view to the render target:
_renderTargetSrView = _renderTarget;
Then create the depth stencil buffer with the same size as the render target:
_depthStencilBuffer = DepthStencilBuffer.New(GraphicsDevice, renderTargetSize.Width,
    renderTargetSize.Height, DepthFormat.Depth32, true);
Now, set the render target size to be the same as the render target:
renderTargetSize.Width = _renderTarget.Width;
renderTargetSize.Height = _renderTarget.Height;
Then create the eye render viewport array, with each index representing an eye viewport with half the width of the Rift:
_eyeRenderViewport = new Rect[2];
_eyeRenderViewport[0] = new Rect(0, 0, renderTargetSize.Width / 2, renderTargetSize.Height);
_eyeRenderViewport[1] = new Rect((renderTargetSize.Width + 1) / 2, 0, _eyeRenderViewport[0].Width,
    _eyeRenderViewport[0].Height);
Next, create the eye textures:
_eyeTexture = new D3D11TextureData[2];
_eyeTexture[0].Header.API = RenderAPIType.D3D11;
_eyeTexture[0].Header.TextureSize = renderTargetSize;
_eyeTexture[0].Header.RenderViewport = _eyeRenderViewport[0];
_eyeTexture[0].pTexture = ((SharpDX.Direct3D11.Texture2D)_renderTarget).NativePointer;
_eyeTexture[0].pSRView = _renderTargetSrView.NativePointer;
_eyeTexture[1] = _eyeTexture[0];
_eyeTexture[1].Header.RenderViewport = _eyeRenderViewport[1];
In this case I'm using the same viewport and texture for each eye. Next get the graphics device:
var device = (Device)GraphicsDevice;
Then create the Direct3D 11 rendering configuration:
var d3D11Cfg = new D3D11ConfigData();
d3D11Cfg.Header.API = RenderAPIType.D3D11;
d3D11Cfg.Header.RTSize = _hmd.Resolution;
d3D11Cfg.Header.Multisample = 1;
d3D11Cfg.pDevice = device.NativePointer;
d3D11Cfg.pDeviceContext = device.ImmediateContext.NativePointer;
d3D11Cfg.pBackBufferRT = ((RenderTargetView)GraphicsDevice.BackBuffer).NativePointer;
d3D11Cfg.pSwapChain = ((SharpDX.DXGI.SwapChain)GraphicsDevice.Presenter.NativePresenter).NativePointer;
Next I get the eye render configuration data through the ConfigureRendering SDK method. If there's an error, I throw an exception:
 _eyeRenderDesc = new EyeRenderDesc[2];
  if (!_hmd.ConfigureRendering(d3D11Cfg, _hmd.DistortionCaps,
      _hmd.DefaultEyeFov, _eyeRenderDesc))
  {
      throw new Exception("Unable to configure rendering!");
  }
Last, I start the HMD sensor to indicate that the device supports orientation and yaw correction, and that, at a minimum, orientation tracking is needed:
_hmd.StartSensor(SensorCapabilities.Orientation | SensorCapabilities.YawCorrection,
     SensorCapabilities.Orientation);
The completed InitHmd method is in Listing 3.
Listing 3: The InitHmd Method
private void InitHmd()
 {
     var renderTargetSize = _hmd.GetDefaultRenderTargetSize();
     _renderTarget = RenderTarget2D.New(GraphicsDevice, renderTargetSize.Width, renderTargetSize.Height,
         new MipMapCount(1), PixelFormat.R8G8B8A8.UNorm);
     _renderTargetSrView = _renderTarget;

     _depthStencilBuffer = DepthStencilBuffer.New(GraphicsDevice, renderTargetSize.Width,
         renderTargetSize.Height, DepthFormat.Depth32, true);

     renderTargetSize.Width = _renderTarget.Width;
     renderTargetSize.Height = _renderTarget.Height;

     _eyeRenderViewport = new Rect[2];
     _eyeRenderViewport[0] = new Rect(0, 0, renderTargetSize.Width / 2, renderTargetSize.Height);
     _eyeRenderViewport[1] = new Rect((renderTargetSize.Width + 1) / 2, 0, _eyeRenderViewport[0].Width,
         _eyeRenderViewport[0].Height);

     _eyeTexture = new D3D11TextureData[2];
     _eyeTexture[0].Header.API = RenderAPIType.D3D11;
     _eyeTexture[0].Header.TextureSize = renderTargetSize;
     _eyeTexture[0].Header.RenderViewport = _eyeRenderViewport[0];
     _eyeTexture[0].pTexture = ((SharpDX.Direct3D11.Texture2D)_renderTarget).NativePointer;
     _eyeTexture[0].pSRView = _renderTargetSrView.NativePointer;

     _eyeTexture[1] = _eyeTexture[0];
     _eyeTexture[1].Header.RenderViewport = _eyeRenderViewport[1];

     var device = (Device)GraphicsDevice;
     var d3D11Cfg = new D3D11ConfigData();
     d3D11Cfg.Header.API = RenderAPIType.D3D11;
     d3D11Cfg.Header.RTSize = _hmd.Resolution;
     d3D11Cfg.Header.Multisample = 1;
     d3D11Cfg.pDevice = device.NativePointer;
     d3D11Cfg.pDeviceContext = device.ImmediateContext.NativePointer;
     d3D11Cfg.pBackBufferRT = ((RenderTargetView)GraphicsDevice.BackBuffer).NativePointer;
     d3D11Cfg.pSwapChain = ((SharpDX.DXGI.SwapChain)GraphicsDevice.Presenter.NativePresenter).NativePointer;

     _eyeRenderDesc = new EyeRenderDesc[2];
     if (!_hmd.ConfigureRendering(d3D11Cfg, DistortionCapabilities.Chromatic,
         _hmd.DefaultEyeFov, _eyeRenderDesc))
     {
         throw new Exception("Failed to configure rendering");
     }

     _hmd.SetEnabledCaps(HMDCapabilities.LowPersistence);
     _hmd.StartSensor(SensorCapabilities.Orientation | SensorCapabilities.YawCorrection,
         SensorCapabilities.Orientation);
 }
It's now time to update the Update method to read and react to the user's keyboard input. First, I get the current keyboard state:
var kbState = _kbKeyboardManager.GetState();
Next I check if the user has pressed the escape key, and if so exit the game:
if (kbState.IsKeyDown(Keys.Escape))
 {
     Exit();
 }
Then I check if the user's pressed the space key, and restart the sensor if they have:
if (kbState.IsKeyDown(Keys.Space))
 {
     _hmd.ResetSensor();
 }
The completed Update method should now look link Listing 4.
Listing 4: The Update Method
protected override void Update(GameTime gameTime)
 {
     base.Update(gameTime);
     _view = Matrix.LookAtRH(new Vector3(0.0f, 0.0f, 7.0f), new Vector3(0, 0.0f, 0), Vector3.UnitY);
     _projection = Matrix.PerspectiveFovRH(0.9f,
         (float)GraphicsDevice.BackBuffer.Width / GraphicsDevice.BackBuffer.Height, 0.1f, 100.0f);

     var kbState = _kbKeyboardManager.GetState();
     if (kbState.IsKeyDown(Keys.Escape))
     {
         Exit();
     }

     if (kbState.IsKeyDown(Keys.Space))
     {
         _hmd.ResetSensor();
     }
 }
Next I add the DrawModel method, which renders the space ship model at { 0, -1.5, 2.0 } with a y-axis rotation and scale of 0.003:
protected virtual void DrawModel(Model model, GameTime gameTime)
 {
     var time = (float)gameTime.TotalGameTime.TotalSeconds;
     var world = Matrix.Scaling(0.003f) *
                 Matrix.RotationY(time) *
                 Matrix.Translation(0, -1.5f, 2.0f);
     model.Draw(GraphicsDevice, world, _view, _projection);
     base.Draw(gameTime);
 }
Now, to implement the Draw method that will call DrawModel for each eye and utilize the renderer to apply distortion. First I set the render target:
GraphicsDevice.SetRenderTargets(_depthStencilBuffer, _renderTarget);
Then I set the viewport to be the render target size:
GraphicsDevice.SetViewport(0f, 0f, (float)_renderTarget.Width, (float)_renderTarget.Height);
Next, I call BeginFrame on the HMD to signal that rendering has begun:
_hmd.BeginFrame(0);
Then I clear the screen, in this case to cornflower blue color:
GraphicsDevice.Clear(Color.CornflowerBlue);
Now it's time to render each eye:
for (int eyeIndex = 0; eyeIndex < 2;="" eyeindex++)="">
First I get the recommended first eye to render from the HMD's eye render order:
var eye = _hmd.EyeRenderOrder[eyeIndex];
Next, I get the render pose from BeginEyeRender, which contains the orientation and position tracking data (position tracking to be added in DK2):
var renderPose = _hmd.BeginEyeRender(eye);
Then I get the correct render description for the eye to be rendered:
var renderDesc = _eyeRenderDesc[(int)eye];
Next up is to get the correct eye render viewport:
var eyeRenderViewport = _eyeRenderViewport[(int)eye];
Then I calculate the orientation by taking the product of the eye yaw and read render pose orientation:
var orientation = Matrix.RotationY(EyeYaw);
var finalOrientation = orientation * Matrix.RotationQuaternion(renderPose.Orientation);
Now I calculate the normalized up vector based on the orientation:
var up = Vector3.TransformNormal(new Vector3(0, 1, 0), finalOrientation);
Then I calculate the normalized forward vector based on the orientation:
var forward = Vector3.TransformNormal(new Vector3(0, 0, 1), finalOrientation);
The next step is to calculate the offset eye position based on the orientation:
var offsetEyePos = _eyePos + Vector3.TransformNormal(renderPose.Position, orientation);
Then I create the view matrix, which is a standard right-handed look at the matrix. The view matrix is positioned at the offset position and looking at the player's forward vector. The look at view matrix uses prior computed up vector that factors in the HMD rotation. Finally, the view matrix is translated by the render description view adjust vector for the target eye:
_view = Matrix.Translation(renderDesc.ViewAdjust)
     * Matrix.LookAtRH(offsetEyePos, offsetEyePos + forward, up);
Next I create the right-handed projection field of view matrix using the OVR.MatrixProjection method, with a min z depth of 0.001 and max z depth of 1000:
_projection = OVR.MatrixProjection(renderDesc.Fov, 0.001f, 1000.0f, true);
Now, I transpose the projection matrix:
_projection.Transpose();
Then set the render viewport for the current eye:
GraphicsDevice.SetViewport(eyeRenderViewport.ToViewportF());
Then render the model to the eye viewport:
DrawModel(_model, gameTime);
Next, EndEyeRender must be called to finish drawing the scene to the eye texture:
_hmd.EndEyeRender(eye, renderPose, _eyeTexture[(int)eye]);
Once both eyes have been rendered to their eye textures outside the loop, I call EndFrame on the HMD to draw the finished texture to the screen:
_hmd.EndFrame();
The completed Draw method can be seen in Listing 5.
Listing 5: The Draw Method
protected override void Draw(GameTime gameTime)
 {
     GraphicsDevice.SetRenderTargets(_depthStencilBuffer, _renderTarget);
     GraphicsDevice.SetViewport(0f, 0f, (float)_renderTarget.Width, (float)_renderTarget.Height);
     _hmd.BeginFrame(0);
     GraphicsDevice.Clear(Color.CornflowerBlue);

     for (int eyeIndex = 0; eyeIndex < 2;="" eyeindex++)="" {="" var="" eye="_hmd.EyeRenderOrder[eyeIndex];" var="" renderpose="_hmd.BeginEyeRender(eye);" var="" renderdesc="_eyeRenderDesc[(int)eye];" var="" eyerenderviewport="_eyeRenderViewport[(int)eye];" var="" orientation="Matrix.RotationY(EyeYaw);" var="" finalorientation="orientation" *="" matrix.rotationquaternion(renderpose.orientation);="" var="" up="Vector3.TransformNormal(new" vector3(0,="" 1,="" 0),="" finalorientation);="" var="" forward="Vector3.TransformNormal(new" vector3(0,="" 0,="" 1),="" finalorientation);="" var="" offseteyepos="_eyePos" +="" vector3.transformnormal(renderpose.position,="" orientation);="" _view="Matrix.Translation(renderDesc.ViewAdjust)" *="" matrix.lookatrh(offseteyepos,="" offseteyepos="" +="" forward,="" up);="" _projection="OVR.MatrixProjection(renderDesc.Fov," 0.001f,="" 1000.0f,="" true);="" _projection.transpose();="" graphicsdevice.setviewport(eyerenderviewport.toviewportf());="" drawmodel(_model,="" gametime);="" _hmd.endeyerender(eye,="" renderpose,="" _eyetexture[(int)eye]);="" }="" _hmd.endframe();="" }="">
The final step is to implement the Dipose method to clean up the ShaprOVR library by disposing of the HMD and calling OVR.Shutdown:
protected override void Dispose(bool disposeManagedResources)
{
    base.Dispose(disposeManagedResources);
    if (!disposeManagedResources) return;
    _hmd.Dispose();
    OVR.Shutdown();
}
The game is now complete, with full orientation head tracking. It's shown in Figure 5.
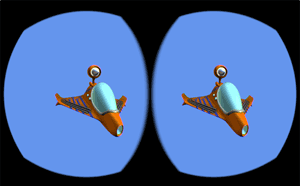 [Click on image for larger view.]
Figure 5. The finished game.
It's pretty amazing: with fewer than 200 lines of code, you can create your first Oculus Rift game or interactive application using SharpOVR. SharpOVR utilizes the latest version of the Oculus SDK and thus will be compatible with the upcoming Oculus Rift DK2, slated for release in July. The source Oculus SDK doesn't currently support positional tracking, so you'll need to update your application as needed for the DK2 as the source OVR SDK matures. Happy Rifting!