Cross Platform C#
Xamarin Tools: Components, Components, Components!
The Xamarin tool ecosystem is gaining popularity, as more developers continue to build tools with mobility in mind. Here's how to use them in your projects.
I couldn't help but think about Steve Ballmer's "Developers, developers, developers! …" chant. While often lampooned, the chant shows how important developers are to growing the Microsoft platform.
End-user developers and companies will often judge a company's acceptance in the marketplace by the number of third-party components and add-ins that are developed around that product. It's a complaint I've heard leveled against Xamarin, that it lacks a robust ecosystem of tools, but that is changing.
In 2011, Xamarin was a startup of unknown quantity. Since then, Xamarin has definitely improved support for its platform from a number of the "usual suspects" in the .NET world. I spoke with Michael Crump, developer evangelist at Telerik, who tells me that Telerik should have a suite of UI controls for the Xamarin .Android, .iOS and .Forms product out this fall.
Besides the standard .NET component vendors supporting Xamarin are some of the vendors out on the fringe. Mobile is very much about connectedness and scale. Xamarin has support from vendors such as Parse, Microsoft, Amazon, and others. Check out this news from the Xamarin Evolve conference for more information on some of those companies producing Xamarin components.
To get a handle on the growing component ecosystem, Xamarin created a component store. The Xamarin Component Store provides add-ins that developers can use directly within Visual Studio and Xamarin Studio. Some are available for free, others for a nominal fee and depends on the component and the value of its features.
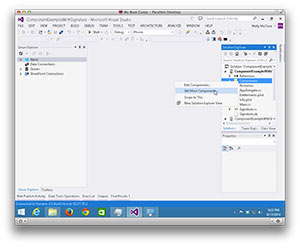
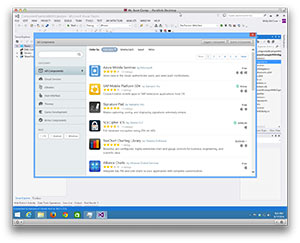
Getting components into a project is fairly simple. From within a Xamarin.iOS or Xamarin.Android project, right-click on the Components folder, and select Get More Components to open a view into the Xamarin Component Store. Within the store, developers can search and select a component, which is then added to the project. The component is downloaded to the local system, stored on the file system associated with the solution, and finally added as a reference so that it's immediately usable. The integration with Visual Studio is shown in Figure 1 and Figure 2.
 [Click on image for larger view.]
Figure 1. Getting More Components
 [Click on image for larger view.]
Figure 2. A View of the Xamarin Component Store
The Xamarin Component Store contains a good cross section of components:
- UI components of various types, including a number of charting components
- Support for various cloud services, such as Amazon, Microsoft Azure, and Salesforce
- Social network components: Pinterest, Facebook
- Theme and game development components
Adding a Signature Component
My local Apple Store needed a signature for a recent purchase, and I was able to sign with an iPhone using my finger as a pen. It was amazingly convenient. The ability to capture a real signature is one that is uniquely mobile. There was no fumbling for a pen and no phony signatures that some online Web sites use as a substitute.
I wondered: "How can I create the same functionality for my readers?" Easy, because the Xamarin Component Store has a signature component. It runs on iOS, as well as Android.
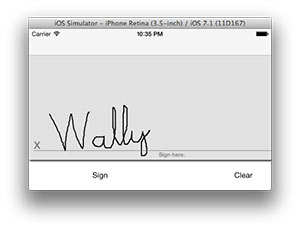
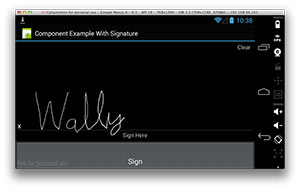
For iOS, you can easily add the component to the View of a UIViewController; for the associated Android View, you add it to an Android Layout. For this example, the signature component instance is named "signature." Once a person has signed the component, you can easily obtain the image. The API in iOS and Android is the same. The method on the signature instance is .GetImage. In iOS, this returns a UIImage object instance (see Figure 3). In Android, it returns a Bitmap object instance (see Figure 4).
 [Click on image for larger view.]
Figure 3. Signature in iOS Returns as a UIImage Object Instance
 [Click on image for larger view.]
Figure 4. Signature in Android Returns a Bitmap Object Instance
What do you do with the image that's returned from the signature object? This data needs to be saved some place. In the past, I've saved data in a local SQLite database for later syncing with a remote database, as well as saving immediately to a remote data source. In either case, the conversion of the image from a platform-specific image to a Base64 String allows the application to then store the data either locally in SQLite or to be saved remotely via a Web service call. Here's the iOS code to convert the data to a string:
var img = signature.GetImage(true);
var data = img.AsPNG();
var bytesImg = data.ToArray();
var dataAsString = Convert.ToBase64String(bytesImg);
And here's the Android code to convert the data to a string:
var img = signature.GetImage();
var stream = new MemoryStream();
img.Compress(Bitmap.CompressFormat.Png, 100, stream);
var data = stream.ToArray();
Where To Find More Components
There are other locations to find components for Xamarin's platforms besides the Xamarin Component Store. Xamarin.iOS and Xamarin.Android support Portable Class Libraries (PCL), you can have ready access to components through PCLs The library LINQ To Twitter (L2T) is a PCL library that allows a program to access the Twitter API. L2T is available in Nuget.
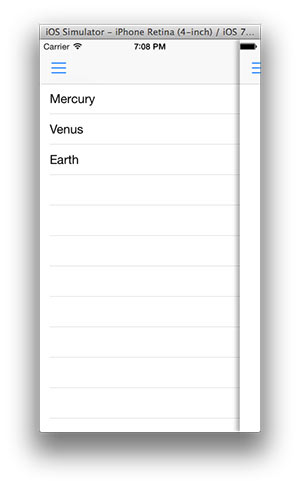
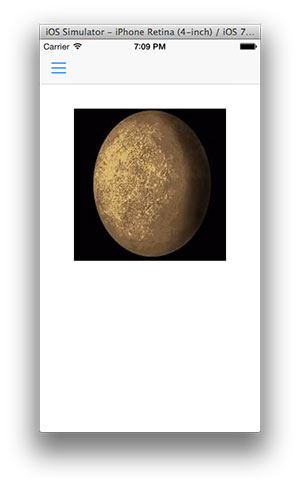
In addition, I have found several libraries in GitHub. One that I've found to be useful is MonoTouch.SlideOutNavigation. Figure 5 shows an image of a menu slide-out in the iPhone simulator; Figure 6 shows the image displayed after an item is selected.
 [Click on image for larger view.]
Figure 5. Menu Slide-out on an iPhone Simulator
 [Click on image for larger view.]
Figure 6. Selecting an Item in the Slide-Out
The code for this is shown in Listing 1, Listing 2 and Listing 3. In Listing 1 is AppDelegate, where an instance of the slide-out controller is created and the RootViewController is assigned.
Listing 1: AppDelegate for the Example Application
[Register ("AppDelegate")]
public partial class AppDelegate : UIApplicationDelegate
{
  UIWindow window;
  public SlideoutNavigationController Menu { get; private set; }
  public List<string> planetName = new List<string>(){ "Mercury", "Venus", "Earth"};
  public List<string> planetImg =
    new List<string>(){ "mercury.jpg", "venus.jpg", "earth.jpg"};

  public override bool FinishedLaunching (UIApplication app, NSDictionary options)
  {
    window = new UIWindow (UIScreen.MainScreen.Bounds);
    Menu = new SlideoutNavigationController();
    Menu.MenuViewController = new MainNavigationController(new MenuController(), Menu);
    Menu.MainViewController =
      new MainNavigationController(new MainViewController(), Menu);
    window.RootViewController = Menu;
    window.MakeKeyAndVisible ();
    return true;
  }
}
Listing 2 shows the menu that will be displayed. The menu is a UITableViewController. When a user selects one of the cells in the UITableViewController, the RowSelected method event is called. Within RowSelected, a reference is created to the main view and the image is loaded. Once an item is selected, the menu is closed.
Listing 2: The Menu Is a UITableViewController
public class MenuController : UITableViewController
{
  AppDelegate app;
  public MenuController ()
  {
    app = (AppDelegate)UIApplication.SharedApplication.Delegate;
  }

  string cellIdentifier = "PlanetCell";

  public override int RowsInSection (UITableView tableview, int section)
  {
    return app.planetName.Count;
  }
  public override UITableViewCell GetCell (UITableView tableView,
    MonoTouch.Foundation.NSIndexPath indexPath)
  {
    UITableViewCell cell = tableView.DequeueReusableCell (cellIdentifier);
    if (cell == null)
      cell = new UITableViewCell (UITableViewCellStyle.Default, cellIdentifier);
    cell.TextLabel.Text = app.planetName[indexPath.Row];
    return cell;
  }
  public override void RowSelected (UITableView tableView, NSIndexPath indexPath)
  {
    var mainView =
      (MainViewController)app.Menu.MainViewController.ChildViewControllers[0];
    mainView.PlanetImage = indexPath.Row;
    app.Menu.Close(true);
  }
}
In the MainViewController, when the index representing the planet is set, the image will then be displayed to the user. This is shown in Listing 3.
Listing 3: MainViewController Contains the Image Displayed to the User
public partial class MainViewController : UIViewController
{
  UIImageView uiiv;
  int? _i;
  AppDelegate app;
  public int PlanetImage{
    get{ return _i.Value; }
    set{
      _i = value;
      var planetImg = app.planetImg[_i.Value];
      uiiv.Image = UIImage.FromBundle(planetImg);
    }
  }

  public MainViewController () : base ("MainViewController", null)
  {
    app = (AppDelegate)UIApplication.SharedApplication.Delegate;
  }

  public override void DidReceiveMemoryWarning ()
  {
    // Release the view if it doesn't have a superview.
    base.DidReceiveMemoryWarning ();

    // Release any cached data, images, etc. that aren't in use.
  }

  public override void ViewDidLoad ()
  {
    base.ViewDidLoad ();
    View.BackgroundColor = UIColor.White;
    uiiv = new UIImageView();
    uiiv.Frame = new RectangleF(50, 100, 220, 220);
    View.Add(uiiv);
  }
}
Platform-Specific Libraries
You'll find libraries and components in The Xamarin Component Store, NuGet, GitHub and other places online, but these are just a subset of all of the libraries available for iOS and Android. And while iOS and Android have a large number of components for their respective platforms, those libraries are written in Objective-C, Swift, Java or another language. On the surface these libraries can't easily be added to a Xamarin project. But Xamarin has a solution that involves creating bindings for each platform. With a little bit more work than I can explain here this time, these bindings will allow an application's logic to call into an Objective-C or Java library as necessary.
The Xamarin platform has definitely grown since the iOS product first shipped in 2009. It has definitely gained a large following with regarding third party library and component support. The ecosystem can only get richer.
About the Author
Wallace (Wally) B. McClure has authored books on iPhone programming with Mono/Monotouch, Android programming with Mono for Android, application architecture, ADO.NET, SQL Server and AJAX. He's a Microsoft MVP, an ASPInsider and a partner at Scalable Development Inc. He maintains a blog, and can be followed on Twitter.