Cross Platform C#
I Get XAML, You Get XAML, Everyone Gets XAML with Xamarin.Forms
Xamarin.Forms gives you the gift of XAML if you're looking to take the short route to building mobile interfaces.
Many of you in the Microsoft .NET Framework world are familiar with XAML. XAML is an XM-based language for working with objects. It has been used extensively in developing UIs in Silverlight, Windows Presentation Foundation and is used in the Windows Runtime. Unfortunately, XAML support isn't a feature that's built into iOS or Android. With the release of the Xamarin cross-platform toolkit, Xamarin.Forms, XAML can now be used with those platforms, as well as Windows Phone.
Creating a Xamarin XAML Page
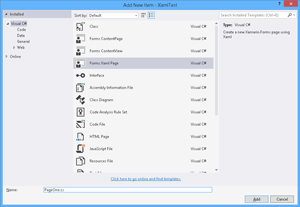
To get started, create a Xamarin.Forms Portable project. Within the Portable project of the solution, add a new Forms.Xaml Page in the project. In the example shown in Figure 1, I used the name PageOne.cs for the file name.
 [Click on image for larger view.]
Figure 1. Adding a Forms.Xaml Page to a New Xamarin.Forms Portable Project
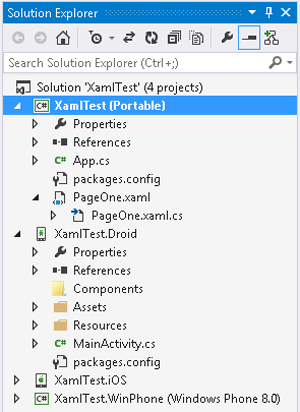
The result of this is to add a XAML file and code page, as shown in Figure 2.
 [Click on image for larger view.]
Figure 2. Adding a XAML File and Code Page
Now the project has XAML, and from this point, the Xamarin.Forms project has XAML. The XAML will be used across all of the projects. In this case, I have three projects for each platform: iOS, Android and Windows Phone. If the Xamarin.Forms project had been created on a Mac, there would only be two projects (iOS and Android).
Adding XAML
Now that the XAML page has been set up, the layout should be added to the app. To do this, add code to the .xaml file. For this example, the code in Listing 1 is added.
Listing 1: Add XamlTest.PageOne to Your .xaml File
<?xml version="1.0" encoding="utf-8" ?>
<ContentPage xmlns="http://xamarin.com/schemas/2014/forms"
  xmlns:x="http://schemas.microsoft.com/winfx/2009/xaml"
  x:Class="XamlTest.PageOne">
  <StackLayout>
    <Entry x:Name="FirstName"
      Placeholder="First Name"
      HorizontalOptions="FillAndExpand"
      VerticalOptions="End" />
    <Entry x:Name="LastName"
      Placeholder="Last Name"
      HorizontalOptions="FillAndExpand"
      VerticalOptions="End" />
    <Entry x:Name="PhoneNumber"
      Placeholder="Phone Number"
      Keyboard="Telephone"
      HorizontalOptions="FillAndExpand"
      VerticalOptions="End" />
      <Slider VerticalOptions="End"
        ValueChanged="OnSliderValueChanged" />
   <Label x:Name="valueLabel" Text="Slider Value Displayed"
     Font="Large"
     HorizontalOptions="Center"
     VerticalOptions="End" />
     <Button Text="Click Me!"
       HorizontalOptions="Center"
       VerticalOptions="End"
       Clicked="OnButtonClicked" />
  </StackLayout>
</ContentPage>

using System;
using System.Collections.Generic;
using System.Linq;
using System.Text;
using System.Threading.Tasks;
using Xamarin.Forms;
namespace XamlTest
{
  public partial class PageOne : ContentPage
  {
    public PageOne()
    {
      InitializeComponent();
    }
    public void OnSliderValueChanged(Object sender, ValueChangedEventArgs e)
    {
      valueLabel.Text = e.NewValue.ToString("F3");
    }
    async void OnButtonClicked(object sender, EventArgs args)
    {
      Button button = (Button)sender;
      await DisplayAlert("Clicked!",
        "The button labeled '" + button.Text + "' has been clicked",
        "OK");
    }
  }
}
Listing 1 displays several input fields:
- Two fields for the name: One is for the first name, and one is for the last name. The default keyboard is selected when the user chooses one of these fields. Notice that the placeholder property has been set to instruct the user what to input in this field.
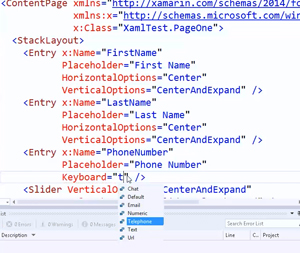
- One field to input the phone number: When the user selects this field, a keyboard optimized for telephone input is displayed. This is set via the Keyboard property.
- A slider control: As the user moves the slider control, an event is called to update the next UI element.
- A user label: Notice the label is centered left to right on the screen.
- A button: When the user clicks on the button, an alert style element is displayed.
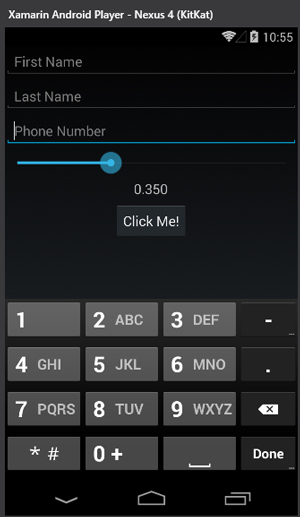
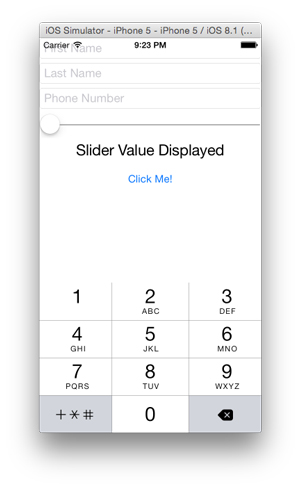
Figure 3 shows the output of XAML code; Figure 4 shows the same output in the iOS simulator on the Mac.
 [Click on image for larger view.]
Figure 3. XAML Output in the Xamarin Android Player
 [Click on image for larger view.]
Figure 4. Same XAML Output, but In iOS Simulator on Mac
Xamarin.Forms XAML
If you've been doing XAML-based development, you're familiar with the XAML language as defined in several iterations of products from Microsoft, iOS and Android (and, by extension, Xamarin.) have a different set of UI controls with a different set of properties. These controls, properties and events are different from what Microsoft defined in the original implementation. The result is that the Xamarin implementation of XAML differs from Microsoft's, and creates confusion with developers.
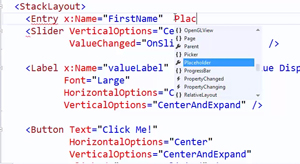
Note, too, that at the time I wrote this article, there was no Xamarin.Forms design surface support. What's a developer to do? Thankfully, the community has stepped up with an early implementation of IntelliSense for Visual Studio that comes as an extension, as shown in Figure 5 and Figure 6.
 [Click on image for larger view.]
Figure 5. IntelliSense Support in Visual Studio
 [Click on image for larger view.]
Figure 6. More IntelliSense Support Examples
Styling
With HTML, UI controls can be styled with CSS, which allows the look of UI controls to be managed in one place. For example, by making one change to a single CSS file, all of the text fields -- or the text fields with certain properties -- can be updated. One of the features in Xamarin.Forms 1.3 and newer is styling support. There are two types of styles possible with Xamarin.Forms, the built-in ones and ones that can be customized. These are the built-in styles included with Xamarin.Forms:
- BodyStyle
- CaptionStyle
- ListItemDetailTextStyle
- ListItemTextStyle
- SubtitleStyle
- TitleStyle
These styles can be set with the Style property in the XAML.
How to Build Your UI
A question I always get is, "How should I build a Xamarin.Forms UI?" The answer, like many things, is: "It depends." The two options are to build the application's UI programmatically or to use XAML as I've shown here. You have to weigh your choices every day.
When Xamarin.Forms first shipped, my recommendation was to create the UI programmatically. The problem was that this approach provided the user with design time feedback of user interface problems. XAML in Xamarin.Forms at the time did not have any type of design surface. There was no IntelliSense, and even now there's no designer support. For me, the XAML IntelliSense support is a great feature. In the future, a designer will allow a developer to continue with XAML support. What's a developer to do? We have to live in the here and now. My recommendation today, and it can change at any moment, is to start with the XAML intellisense support today and move to a designer when it becomes available in the future.
Other UI Controls
The Xamarin.Forms UI is loaded with features, and in this article I've only looked at the basic ones. There are a number of controls, or Views, in the Xamarin.Forms terminology, which include:
- Button: A button view is a UI control that allows a user to interact via touch events.
- DatePicker: A DatePicker allows a user to select a date visually.
- Editor: An editor view allows a user to edit multiple lines of text; this is related to an entry view.
- Entry: An entry view allows a user to edit a single line of text.
- Image: An image view displays an image to a user.
- Label: A label view displays a read-only set of textual data to a user. A label may be one or multiple lines of text.
- ListView: A ListView displays a set of data in a vertical list. For those developers coming from the Web, this is analogous to a table with a set of data-bound content.
- Picker: A picker view allows a user to choose from a predefined set of items. From the Windows world, this is analogous to a dropdown list box.
- ProgressBar: A ProgressBar is a view that indicates the progress in completing some predefined task.
- SearchBar: A SearchBar is a view that provides a search box.
- Slider: A slider is a view that allows a user to input a value based on sliding a selection point between two defined values.
- Stepper: A stepper is a view that enters a discrete value based on adding or subtracting values constrained to maximum and minimum values.
- Switch: A switch view allows a user to toggle between two values.
- TableView: A TableView holds a set of cells.
- TimePicker: A TimePicker view allows a user to select a time from a visual representation.
- WebView: A WebView displays HTML content.
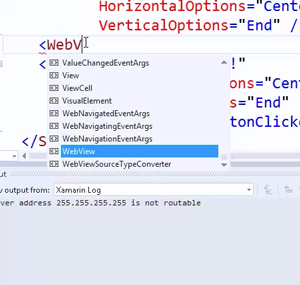
The IntelliSense provided via the Visual Studio extension supports these views and is shown in Figure 7.
 [Click on image for larger view.]
Figure 7. IntelliSense in XAML Supporting Various Other Controls in an IntelliSense-Based Autocomplete in Visual Studio
Note: Remember to keep your Xamarin.Forms apps up-to-date with the latest version of Xamarin.Forms, as well as Xamarin.iOS and Xamarin.Android. There is also an open source project with additional controls and components called Xamarin.Forms Labs that may be of interest to developers.
Look at That (Inter)Face
Building a UI is the single most important part of building an application. For .NET developers, XAML is an important technology. And with Xamarin.Forms, that means XAML available in iOS and Android. The iOS gets XAML, Android gets XAML and, most important, everyone gets XAML!
About the Author
Wallace (Wally) B. McClure has authored books on iPhone programming with Mono/Monotouch, Android programming with Mono for Android, application architecture, ADO.NET, SQL Server and AJAX. He's a Microsoft MVP, an ASPInsider and a partner at Scalable Development Inc. He maintains a blog, and can be followed on Twitter.