In-Depth
Take Unit Testing to the Next Level
How to associate unit tests with requirements in Visual Studio 2010.
- By Jeff Levinson
- 03/01/2011
Many teams today use Agile techniques such as Test-Driven Development (TDD), eXtreme Programming or just a heavy use of unit testing to verify functionality. One of the gaps in unit testing is the ability to map unit tests to requirements to get an overall view of the requirements coverage (as opposed to code coverage) that the unit tests provide.
Consider the following situation: Your application has 10 requirements that need to be built. There are 100 unit tests that cover all of the methods in your application, giving you 100 percent coverage of your code. But in terms of providing information on the requirements coverage, who knows? Maybe you've covered nine of the requirements many times over, but one requirement only has one test that relates to it.
Why does this matter? Unit tests are traditionally used to verify methods without regard for the functionality the methods are part of. However, as unit tests are relied on more heavily, it's helpful to be able to show how many unit tests were written and executed against each requirement. The problem with doing this is that unit tests are code: They don't actually map to a requirement and in fact are completely independent of any given requirement. So, what can you do?
Team Foundation Server (TFS) provides the first (that I know of) capability of associating any automated test -- not just unit tests, but load tests and generic tests -- with a requirement. This gives you a complete understanding of how many functional tests versus unit tests were created and executed for any given requirement. This article will show you how to do this.
As an added benefit of using this technique, functional testers can actually execute the unit tests created by developers as part of automated test runs and modify the data used by the unit tests as needed -- without having to ask the developers to make changes. These tests can also be added to test plans and reported on like any other functional tests.
For the purposes of this how-to article, I'll be using a simple calculator application that does basic addition, subtraction, multiplication and division. The class that I'll be unit testing is the CalcMath class and in particular the PerformOp method. Note that there are some bugs in this class, but this article doesn't address finding those.
Creating Basic Unit Tests
At this point there are no unit tests associated with the solution, so let's add a few here. There are several ways to add unit tests in Visual Studio, so we'll create them directly from the method we want to test.
Open the CalcMath class, right-click within the PerformOp method and select Create Unit Tests. This will display the Create Unit Tests dialog, as shown in Figure 1.
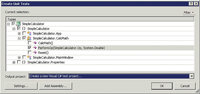
[Click on image for larger view.] |
| Figure 1. The Create Unit Tests dialog. |
Click OK. Call the new test project "SimpleCalcTests" and click Create. This will create a new project that's automatically added to the solution and a test method that calls the PerformOp method shown in Listing 1 (note that a DeploymentItem attribute may also be generated, but for the current purposes this can be deleted).
Now modify the method so it looks like this:
[TestMethod()]
public void PerformOpAddTest()
{
  CalcMath target = new CalcMath ();
  double expected = 12;
  double actual;
  target.PerformOp(Op.Add, 7);
  actual = target.PerformOp(Op.Equals, 5);
  Assert.AreEqual(expected, actual);
}
Unit tests should be short, simple, to the point and easy to read -- because you might have to debug why your test failed, and the failure might be in the test itself. As you can see, this method adds seven and five together and the expected result is 12.
Now add three additional unit tests for subtraction, multiplication and division. The result is shown in Listing 2.
You can view the Test List Editor by double-clicking the SimpleCalc.vsmdi file in the Solution Folder or select Test | Windows | Test List Editor. Figure 2 shows the Test List Editor window.
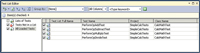
[Click on image for larger view.] |
| Figure 2. The Test List Editor. |
At this point, feel free to execute the unit tests to verify that they work. Check the All Loaded Tests checkbox shown in the left panel of Figure 2, and click the run button located on the toolbar at the top. Finally, check the entire solution into TFS.
At this point you have four unit tests, which you'd like to be associated with each of the four requirements in your project.
Associating Unit Tests with Requirements
The next step is to associate these unit tests with the requirements. This is a two-part process that involves first generating the test cases and linking them with the unit tests, and then linking the test cases to the requirements. This will give you full traceability from unit tests to requirements and vice versa.
There are two ways to accomplish the first step -- either through the TCM command-line tool or through the Test List Editor. Both ways are described here, but you only need to walk through one of these ways to do it.
Let's start with associating unit tests with test cases via the Test List Editor. It's a simple two-step process, but you must do this for each test one at a time, versus using the TCM command-line tool, which lets you associate multiple unit tests with test cases:
1. Right-click the PerformOpAddTest 2. Select Create Test Case from Test that will create the Test Case work item
Repeat these steps for each of the other unit tests.
Now, let's perform the same operation, but using the TCM command-line tool. Do the following:
- Open the Visual Studio Command Prompt by clicking Start | All Programs | Microsoft Visual Studio 2010 | Visual Studio Tools | Visual Studio Command Prompt (2010)
- Navigate to the debug folder, which contains the compiled test case assembly (SimpleCalcTests.dll)
- Enter the following command:
tcm testcase /import /collection:http://<server>:8080/tfs/<collection>
/teamproject:UnitTestDemo /storage:SimpleCalcTests.dll
Here, <server> points to your server and <collection> points to your specific collection. This results in the output shown in Figure 3.
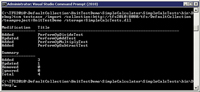
[Click on image for larger view.] |
| Figure 3. The tcm testcase /import command results. |
Note that I ran this after generating a test case through the Test List Editor, which is why the results shown in Figure 3 may look a little different than what your results look like.
So, what happened here? The tcm testcase command not only creates test cases for unit tests automatically, but it will also update any changes in storage location or remove the automation for test cases when the unit tests no longer exist. Additional details for this command can be found in the MSDN library.
After running the tcm testcase /import command, switch back to Visual Studio and run the My Test Cases work item query. Four test cases should be returned: one for each of the unit tests.
Associate Test Cases with Requirements
While the unit tests are associated with the test cases, they're still not associated with the requirements (user stories in the Agile template). To link the test cases with the stories, do the following:
- Run the Product Backlog query to view the User Stories in the project. Note the ID number of the "Build addition functionality for the calculator" user story.
- Select the Tested User Stories tab and click Link To. This will display the Add Link dialog.
- Enter the ID number noted in Step 1 in the Work item IDs field and click OK.
- Click Save Work Item on the Test Case.
Repeat these steps for each test case.
At this point, automated test results that are generated through Microsoft Test Manager or command-line test runs (with the publish option set) will associate the test results with a particular requirement. Microsoft Test Manager must be used at some point to set up a test suite. Now, I'll show you the entire process.
Create an Automated Build
In order to make this work, you must first create an automated build. If you're not using automated builds, now is a good time to start. A good use of unit tests is executing them every time the build runs, such as when using Continuous Integration, which is a best practice to help ensure high quality.
These next steps assume that you've left the solution open in Visual Studio.
- Right-click the Builds node and select New Build Definition.
- Select the Workspace tab and click Reset to Default Workspace.
- Select the Build Defaults tab and enter the output location for the build.
- Click the Save disk icon (on the toolbar) or select File | Save All.
- Right-click the newly created build definition (by default this should be named "SimpleCalculator") from the Builds node in Team Explorer and select Queue New Build.
At this point the build should execute and complete with all four unit tests running successfully.
Unit Testing with Microsoft Test Manager
The next step is to allow the testers to be able to execute the unit tests as part of their testing process. The reason this is critical is because testing done by the developers is done at the method level. By using Microsoft Test Manager, the testers are effectively executing the tests against the requirements and thereby associating the test results with the requirements that they're testing.
A quick note before I proceed. This operation assumes that you have a configured Test Controller, which is registered with your collection. It also assumes that you have a configured Test Agent, which is registered with the Test Controller. If this is not the case, refer to the "Installing and Configuring Visual Studio Agents and Test and Build Controllers" MSDN library article for instructions on how to install and configure the Controller and Agent.
- Open Microsoft Test Manager (Start | All Programs | Microsoft Visual Studio 2010 | Microsoft Test Manager).
- Enter the server name (this is the full URL of the server, such as http://<server>:8080/tfs).
- Expand the collection name, select the UnitTestDemo project and click Connect Now.
- Click Add to create a new Test Plan and call it "Demo Plan."
- Next, click Select Plan to open the plan. You should now be looking at the Testing Center, Plan tab, Contents page.
- Click the Add Requirements button.
- Click the Run button from the middle of the screen to return all of the requirements associated with the UnitTestDemo project (this should return four requirements).
- Select all of the requirements and then click Add requirements to plan in the lower-right of the screen. This returns you to the Contents page.
- Switch to the Properties page.
- In the Builds section, select Modify and then select the build that just completed in the previous set of steps.
- Click the X in the upper-right corner to return to the Properties page.
- Configure the Automated Test Settings to use an automated test environment.
- Switch to the Test tab, Run Tests page.
- Select any suite and then a test and click Run.
When you're done configuring the Properties page, it should look like the one shown in Figure 4.
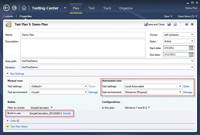
[Click on image for larger view.] |
| Figure 4. The Plan tab and Properties page after configuration. |
During the test run you'll see the test run details page. Note that you can actually queue a number of runs. You don't have to wait for one run to be completed before the next run starts. Wait for two hours (at most) and run the Stories Overview report, and you'll see the results of your test cases against the requirement in Figure 5.
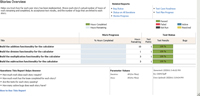
[Click on image for larger view.] |
| Figure 5. The Stories Overview report. |
Test Cases as the Data Source for Data-Driven Unit Tests
Using TFS, you can take testing against requirements one step further: you can data-drive the unit tests using the Test Case as the data source. This approach eliminates the need to have a separate, version-controlled Excel file, text file or other artifact and allows you to store the test data for a particular test with that test case.
- In Microsoft Test Manager, open the PerformOpAddTest test case in order to edit it.
- In the Test Steps section, in the first row in the Action column, enter the following text and then press enter: @first, @second, @expected.
- This causes the parameters section of the test steps to be enabled with three columns: "first," "second" and "expected." Fill in these values as shown in Table 1.
- Next, edit the PerformOpAddTest method so that it looks like that shown in Figure 4. First add the DataSource attribute -- and be sure to set the URL for your TFS instance and project, and set the Test Case ID (878 in Listing 2) to be that of the Test Case in your system.
- Next, update the expected value with a call to the data source.
- Finally, update the two calls to the PerfomOp method with a call to the data source.
| First |
Second |
Expected |
| 5 |
7 |
12 |
| 0 |
9 |
9 |
| 500 |
30 |
530 |
Table 1 Parameter Values |
Please note that the figures in Table 1 are demo values. In actual testing you'd use a spread of values, including boundary values or other values that are likely to cause a bug, as shown in Listing 3.
When you re-execute the unit test either from Visual Studio or through Microsoft Test Manager, the unit test will now pull its data from the test case work item. This is a handy way to maintain the data used by the test case and allows testers to easily update the data being used by the unit test. It also allows for testers to perform even more comprehensive regression testing and have those test results linked to the actual requirements.
In this article I've shown you some simple techniques to associate unit tests with test cases and, by extension, requirements. In doing so, end users get a comprehensive view of how well their application is being tested -- even to the unit-test level, which is a view most end users never see. In addition, when developers use this simple technique, testers can execute unit tests without ever opening a Visual Studio solution. They can also update the data used by the test case if the situation warrants it -- and do all this without going back to the developers. Using these techniques and tools, you should be able to improve the quality and maintainability of your applications.