In-Depth
Microsoft How-To: Scrum for Everyone
Working with the Microsoft Visual Studio Scrum 1.0 process template.
Microsoft Visual Studio Scrum 1.0 is a new Team Foundation Server (TFS) process template for teams practicing Scrum. Scrum has become a dominant methodology in the software industry in recent years, and teams are in search of tooling to help support their processes and practices. In this article, we'll take a brief look at what it looks like to run a Scrum project using the Microsoft Visual Studio Scrum 1.0 process template on TFS 2010.
Getting Started
As your team gets started, the first thing to do is make a decision about the length of your Sprints. Sprints are time-boxed iterations of work in which your team produces a potentially shippable increment of the product being developed. Your team can decide the appropriate length for you, but most teams choose a length of time between a week and 30 days. The actual length is less important (every team has to find the sprint cadence that works for them), but what is important is that items pulled from the Product Backlog can be delivered within the sprint boundaries.
Once your iteration length has been chosen, you can enter the dates into the Sprint work items in your project. After creating a new project with the Microsoft Visual Studio Scrum 1.0 template, your project is pre-populated with 24 sprints (six sprints across four releases). This can easily be modified -- you may have 10 sprints in your first release, for instance -- but for the purposes of this article we'll use the default sprints as our example.
In Visual Studio, open up Team Explorer and navigate to the All Sprints query. Each Sprint work item returned in this query is mapped directly to an iteration value in TFS. Open the first few sprint work items and enter the dates for your first few sprints. It's not important to enter all the sprint dates at this time, but it's good to add what you know so that your team and Product Owner can begin to get a feel for the product schedule.
Building Your Product Backlog
You likely already have a list of requirements for your project. The next step is to turn these into a list of Product Backlog Item (PBI) work items in your Product Backlog. The Product Backlog is a prioritized list of requirements for your project. Each item on the Product Backlog is represented as a work item called a PBI.
To create a new PBI, click the New Work Item drop-down list from the toolbar and select Product Backlog Item. Your Product Owner will fill out the work item form in detail, including the Title, Backlog Priority, Description and Business Value. These fields are the core of the work item as they describe the item, its relative priority compared to other work on the backlog, and a value that represents the amount of business value it will provide once implemented. After saving the new work item, it will be displayed in the results of the Product Backlog query. The Product Backlog query is defined as all PBIs and Bugs assigned to the root iteration path of your project that haven't been completed.
Each PBI moves through a series of state transitions that track the lifecycle of requirement: New, Approved, Committed and Done.
New: This state is the starting point for all items on the Product Backlog. As new PBIs are entered by your Product Owner they start in the New state and are assigned a default Backlog Priority of 1,000. This is done to ensure that new PBIs are pushed to the bottom of your Product Backlog.
Approved: Your Product Owner moves a PBI to the Approved state when the PBI has been sufficiently detailed and is ready to be brought to the team to be estimated. Most of the time, items near the top of the Product Backlog are in the Approved state, while items toward the middle and bottom are in the New state.
Committed: When the team commits to implementing a PBI during the Sprint Planning Meeting, the state of the PBI is changed to Committed. This state transition indicates that the team will complete the PBI in a sprint.
Done: Finally, a PBI is moved to the Done state when the team has completed all the Tasks associated and the Product Owner has agreed that the PBI has been implemented according to the Acceptance Criteria.
When your Product Owner adds new items to the Product Backlog, it's critical that each item be prioritized appropriately. As the team begins to tackle work sprint by sprint, they work through the items on the Product Backlog in priority order. So, what determines the priority of an item on the backlog? The answer to that question is unique to each situation, but some general rules and guidelines can help a Product Owner make good decisions about priority.
The goal for each sprint is to deliver value to the customer. This goal is grounded in the notion that delivering value early and often will help drive better decision making later in the project cycle. With that in mind, it's important for the Product Owner to consider which items on the Product Backlog will deliver the most value to the customer as compared to the amount of effort required to complete the items. Both the PBI and Bug work item forms have a Business Value field to track this value. Your Product Owner should use this value and the effort field to make good decisions about the relative priority of the work on the Product Backlog.
Acceptance Criteria
As a Product Owner, one of the most important things you can do with each of your PBIs is to detail the Acceptance Criteria for each item. What is Acceptance Criteria? Put simply, it's the criteria that defines what "Done" means for each PBI. Acceptance Criteria is critical to the success of a Scrum team, as it becomes the handshake between the Product Owner and the team -- it helps define what the team is committing to.
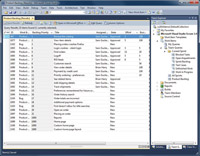
[Click on image for larger view.] |
| Figure 1. A look at the Product Backlog query. |
Some of the best interactions on the team happen as the Product Owner and the team review the Acceptance Criteria for each item on the backlog. What emerges is a shared understanding of what "Done" means for each item. "Done" in the Agile world means that something is ready to be shipped to customers. There's no outstanding work, including testing, documentation, setup and so on. Remember that the goal with every sprint is to produce a "potentially shippable increment of work." In order for something to be shippable, all the work needs to be "Done." There are many good formats for writing Acceptance Criteria, but in the end, each criteria should be simple to read and understandable by everyone involved.
Planning Your First Sprint
After your Product Owner has created and prioritized the Product Backlog, your team is ready to get started on its first sprint. The team gathers for the Sprint Planning Meeting, where the team agrees on a goal for the sprint. The goal for the sprint is captured in the Goal field on the sprint work item. The Product Owner then begins to describe the highest-priority PBIs and Bugs on the Product Backlog by reading to the team each item along with its associated Acceptance Criteria. During this part of the meeting, the team is learning about each item on the backlog and gaining an understanding of what it's being asked to build.
After the team has had adequate discussion about the items being considered, it's time to estimate each item. A common practice for Agile teams today is to use an estimation technique like Planning Poker. During Planning Poker each team member has a deck of cards with values representing the amount of effort needed to complete a backlog item. Most Planning Poker cards use the Fibonacci sequence (1, 2, 3, 5, 8, 13 and so on), as it reflects that the team doesn't expect perfect estimates. For example, what's the difference between an estimate of 11 versus 12 when discussing something on the backlog? In truth, there isn't much difference, because estimating at that level of detail is inherently flawed. However, it's easier to compare the differences between an estimate of 8 versus 13, or even 5 versus 13.
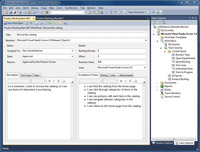
[Click on image for larger view.] |
| Figure 2. Well-defined Acceptance Criteria is vital to a successful process. |
By limiting the available choices, the team can have more productive discussions about the work involved. After each member of the team reveals their estimate -- simultaneously -- the team members that have high or low estimates are given a chance to explain why they chose their values. Again, the goal of the exercise is not to arrive at a precise estimate; rather, it's to spark conversations that lead to a shared understanding of what "Done" means for each item being discussed. The team can vote again after discussion and will eventually arrive at a consensus estimate. That value is entered into the Effort field of the PBI or Bug work item being estimated.
This process repeats for each of the items presented by the Product Owner until the team believes they have enough work to achieve the sprint goal. The next step is for the team to break down each item into Task work items. Tasks represent the actual work that the team will perform and should encompass all the work involved including testing, documentation, interface design and so on.
Remember, an item isn't "Done" until every-thing is done. For this reason it's important that the team collaborate through this part of the meeting to record all the necessary work. Each task work item is then estimated by the team. As the team details the tasks for each item, it may find that an item is bigger than originally thought. In this case, the team negotiates with the Product Owner to move the item back to the Product Backlog.
To add a Task to a PBI or Bug, switch to the Tasks tab on the work item itself and click the New Linked Work Item icon. Tasks are added as children of their parent PBI or Bug and begin in the To Do state. They can be tracked on the Tasks tab of both PBIs and Bugs.
After all the Tasks have been created, the final step is for the team to make a commitment to the work. This is done by setting each PBI or Bug work item to the Committed state, indicating that the team is committing to complete the item during the upcoming sprint.
The result of the Sprint Planning Meeting is:
- An agreement between the Product Owner and the team on what items from the Product Backlog are to be accomplished during the sprint.
- A list of all the Tasks necessary to complete the items selected by the Product Owner and the team.
The ultimate success of the sprint will be determined at the end of the sprint during the Sprint Review Meeting.
Tracking Your First Sprint
Now that the sprint is planned, the team is ready to get started on the work. It's important that the team doesn't start work on too many backlog items at once. Ideally, the team works together on a backlog item until all the Tasks are completed before moving on to the next item. This helps minimize the risk of reaching the end of the sprint with everything 90 percent completed but nothing actually being "Done."
Members of the team begin by selecting the Tasks that they'll work on first. This is accomplished by changing the Assigned To field on a Task work item and setting the State field to In Progress. Team members record daily the number of remaining hours left for each Task they're working on by updating the Remaining Work field. Ideally, each team member only has one In Progress task at a time, so as to minimize the risk of work being left unfinished or partially completed. As team members complete Tasks, the state of each Task is changed from In Progress to Done, and progress is reported at the daily standup.
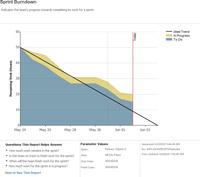
[Click on image for larger view.] |
| Figure 3. The Burndown chart offers a glance at sprint progress. |
During the sprint, the team tracks progress toward completing all the work using the Sprint Burndown chart. The chart clearly indicates the team's progress toward burning down the hours committed to the sprint, as well as tracking the amount of work the team has In Progress. In the example provided in Figure 3, you can see the team has 20 hours of work to complete before the last day of this sprint. The Sprint Burndown can be displayed during the daily standup so that each team member understands how the team is progressing toward meeting its commitment.
Additionally, the team can use the Unfinished Work query to track all the remaining work in the sprint. The results from this query exclude completed work, making it a powerful tool to track and monitor remaining work.
Sprint Review and Retrospective
At the end of the sprint, the team holds a Sprint Review meeting to show what they accomplished during the sprint. A demo is held and stakeholders beyond the Product Owner are invited to participate.
Sprint Review meetings should be informal and should feel like a natural end to the sprint.
The final step is for the team to hold a Sprint Retrospective, where they meet to discuss what worked during the sprint and what they want to improve in the next sprint. The retrospective is an opportunity for the team to improve, to take a hard look at places they might have stumbled, and to have an honest conversation about what they can do differently to improve in the next sprint.
Remember that one of the four value statements from the Agile Manifesto is "Responding to change over following a plan." The team made a plan for the sprint when they started, but it's important to look back at that plan and understand how to improve going forward. The plan at this point is irrelevant. What's important is how the team responds and improves going forward. The data from the retrospective is recorded on the Retrospective tab of the sprint work item.
Using Velocity
After the team has completed its first few sprints, it will start to better understand its velocity. What is velocity? Quite simply, it's the amount of effort the team completed in the last sprint. This is often referred to as yesterday's weather and can be used when planning for future sprints. If the team completed 15 units of effort in the last sprint, it's natural for the team to commit to a similar amount of effort in the next sprint. Obviously this is not an exact science, but it's a useful metric when the team is planning a sprint or trying to understand when it will be ready to release the product.
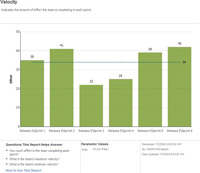
[Click on image for larger view.] |
| Figure 4. The Velocity report shows the amount of effort completed in each sprint. |
Microsoft Visual Studio Scrum 1.0 doesn't prescribe a unit of effort on PBI and Bug work items (story points, ideal days, days and so on). The reason is that the unit itself is irrelevant. What is important is how the actual number is used during planning. Whether your team decides on story points, ideal days or some other metric, be sure that you stay consistent and learn to use velocity to help the team plan both sprints and releases.
The Microsoft Visual Studio Scrum 1.0 process template includes a velocity report that shows the amount of effort the team has completed in each sprint. The parameters on the report allow you to choose which sprints to include as well as filters on area path, which are helpful when looking at the velocity of different teams.
There's obviously more that goes into running a Scrum project, but hopefully this article has provided you with some insight into how the Microsoft Visual Studio Scrum 1.0 process template and TFS 2010 support the Scrum process. For more information on the Microsoft Visual Studio Scrum 1.0 template, see the process guidance on MSDN.